Hamilton Beach 40715 Support Question
Hamilton Beach 40715 Support Question
Find answers below for this question about Hamilton Beach 40715.Need a Hamilton Beach 40715 manual? We have 1 online manual for this item!
Question posted by LordGorloc on September 2nd, 2015
Brew Head Flow Reduction.
I would like to know the correct procedure for removing the brew head for a thorough cleaning, as well as how many parts are involved and the correct replacement of said parts. An exploded diagram of the brew head assembly would be quite wonderful as well if possible. The reason I ask is that I am having a greatly reduced flow through the brew head, basically a slight drip (With the brew head fully exposed, no cup attached) and it is not enough to brew my espresso (Unless I want to wait for several hours). The pump is working fine and I have no issues with steam production.Thank you.
Current Answers
Answer #1: Posted by TechSupport101 on September 2nd, 2015 11:07 PM
TechSupport101

Member since:
May 24th, 2013 Points: 12,171,325

Member since:
May 24th, 2013 Points: 12,171,325
I would suggest you see the 'Use & Care Guide' here https://www.helpowl.com/manuals/Hamilton%20Beach/40715/104523
Related Hamilton Beach 40715 Manual Pages
Use & Care - Page 2
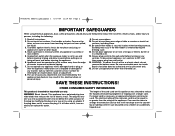
...parts or from the edge of fire or electric shock, do not place cord, plug, or appliance in place when brewing espresso. Do not use only.
To disconnect appliance, turn controls to prevent accidental tipping. 7. WARNING: To reduce the risk of counter to OFF and then remove plug from outlet when the espresso maker...and before cleaning the appliance...have an electrician replace the outlet....
Use & Care - Page 3
....qxd:Layout 1 6/17/09 11:34 AM Page 3
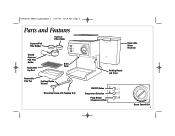
Parts and Features
Espresso/Pod Filter Holder
Espresso Filter Holder
Ground Espresso/ Pod Filter Holder
Removable Cup Rest
Brew Head
Removable Drip Tray
Frothing Nozzle Wrench
Measuring Scoop with Tamping Tool
Removable Water Reservoir
Frothing Nozzle and Cover
ON/OFF Button
Temperature Selection Pump Button (dispenses coffee)
Steam Control Dial
3
Use & Care - Page 4
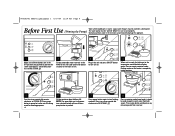
...dial is turned fully clockwise to NO STEAM .
2
Fill the removable water reservoir to the MAX fill line with cold water and replace securely on .
4
When unit is pushed.
7
Press pump ...frothing wand for cleaning purposes. 4
6
Fill the container about halfway full. Place an empty container under brew head-it should be "primed" before first use to turn off ; No parts may be washed...
Use & Care - Page 5
... parts again with warm, soapy water and dry thoroughly. Shock Hazard. The light next to turn off . See Cleaning section... on page 11 for full instructions.
5 840181701 ENnv01.qxd:Layout 1 6/17/09 11:34 AM Page 5
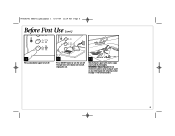
Before First Use (cont.)
9
Press pump button again to turn off.
10
Press ON/OFF button to the button will turn the unit off . WARNING! Do not immerse machine...
Use & Care - Page 6
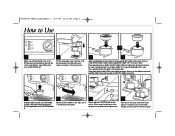
...Press grounds firmly into brew head with tamping tool. Place ground espresso holder into filter holder. If using single-serve pod, always use one cup, use the shallower espresso/ pod filter holder....
2
Fill the removable water reservoir with desired amount of cold water and replace securely on the back of unit.
3
4
Align raised dimple on the exterior of espresso/pod filter holder ...
Use & Care - Page 7
... filter holder is normal and a result of product operation.
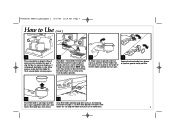
11
To empty espresso grounds and/or an espresso pod from brew head. Allow espresso to drip from filter holder for 15-20 seconds before removing cup(s).
10
Wait about 1 minute before removing filter holder from machine to allow grounds to drip intermittently from the filter holder, flip the...
Use & Care - Page 8
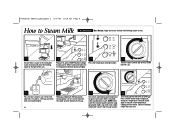
... there is steamed when cup becomes warm. Clean the frothing nozzle after each time steaming and to NO STEAM . Milk is water in the removable water reservoir and move the frothing nozzle to...Fill a metal or ceramic cup 1/3 full with water under nozzle and "steam" into the cup to clean.
8
Turn steam control dial to prevent clogging nozzle, hold a cup with cold milk. heating water...
Use & Care - Page 9
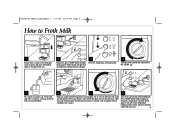
... about 1/4 to 1/2 inch between the nozzle and the bottom of the unit.
2
Plug unit in the removable water reservoir and move the frothing nozzle to the right of the cup. Press ON/OFF button (light will...
6
7
8
Hold cup underneath frothing nozzle, leaving about 3/4 turn off steam temperature. Clean the frothing
nozzle after each use.
9 Froth should be stiff and scoopable with cold milk.
Use & Care - Page 10
....com for delicious recipes, tips, and to taste. 840181701 ENnv01.qxd:Layout 1 6/17/09 11:34 AM Page 10
Recipes
Espresso
Brew one or two cups at a time following directions.
Cappuccino
Mix 1/3 espresso, 1/3 steamed milk, and 1/3 frothed milk. Top with ground nutmeg, ground cinnamon, powdered chocolate, or vanilla to register your product online...
Use & Care - Page 11
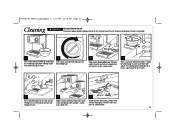
... ON/OFF button to NO STEAM .
3
Wipe nozzle. Every other use: Remove nozzle tip with wrench on tamping tool and wash in warm, soapy water.
4
Place a container under brew head-it should be hot. Unplug the unit. DO NOT wash any parts in any liquid.
1
Turn steam dial to STEAM and empty any remaining...
Use & Care - Page 12
...12 If the coffee is ground too fine, then the water will flow too fast through the coffee.
• Espresso pods make coffee. If the grind is too coarse, water will not flow through the coffee and result in a coffee grinder. If ...ground in a weaker flavor. It is too fine if it even easier to brew a great cup of espresso and cleanup is as easy as throwing out the used , store the unused ...
Use & Care - Page 13

... ground coffee in the section How to Use.
• Too much milk; PROBABLE CAUSE
• Is the water reservoir empty? • Is the water reservoir properly fitted into the espresso maker? • Clean the filter, filter holder, and brew head. 840181701 ENnv01.qxd:Layout 1 6/17/09 11:34 AM Page 13
Troubleshooting
POTENTIAL PROBLEM Espresso will not flow...
Use & Care - Page 14
...the original consumer purchaser or gift recipient. If the product or component is repair or replacement of this period, your appliance.
14 All liability is required to the extent prohibited...warranty claim, do not allow limitations on your exclusive remedy is no longer available, we will replace with a similar one (1) year from the date of express or implied warranty. This warranty is...
Similar Questions

Parts For 47214 Hamilton Beach Coffee Maker
I need a "Coffee Tank Screen" for a Hamilton Beach Coffee Maker Model Number 47214.
I need a "Coffee Tank Screen" for a Hamilton Beach Coffee Maker Model Number 47214.
(Posted by kenuebele 1 year ago)

How To Program The Coffee Maker To Start Brewing
how to program coffee maker to start brewing modell 48577
how to program coffee maker to start brewing modell 48577
(Posted by eulb990 6 years ago)


Do I Have To Remove The Small Plastic Piece On The Spring?
My brand new espresso machine is very slow. Its dripping and its taking froever for the cup to fill....
My brand new espresso machine is very slow. Its dripping and its taking froever for the cup to fill....
(Posted by rens78 10 years ago)
