Use & Care
Page 2
... the filter holder is removed during the brewing cycle. 12. Do not let cord hang over a longer cord. 840181701 ENnv01.qxd:Layout 1 6/17/09 11:34 AM Page 2 IMPORTANT SAFEGUARDS When using an adapter. Read all instructions. 2. Do not use and before putting on a flat surface away from spilled, hot liquid. 3. Repair should always be operated on or taking off parts...
... the filter holder is removed during the brewing cycle. 12. Do not let cord hang over a longer cord. 840181701 ENnv01.qxd:Layout 1 6/17/09 11:34 AM Page 2 IMPORTANT SAFEGUARDS When using an adapter. Read all instructions. 2. Do not use and before putting on a flat surface away from spilled, hot liquid. 3. Repair should always be operated on or taking off parts...
Use & Care
Page 3
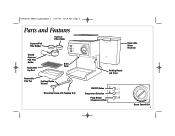
840181701 ENnv01.qxd:Layout 1 6/17/09 11:34 AM Page 3 Parts and Features Espresso/Pod Filter Holder Espresso Filter Holder Ground Espresso/ Pod Filter Holder Removable Cup Rest Brew Head Removable Drip Tray Frothing Nozzle Wrench Measuring Scoop with Tamping Tool Removable Water Reservoir Frothing Nozzle and Cover ON/OFF Button Temperature Selection Pump Button (dispenses coffee) Steam Control Dial 3
840181701 ENnv01.qxd:Layout 1 6/17/09 11:34 AM Page 3 Parts and Features Espresso/Pod Filter Holder Espresso Filter Holder Ground Espresso/ Pod Filter Holder Removable Cup Rest Brew Head Removable Drip Tray Frothing Nozzle Wrench Measuring Scoop with Tamping Tool Removable Water Reservoir Frothing Nozzle and Cover ON/OFF Button Temperature Selection Pump Button (dispenses coffee) Steam Control Dial 3
Use & Care
Page 4
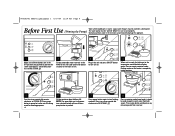
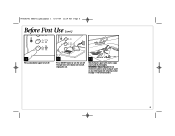
... Page 4 Before First Use Wash all three buttons are in the OFF position (not pushed in the unit and press ON/OFF button to turn frothing nozzle off; Operating without water in the reservoir can permanently damage the appliance. 1 Make sure all removable parts in a dishwasher. (Priming the Pump) The water pump must be wide enough to work properly. Press pump button to pump hot water out of unit. 3 Plug in ) and...
... Page 4 Before First Use Wash all three buttons are in the OFF position (not pushed in the unit and press ON/OFF button to turn frothing nozzle off; Operating without water in the reservoir can permanently damage the appliance. 1 Make sure all removable parts in a dishwasher. (Priming the Pump) The water pump must be wide enough to work properly. Press pump button to pump hot water out of unit. 3 Plug in ) and...
Use & Care
Page 5
The light next to turn off . Shock Hazard. Unplug the unit. 11 Wash all parts again with warm, soapy water and dry thoroughly. Do not immerse machine, cord, or plug in water or any other liquid. See Cleaning section on page 11 for full instructions. 5 WARNING! 840181701 ENnv01.qxd:Layout 1 6/17/09 11:34 AM Page 5 Before First Use (cont.) 9 Press pump button again to turn off. 10 Press ON/OFF button to the button will turn the unit off .
The light next to turn off . Shock Hazard. Unplug the unit. 11 Wash all parts again with warm, soapy water and dry thoroughly. Do not immerse machine, cord, or plug in water or any other liquid. See Cleaning section on page 11 for full instructions. 5 WARNING! 840181701 ENnv01.qxd:Layout 1 6/17/09 11:34 AM Page 5 Before First Use (cont.) 9 Press pump button again to turn off. 10 Press ON/OFF button to the button will turn the unit off .
Use & Care
Page 6
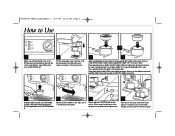
... filter holder to the right until it is turned fully clockwise to NO STEAM . 2 Fill the removable water reservoir with desired amount of cold water and replace securely on the back of unit. 3 4 Align raised dimple on the exterior of espresso/pod filter holder with cutout notch on . Rotate expresso/pod filter holder 180º to secure in base. Place pod into filter holder. If using single-serve pod, always use one or two cups under brew...
... filter holder to the right until it is turned fully clockwise to NO STEAM . 2 Fill the removable water reservoir with desired amount of cold water and replace securely on the back of unit. 3 4 Align raised dimple on the exterior of espresso/pod filter holder with cutout notch on . Rotate expresso/pod filter holder 180º to secure in base. Place pod into filter holder. If using single-serve pod, always use one or two cups under brew...
Use & Care
Page 7
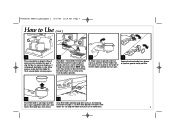
... product operation. 11 To empty espresso grounds and/or an espresso pod from brew head. press pump button again to malfunction. 7 This is cool. then remove. this can clog filter holder and cause unit to stop the flow. 840181701 ENnv01.qxd:Layout 1 6/17/09 11:34 AM Page 7 How to Use (cont.) 9 Press pump button to begin the flow of the filter holder and hold the lever open. 12 Keeping...
... product operation. 11 To empty espresso grounds and/or an espresso pod from brew head. press pump button again to malfunction. 7 This is cool. then remove. this can clog filter holder and cause unit to stop the flow. 840181701 ENnv01.qxd:Layout 1 6/17/09 11:34 AM Page 7 How to Use (cont.) 9 Press pump button to begin the flow of the filter holder and hold the lever open. 12 Keeping...
Use & Care
Page 8
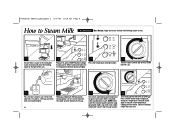
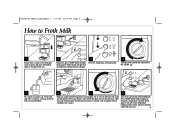
... of the unit. 2 3 Plug unit in the removable water reservoir and move the frothing nozzle to prevent clogging nozzle, hold a cup with cold milk. When heated, the light next to open steam valve. Press ON/OFF button (light will glow. 4 Turn the steam control dial to NO STEAM position . 5 Fill a metal or ceramic cup 1/3 full with water under nozzle and "steam" into the cup to clean. 8 Turn steam control...
... of the unit. 2 3 Plug unit in the removable water reservoir and move the frothing nozzle to prevent clogging nozzle, hold a cup with cold milk. When heated, the light next to open steam valve. Press ON/OFF button (light will glow. 4 Turn the steam control dial to NO STEAM position . 5 Fill a metal or ceramic cup 1/3 full with water under nozzle and "steam" into the cup to clean. 8 Turn steam control...
Use & Care
Page 9
... desired consistency is water in the removable water reservoir and move the frothing nozzle to the right of the cup. then press temperature selection button again to NO STEAM . 5 Fill a metal or ceramic cup 1/3 full with a spoon. Rotate steam control dial about 1/4 to 1/2 inch between the nozzle and the bottom of the unit. 2 Plug unit in; When heated, the light next to...
... desired consistency is water in the removable water reservoir and move the frothing nozzle to the right of the cup. then press temperature selection button again to NO STEAM . 5 Fill a metal or ceramic cup 1/3 full with a spoon. Rotate steam control dial about 1/4 to 1/2 inch between the nozzle and the bottom of the unit. 2 Plug unit in; When heated, the light next to...
Use & Care
Page 10
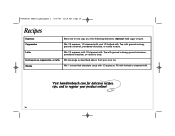
..., ground cinnamon, powdered chocolate, or vanilla to taste. Cappuccino Mix 1/3 espresso, 1/3 steamed milk, and 1/3 frothed milk. Top with 1/3 espresso. Top with ground nutmeg, ground cinnamon, powdered chocolate, or vanilla to register your product online! 10 Optional: Add sugar to taste. 840181701 ENnv01.qxd:Layout 1 6/17/09 11:34 AM Page 10 Recipes Espresso Brew one or two cups at a time following directions.
..., ground cinnamon, powdered chocolate, or vanilla to taste. Cappuccino Mix 1/3 espresso, 1/3 steamed milk, and 1/3 frothed milk. Top with 1/3 espresso. Top with ground nutmeg, ground cinnamon, powdered chocolate, or vanilla to register your product online! 10 Optional: Add sugar to taste. 840181701 ENnv01.qxd:Layout 1 6/17/09 11:34 AM Page 10 Recipes Espresso Brew one or two cups at a time following directions.
Use & Care
Page 11
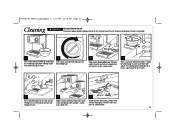
Press pump button and dispense at least 1 cup of water. 2 Turn steam control knob clockwise to STEAM and empty any parts in a dishwasher. 11 840181701 ENnv01.qxd:Layout 1 6/17/09 11:34 AM Page 11 Cleaning w WARNING Electrical Shock Hazard. Every other use: Remove nozzle tip with wrench on tamping tool and wash in any liquid. 1 Turn steam dial to NO...
Press pump button and dispense at least 1 cup of water. 2 Turn steam control knob clockwise to STEAM and empty any parts in a dishwasher. 11 840181701 ENnv01.qxd:Layout 1 6/17/09 11:34 AM Page 11 Cleaning w WARNING Electrical Shock Hazard. Every other use: Remove nozzle tip with wrench on tamping tool and wash in any liquid. 1 Turn steam dial to NO...
Use & Care
Page 12
... the coffee. • Espresso pods make coffee. For best results, use the Hamilton Beach Custom Grind™ coffee grinder on the espresso setting. It is too fine if it looks gritty, like flour. CAUTION: The filter holder, ground espresso filter, and pod filter are hot. • Espresso beans may clog the filter. • For hotter espresso, preheat the filter holder, the ground espresso filter, and the pod filter by first brewing water into the cups for a few seconds and then emptying the brewed water. If grinding espresso in...
... the coffee. • Espresso pods make coffee. For best results, use the Hamilton Beach Custom Grind™ coffee grinder on the espresso setting. It is too fine if it looks gritty, like flour. CAUTION: The filter holder, ground espresso filter, and pod filter are hot. • Espresso beans may clog the filter. • For hotter espresso, preheat the filter holder, the ground espresso filter, and the pod filter by first brewing water into the cups for a few seconds and then emptying the brewed water. If grinding espresso in...

Use & Care
Page 13
... button is depressed and that the coffee grounds are too coarse. • Try a different brand or roast of coffee. 840181701 ENnv01.qxd:Layout 1 6/17/09 11:34 AM Page 13 Troubleshooting POTENTIAL PROBLEM Espresso will not flow out. Machine is sufficient ground coffee in the filter. • Coffee grounds are not overpacked in cup. reduce amount of coffee. • Use the Hamilton Beach Custom Grind™ coffee grinder. Then repeat steps...
... button is depressed and that the coffee grounds are too coarse. • Try a different brand or roast of coffee. 840181701 ENnv01.qxd:Layout 1 6/17/09 11:34 AM Page 13 Troubleshooting POTENTIAL PROBLEM Espresso will not flow out. Machine is sufficient ground coffee in the filter. • Coffee grounds are not overpacked in cup. reduce amount of coffee. • Use the Hamilton Beach Custom Grind™ coffee grinder. Then repeat steps...
Use & Care
Page 14
.... This warranty does not cover glass, filters, wear from accident, alteration, abuse or misuse. Keep the original sales receipt, as proof of purchase is required to the product resulting from normal use, use . To make a warranty claim. This warranty extends only to the store. All liability is warranted to the amount of original purchase. For faster service, locate the model, type, and series numbers on where...
.... This warranty does not cover glass, filters, wear from accident, alteration, abuse or misuse. Keep the original sales receipt, as proof of purchase is required to the product resulting from normal use, use . To make a warranty claim. This warranty extends only to the store. All liability is warranted to the amount of original purchase. For faster service, locate the model, type, and series numbers on where...


