Gigabyte GA-X48-DQ6 Support Question
Gigabyte GA-X48-DQ6 Support Question
Find answers below for this question about Gigabyte GA-X48-DQ6.Need a Gigabyte GA-X48-DQ6 manual? We have 2 online manuals for this item!
Current Answers
Related Gigabyte GA-X48-DQ6 Manual Pages
Manual - Page 1

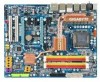
GA-X48-DQ6
LGA775 socket motherboard for Intel® CoreTM processor family/ Intel® Pentium® processor family/Intel® Celeron® processor family
User's Manual
Rev. 1002 12ME-X48DQ6-1002R
Manual - Page 2

Motherboard GA-X48-DQ6
Dec. 14, 2007
Motherboard GA-X48-DQ6
Dec. 14, 2007
Manual - Page 4

...
Box Contents ...6 OptionalItems ...6 GA-X48-DQ6 Motherboard Layout 7 Block Diagram ...8
Chapter 1 Hardware Installation 9 1-1 Installation Precautions 9 1-2 Product Specifications 10 1-3 Installing the CPU and CPU Cooler 13
1-3-1 Installing the CPU 13 1-3-2 Installing the CPU Cooler 15 1-3-3 Installing the Crazy Cool Heatsink on the Back of the Motherboard 16 1-4 Installing the Memory...
Manual - Page 6

The box contents are for reference only. Box Contents
GA-X48-DQ6 motherboard Motherboard driver disk User's Manual Quick Installation Guide Intel® ...brackets I/O Shield Three screws
• The box contents above are subject to change without notice.
• The motherboard image is for reference only and the actual items shall depend on product package you obtain. Optional Items
2-port...
Manual - Page 7

GA-X48-DQ6 Motherboard Layout
KB_MS RCA_SPDIF USB_1394_1 USB_1394_2
SYS_FAN1 ATX_12V_2X
LGA775
CPU_FAN
V_PHASE LED ATX
USB_LAN1
USB_LAN2
AUDIO
RTL8111C
F_AUDIO PCIE_1
NB_FAN
RTL8111C
CODEC CD_IN
PCIE_16_1
PCIE_2 PCIE_3
BP_BIOS MAIN_BIOS
PCIE_16_2
Intel® X48
GA-X48-DQ6
BAT CLR_CMOS
Intel® ICH9R
DDRII1 DDRII2 DDRII3 DDRII4
FDD
SATAII0
IDE
SATAII1
PWR_FAN
SPDIF_O
...
Manual - Page 10

...latest CPU support list.) Š L2 cache varies with CPU Š 1600/1333/1066/800 MHz FSB Š North Bridge: Intel® X48 Express Chipset Š South Bridge: Intel® ICH9R Š 4 x 1.8V DDR2 DIMM sockets supporting up to 8 GB of system ...IDE devices
- 2 x SATA 3Gb/s connectors (GSATAIIA, GSATAIIB) supporting up to the internal IEEE 1394a header)
GA-X48-DQ6 Motherboard
- 10 -
Manual - Page 12

... 5) Due to chipset limitation, Intel ICH9R RAID driver does not support Windows 2000 operating
system. Increase PCIe voltage by 0.05V to 1.55V with 0.05V increment
- GA-X48-DQ6 Motherboard
- 12 - Adjust PCI Express frequency from 100 MHz to 0.75V with 0.05V increment
- Adjust DDR2 frequency
- Increase DDR2 voltage by 0.05V to 700 MHz with...
Manual - Page 14

... to turn off the computer and unplug the power cord from the power outlet to prevent damage to correctly install the CPU into the motherboard CPU socket. GA-X48-DQ6 Motherboard
- 14 -
Step 4: Hold the CPU with the socket alignment keys) and gently insert the CPU into its locked position. Step 5: Once the CPU is...
Manual - Page 16

... Crazy Cool heatsink. The Crazy Cool heatsink and three screws provided
with the motherboard. Step 2: Affix the Crazy Cool heatsink to the left) and remove the bolts.
GA-X48-DQ6 Motherboard
- 16 -
The user shall be responsible for damage of the Motherboard
Please follow the steps below to install the Crazy Cool heatsink provided with the...
Manual - Page 18

...at both ends of the memory socket.
Place the memory module on this motherboard. Step 1: Note the orientation of the memory module.
As indicated in...is securely inserted. Step 2: The clips at both ends of the socket will snap into the memory socket. GA-X48-DQ6 Motherboard
- 18 -
Follow the steps below to the memory module. 1-4-2 Installing a Memory
Before installing a memory ...
Manual - Page 20

...to hardware.
• Insert the SATA signal cable and SATA power cable securely into
to the SATA port on your SATA device.
GA-X48-DQ6 Motherboard
- 20 -
Follow the steps below to install the SATA bracket:
Step 1: Locate one free PCI slot and secure the SATA bracket... supply before installing or removing the SATA bracket and SATA power cable to prevent damage to your motherboard.
Manual - Page 22

... audio software. Use this audio jack for a headphone or 2-channel speaker. Microphones must be reconfigured to connect rear speakers in Chapter 5, "Configuring 2/4/5.1/7.1-Channel Audio." GA-X48-DQ6 Motherboard
- 22 - Side Speaker Out Jack (Gray) Use this audio jack to connect center/subwoofer speakers in a 5.1/7.1-channel audio configuration.
Center/Subwoofer Speaker Out Jack...
Manual - Page 24

...+12V (Only for 2x4 pin 12V)
6
+12V (Only for 2x4 pin 12V)
7
+12V
8
+12V
12
24
1
13
ATX
GA-X48-DQ6 Motherboard
ATX : Pin No. 1 2 3 4 5 6 7 8 9 10 11 12
Definition 3.3V 3.3V GND +5V GND +5V GND...
• To meet expansion requirements, it is turned off and all the components on the motherboard. 1/2) ATX_12V_2X/ATX (2x4 12V Power Connector and 2x12 Main Power Connector)
With the use of...
Manual - Page 26

... (for example, master or slave). (For information about configuring master/slave settings for the IDE devices, read the instructions from the device manufacturers.)
1
2
39
40
GA-X48-DQ6 Motherboard
- 26 - If you wish to connect two IDE devices, remember to set the jumpers and the cabling according to the role of the connector and...
Manual - Page 28

... indicate system power status. Plug in S3/S4 sleep state or powered off . Gently remove the battery from the battery holder and wait for 5 seconds.) 3. GA-X48-DQ6 Motherboard
- 28 - Definition
1
MPD+
2
MPD-
1
3
MPD- System Status LED
S0
On
S1
Blinking
S3/S4/S5 Off
12) BAT (BATTERY)
The battery provides power to a low...
Manual - Page 30

... with your chassis provides an AC'97 front panel audio module, refer to the instructions on each wire instead of the motherboard header. Definition
Pin No. Definition
1
CD-L
2
GND
3
GND
4
CD-R
GA-X48-DQ6 Motherboard
- 30 -
Make sure the wire assignments of the module connector match the pin assignments of a single plug. Incorrect connection between...
Manual - Page 32

..., attach one IEEE 1394a port via an optional USB bracket. The IEEE 1394a header can provide two USB ports via an optional IEEE 1394a bracket. GA-X48-DQ6 Motherboard
- 32 -
For purchasing the optional USB bracket, please contact the local dealer.
1
2
9
10
Pin No. 1 2 3 4 5 6 7 8 9 10
Definition Power (5V) Power (5V) USB DXUSB DYUSB DX...
Manual - Page 34

... NDCD NSIN NSOUT NDTR GND NDSR NRTS NCTS NRI No Pin
23) CI (Chassis Intrusion Header) This motherboard provides a chassis detection feature that detects if the chassis cover has been removed. Definition
1
1
Signal
2
GND
GA-X48-DQ6 Motherboard
- 34 -
22) COM (Serial Port Header) The COM header can provide one serial port via an optional...
Manual - Page 36

GA-X48-DQ6 Motherboard
- 36 -
Manual - Page 38
... Menu. Function Keys:
: BIOS Setup : XpressRecovery2 : Boot Menu : Qflash 11/29/2007-X48-ICH9-6A89OG0DC-00
Function Keys
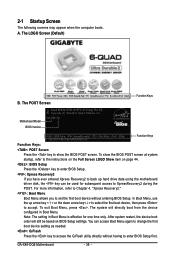
: POST Screen Press the key to accept. The LOGO Screen (Default)
: POST Screen : BIOS Setup/Q-Flash : XpressRecovery2 : Boot Menu: Qflash
B. GA-X48-DQ6 Motherboard
- 38 - 2-1 Startup Screen
The following screens may appear when the computer boots.
To...
Similar Questions

How To Manually Overclock Gigabyte Motherboard Ga-970a-ud3
(Posted by mk45Snowfl 9 years ago)


Gigabyte Motherboard Ga-h55-usb3 (rev. 2.0)
what is the price in INR and from where purchase in india local or online.
what is the price in INR and from where purchase in india local or online.
(Posted by shailkam2001 11 years ago)
Pls. Send Me A Pdf Wiring Installation Guide For My Motherboard Ga-h61m-ds2..thn
(Posted by DAVIDJR1261 11 years ago)
Why My Motherboard Ga-g31m-es2l Not Sporting Any Game
(Posted by camonurai 12 years ago)