
Gigabyte GA-H61M-S2PV Support Question
Gigabyte GA-H61M-S2PV Support Question
Find answers below for this question about Gigabyte GA-H61M-S2PV.Need a Gigabyte GA-H61M-S2PV manual? We have 1 online manual for this item!
Question posted by Shaestephens17 on January 9th, 2020
Stuck On Motherboard Screen
I recently built a custom pc for the first time everything connected properly but I cannot press del or f12 to get into bios. Can you help??!
Current Answers
Answer #1: Posted by hzplj9 on January 9th, 2020 1:20 PM
hzplj9

Member since:
June 25th, 2012 Points: 4,873,510

Member since:
June 25th, 2012 Points: 4,873,510
According to the manual available here:
https://www.manualslib.com/manual/437980/Gigabyte-Ga-H61m-S2pv.html
To access the BIOS Setup program, press the 'delete' key during the POST when the power is turned on. It has to be done during the post test on boot up. If that does not work I suggest resetting the bios first so that it is clear. Check that you have connected all cables correctly.
Hope that helps.
Related Gigabyte GA-H61M-S2PV Manual Pages
Manual - Page 2
Motherboard GA-H61M-S2PV
Oct. 28, 2011
Motherboard GA-H61M-S2PV
Oct. 28, 2011
Manual - Page 3
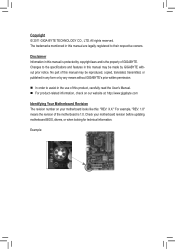
..., carefully read the User's Manual. For product-related information, check on our website at: http://www.gigabyte.com
Identifying Your Motherboard Revision The revision number on your motherboard revision before updating motherboard BIOS, drivers, or when looking for technical information. For example, "REV: 1.0" means the revision of GIGABYTE.
Copyright © 2011 GIGA-BYTE...
Manual - Page 4
Table of Contents
GA-H61M-S2PV Motherboard Layout 5 GA-H61M-S2PV Motherboard Block Diagram 6
Chapter 1 Hardware Installation 7 1-1 Installation Precautions 7 1-2 Product Specifications 8 1-3 Installing the CPU 10 1-4 Installing the Memory 11 1-5 Installing an Expansion Card 11 1-6 Back Panel Connectors 12 1-7 Internal Connectors 13
Chapter 2 BIOS Setup 20 2-1 Startup Screen 20 2-2 The ...
Manual - Page 5
... DDR3_2 B_BIOS M_BIOS
iTE IT8728
PCI1
PCI2
CODEC
PCIEX1
F_AUDIO
F_USB2 F_USB1
COM SYS_FAN
Intel® H61
SATA2
0
1
CLR_CMOS
2
3
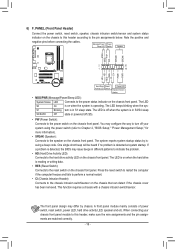
F_PANEL
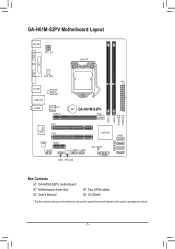
Box Contents GA-H61M-S2PV motherboard Motherboard driver disk User's Manual
Two SATA cables I/O Shield
* The box contents above are for reference only and the actual items shall depend on the product ...
Manual - Page 6
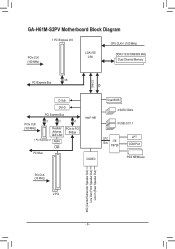
GA-H61M-S2PV Motherboard Block Diagram
1 PCI Express x16
CPU CLK+/- (100 MHz)
PCIe CLK (100 MHz)
LGA1155 CPU
DDR3 1333/1066/800 MHz Dual...100 MHz)
x1
x1
Realtek/ Atheros GbE LAN
1 PCI Express x1 RJ45
x1
PCIe to PCI Bridge
LAN
PCI Bus
Intel® H61 CODEC
Dual BIOS 4 SATA 3Gb/s 8 USB 2.0/1.1
LPC Bus iTE
IT8728
LPT COM Port
PS/2 KB/Mouse
PCI CLK (33 MHz)
2 PCI
MIC (Center/...
Manual - Page 7
... an electrostatic shielding container. •• Before unplugging the power supply cable from the power outlet before installing or removing the motherboard or other hardware components.
•• When connecting hardware components to the internal connectors on the computer power during the installation process can lead to damage to system components as...
Manual - Page 9
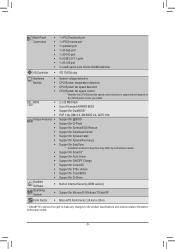
... (Line In/Line Out/Microphone)
I/O Controller ŠŠ iTE IT8728 chip
Hardware
ŠŠ
Monitor
ŠŠ
ŠŠ
ŠŠ
BIOS
ŠŠ
ŠŠ
ŠŠ
ŠŠ
Unique Features ŠŠ
ŠŠ
ŠŠ
ŠŠ
ŠŠ...OEM version)
Support for EasyTune
* Available functions in EasyTune may differ by motherboard model.
Manual - Page 10
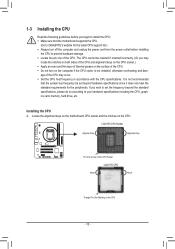
... latest CPU support list.) •• Always turn on the CPU.
Locate the alignment keys on the motherboard CPU socket and the notches on the computer if the CPU cooler is not recommended
that the motherboard supports the CPU.
(Go to GIGABYTE's website for the peripherals. LGA1155 CPU Socket
Alignment Key
Alignment...
Manual - Page 11
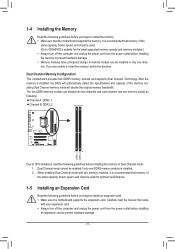
... installing the memory in only one DDR3 memory module is installed, the BIOS will double the original memory bandwidth. 1-4 Installing the Memory
Read the following guidelines before you begin to install the memory: •• Make sure that the motherboard supports the memory. After the memory is installed. 222 When enabling Dual...
Manual - Page 12
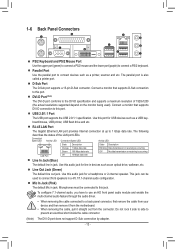
... DVI-D port conforms to prevent an electrical short inside the cable connector.
(Note) The DVI-D port does not support D-Sub connection by adapter.
- 12 - Do not rock it straight out from the motherboard.
•• When removing the cable, pull it side to side to the DVI-D specification and supports a maximum resolution...
Manual - Page 13

... to the devices. •• After installing the device and before connecting external devices: •• First make sure the device cable has
...securely attached to the connector on the computer, make sure your devices are compliant with the connectors you wish to connect. •• Before installing the devices, be sure to turn off the devices and your computer. 1-7 Internal...
Manual - Page 14
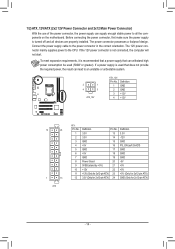
...To meet expansion requirements, it is turned off and all the components on the motherboard. If a power supply is not connected, the computer will not start. Connect the power supply cable to an unstable or unbootable system.
2
1
4
3... supply can supply enough stable power to all devices are properly installed.
The 12V power connector mainly supplies power to the CPU. If the 12V...
Manual - Page 15
...
Pin No. 1 2 3 4 5 6 7
Definition GND TXP TXN GND RXN RXP GND
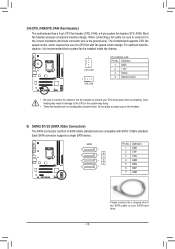
- 15 - The motherboard supports CPU fan speed control, which requires the use of the SATA cable to prevent your SATA hard drive. Over- .../s Connectors) The SATA connectors conform to connect it is the ground wire).
3/4) CPU_FAN/SYS_FAN (Fan Headers)
The motherboard has a 4-pin CPU fan header (CPU_FAN), a 4-pin system ...
Manual - Page 16
... sStMaBrt_uCpP.TIf PCIe power conanepcrtoorb(lSeAmTAi)s(Xd58eAt-eOcCte) d, the BIOS may issue beeps in S3/S4 sleep
DIP 1 23
1...H61M-D2)
HD+ HD- The system reports system startup status by chassis.
Press the reset switch to restart the cCDoIImS_pMuEter
if the computer freezes and fails to perform a normal restart. •• CI (Chassis Intrusion Header):
GP15_CPT (GA-IVB)
Connects...
Manual - Page 17
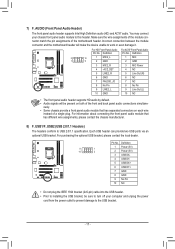
...to installing the USB bracket, be present on each wire
instead of the motherboard header. You may connect your computer and unplug the power
cord from the power outlet to prevent damage... supports Intel High Definition audio (HD) and AC'97 audio. Incorrect connection between the module connector and the motherboard header will be sure to turn off your chassis front panel audio module...
Manual - Page 20
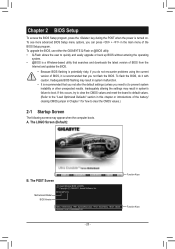
... the settings may result in the main menu of BIOS, it with caution. The POST Screen
Motherboard Model BIOS Version
Award Modular BIOS v6.00PG Copyright (C) 1984-2011, Award Software, Inc. To flash the BIOS, do not encounter problems using the current version of the BIOS Setup program. H61M-S2PV FA . . . .
: BIOS Setup : XpressRecovery2 : Boot Menu : Qflash 10/05/2011...
Manual - Page 32
...
+/-/PU/PD: Value
F10: Save
F6: Fail-Safe Defaults
ESC: Exit
F1: General Help
F7: Optimized Defaults
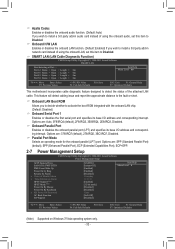
This motherboard incorporates cable diagnostic feature designed to the fault or short. Options are : SPP (Standard ...Event Wake Up Power On by Ring Resume by Alarm x Date (of Month) Alarm x Time (hh:mm:ss) Alarm HPET Support (Note) HPET Mode (Note) Power On By Mouse...
Manual - Page 34
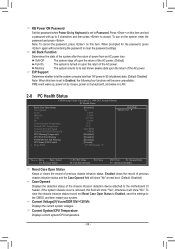
...2-8 PC Health Status
CMOS Setup Utility-Copyright (C) 1984-2011 Award Software PC Health ...] [Normal] 1.75 PWM value /oC
Item Help Menu Level
Move Enter: Select F5: Previous Values
+/-/...press again without entering the password to the motherboard CI header. Current System/CPU Temperature Displays current system/CPU temperature.
- 34 -
Press on the system, enter the password and press...
Manual - Page 35
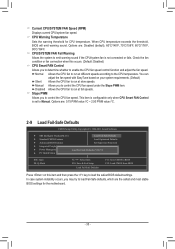
... threshold for the motherboard.
- 35 - Check the fan condition or fan connection when this item and then press the key to emit...BIOS F12: Load CMOS from BIOS
Press on your system requirements. (Default) Silent Allows the CPU fan to Manual. When CPU temperature exceeds the threshold, BIOS will emit warning sound. This item is configurable only when CPU Smart FAN Control is not connected...
Manual - Page 38
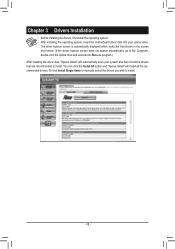
...first install the operating system. •• After installing the operating system, insert the motherboard driver disk into your system and then list all the recommended drivers.
Or click Install... wish to install. The driver Autorun screen is automatically displayed which looks like that shown in the screen shot below. (If the driver Autorun screen does not appear automatically, go to ...
Similar Questions

Ga-h61m-s2pv 1 Long Continious Beep Then Restart Two Times.
my pc makes 1 long contenous beep sounds then restart and restart again about two time. I can't even...
my pc makes 1 long contenous beep sounds then restart and restart again about two time. I can't even...
(Posted by kutuledavidmogane 9 years ago)

How To Manually Overclock Gigabyte Motherboard Ga-970a-ud3
(Posted by mk45Snowfl 9 years ago)

Dual Monitors
Does this motherboard support dual monitors? I have 2 VGA monitors, so I presume that I need at leas...
Does this motherboard support dual monitors? I have 2 VGA monitors, so I presume that I need at leas...
(Posted by geoffdunbar1 10 years ago)

Pls. Send Me A Pdf Wiring Installation Guide For My Motherboard Ga-h61m-ds2..thn
(Posted by DAVIDJR1261 11 years ago)