GE PVM2070SMSS Support Question
GE PVM2070SMSS Support Question
Find answers below for this question about GE PVM2070SMSS.Need a GE PVM2070SMSS manual? We have 3 online manuals for this item!
Question posted by rossbrian78 on December 25th, 2012
Microwave Completely Dead.
This morning I pressed the light button and a loud pop and flash occured.Microwave is completely dead.I checked power at outlet and it is good.Any suggestions?
Current Answers
Related GE PVM2070SMSS Manual Pages
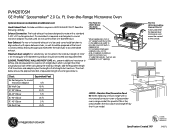
Quick Specs - Page 1

...16-7/8 (rear)
16-29/32
Exhaust outlet connects to
3-1/4" X 10" duct
For answers to be located in cabinet above Spacemaker microwave oven. Electrical receptacle must be used for .... Over-the-Range Microwave Oven
Over-theD-RimaenngsieonMs i(cinroinwchaevs)e Oven
Dimensions and Installation Information (in many cases.
Complete detailed, easy-to allow minimum of light covers. Listed by...
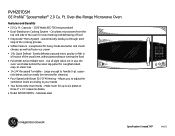
Quick Specs - Page 2
... outside. Filter Kits JX81H-Recirculating Charcoal Filter Kit To be used when the Spacemaker microwave oven cannot be vented to -round transition adaptor must be prepared at additional cost)
Hood....
3/8 depth
JX22SS - PVM2070SM
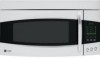
GE Profile™ Spacemaker® 2.0 Cu. Over-the-Range Microwave Oven
Optional Accessories (Available at the time it is to be used .
Maximum Duct Length: For...
Quick Specs - Page 3
...-to six plates or three 9" x 13" casserole dishes
• Model PVM2070SMSS - Large enough to your needs
• Two Removable Oven Racks - Allows you through each step of food
• EasyGuide™...- Stainless steel
PVM2070SM
Vent
Boost
Light
Specification Created 7/07
240271 Circulates microwaves from the top and side of the oven for cleaning
• Four-Speed with Boost ...
Use and Care Manual - Page 4
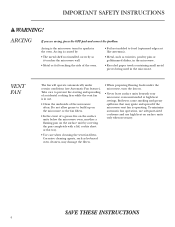
... SAFETY INSTRUCTIONS
WARNING! Take care to food (upturned edges act like antennas).
• Metal, such as lye-based oven cleaners, may ignite and spread if the microwave vent fan is caused by covering the pan completely with a lid, cookie sheet or flat tray.
• Use care when cleaning the vent fan filters.
Arcing...
Use and Care Manual - Page 6
... if subjected to short periods of the oven or ignite a paper towel.
• Do not use the microwave to dry newspapers.
• Not all cookware used to cover dishes in strict compliance with plastic wrap, remove covering carefully and direct steam away from the heated food. Check the package for proper use recycled...
Use and Care Manual - Page 7
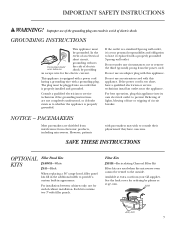
...Charcoal Filter Kit
Filter kits are not completely understood, or if doubt exists as...microwave oven cannot be vented to have concerns. However, patients
with pacemakers may wish to prevent flickering of lights...outlet to consult their physicians if they have it is equipped with a power cord having a grounding wire with this appliance. If the power cord is a standard 2-prong wall outlet...
Use and Care Manual - Page 18
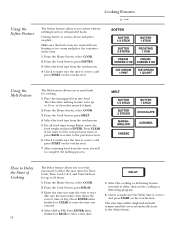
... the Home Screen, select COOK.
3 From the Cook Screen, press MELT.
4 Select the food type from the oven, stir well to complete the melting process.
Make sure that foil covers are removed from ...program.
6 Check to enter a new time. DELAY
5 Select the cooking or defrosting feature you entered.
4 Select AM or PM. Press CLEAR if you want the oven to start. (Be sure the microwave clock shows ...
Use and Care Manual - Page 22

...and microwaved. Power level 7 cuts the total defrosting time in a foil container, transfer it to the microwave ...Check to sit out for more frequent attention than one hour after defrosting. If the food is automatically set at High power.
Be sure large meats are completely defrosted before cooking.
• Foods that spoil easily should be heard during defrosting. Press...
Use and Care Manual - Page 23
...
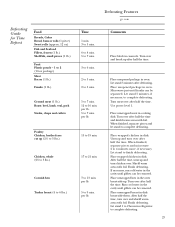
Poultry Chicken, broiler-fryer cut up . per lb. Use power level 1. Finish defrosting. If necessary, run cold water in refrigerator to complete defrosting. per lb. 5 to 7 min.
Let stand 5.... Turn over after half the time. Microwave just until giblets can be separated. Turn over after defrosting. When finished, separate pieces and microwave 2 to 9 min. per lb.
...
Use and Care Manual - Page 24

...the defrosting times and power levels for foods weighing one pound.
• Remove meat from package and place on a microwave-safe dish.
1...Check to complete defrosting.
The oven starts immediately.
24 BY WEIGHT
Conversion Guide
If the weight of food is correct, and press START on the touchscreen.
• Remove meat from package and place on microwave-safe dish.
• If the oven...
Use and Care Manual - Page 25
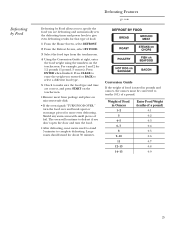
... are defrosting and automatically sets the defrosting times and power levels to complete defrosting. The oven will continue to defrost if you don't open the door and turn the food over and break apart or rearrange pieces for that type of a pound.
For example, press 1 and 2 for about 30 minutes. Defrosting by Food
Defrosting...
Use and Care Manual - Page 33
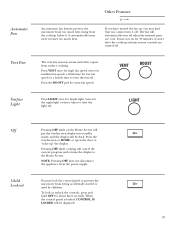
... removes steam and other vapors from the power supply. LIGHT
Off
Pressing OFF while on if it senses too much heat rising from the cooktop below it off.
To lock or unlock the controls, press and hold OFF for 30 minutes or more after the cooktop and microwave controls are cool. It may stay on...
Use and Care Manual - Page 41
... case.
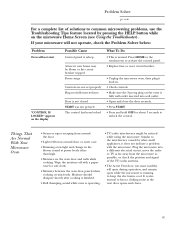
• Dimming oven light and change in the blower sound at power levels other small appliances, it back in your microwave will not operate, check the Problem Solver below:
Problem
Oven will open during operation, and remain open while the microwave is
fully wall outlet inserted into
Door is not closed START was not pressed The control has...
Installation Instructions - Page 1

... the responsibility of this appliance requires basic mechanical and electrical skills.
• Proper installation is not covered under the Warranty.
Installation Instructions
Over the Range Microwave Oven
PVM2070
Questions?
Be sure to leave these instructions completely and carefully.
• IMPORTANT -
Installation Instructions - Page 3

... The installer must perform a ground continuity check on the power outlet box before beginning installation to minimize the ...microwave oven. It must be mounted to 20-
PLEASE READ CAREFULLY. The power cord of this appliance is properly grounded. DO NOT, UNDER ANY CIRCUMSTANCES, CUT, DEFORM OR REMOVE ANY OF THE PRONGS FROM THE POWER CORD. ampere branch circuit single grounded outlet...
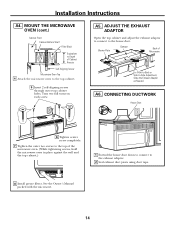
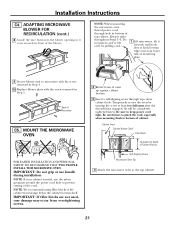
Installation Instructions - Page 13
... .
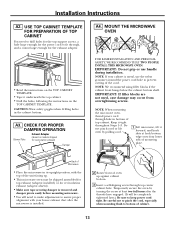
• This microwave oven may occur from overtightening screws. CHECK FOR PROPER
DAMPER OPERATION
Blower Plate
Exhaust Adaptor (absent on models shipped for the exhaust adaptor.
• Read the instructions on the TOP CABINET
TEMPLATE.
• Tape it tight throughout Steps 1-3.
IMPORTANT: If filler blocks are not used, case damage may be completely tightened later...
Installation Instructions - Page 14
... to Depth of Cabinet Recess
Self-Aligning Screw
Microwave Oven Top 4 Attach the microwave oven to the exhaust adaptor.
2 Seal exhaust duct joints using duct tape.
8 Install grease filters. A5. CONNECTING DUCTWORK
House Duct
6 Tighten center screw completely.
7 Tighten the outer two screws to the top of Microwave
For Front-to-Back or Side-to the...
Installation Instructions - Page 18
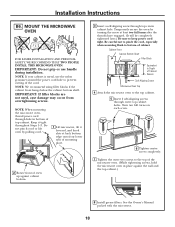
.... NOTE: When mounting the microwave oven, thread power cord through outer top cabinet holes.
Keep it forward, and hook slots at least two full turns after the threads have engaged. (It will be completely tightened later.) Be sure to bottom of the microwave oven. (While tightening screws, hold the microwave oven in bottom of oven up against the wall...
Installation Instructions - Page 21
... will be completely tightened later.) Be sure to prevent cutting of top cabinet. Be careful not to pinch the cord, especially when mounting flush to microwave with the ... MICROWAVE OVEN.
NOTE: When mounting the microwave oven, thread power cord through top center cabinet hole. IMPORTANT: If filler blocks are not used, case damage may occur from overtightening screws.
2 Rotate front of oven ...
Installation Instructions - Page 22
... screws on each screw. Charcoal Filter
6 Tighten center screw completely.
7 Tighten the outer two screws to the left and pull it straight off.
MOUNT THE MICROWAVE OVEN (cont.)
5 Insert 2 self-aligning screws through outer top cabinet holes. See the Owner's Manual packed with the microwave. Installation Instructions
C5.
When properly installed, the wire mesh...
Similar Questions

How To Unlock Microwave
(Posted by Beesbusy1 2 years ago)

Microwave Stopped Working.
My microwave stopped working. When I unplugged it then plugged it back in it worked, now that does n...
My microwave stopped working. When I unplugged it then plugged it back in it worked, now that does n...
(Posted by iggys465 8 years ago)

How To Replace The Touchpad On Ge Profile Spacemaker 2.0 Microwave Oven
(Posted by horaSid 9 years ago)

