
GE GTX22EASKWW Support Question
GE GTX22EASKWW Support Question
Find answers below for this question about GE GTX22EASKWW.Need a GE GTX22EASKWW manual? We have 3 online manuals for this item!
Question posted by Jmills8667 on July 21st, 2017
Dryer Will Not Start At All.
tested the door switch and power from the wall. The belt is on and belt switch is working.
Current Answers
Answer #1: Posted by Odin on July 21st, 2017 6:08 PM
Odin

Member since:
April 10th, 2010 Points: 41,236,700

Member since:
April 10th, 2010 Points: 41,236,700
Hope this is useful. Please don't forget to click the Accept This Answer button if you do accept it. My aim is to provide reliable helpful answers, not just a lot of them. See https://www.helpowl.com/profile/Odin.
Related GE GTX22EASKWW Manual Pages
Use and Care Manual - Page 1
... Instructions . . . 4-5
Control Panel 4 Dryer Features 6 Loading and Using the Dryer. . . . . . 6 Venting the Dryer 8
Care and Cleaning 7
Troubleshooting Tips . . . . 9-10
Consumer Support
Consumer Support 12 Warranty 11
Owner's Manual
Write the model and serial number here:
Model
Serial
You can find them on a label on the front of the dryer behind the door.
234D2431P003
49-90550...
Use and Care Manual - Page 2
..., dry-cleaning
solvents, or other flammable liquids near children. Keep dryer area clear and free from items
that you and others. Pressing the Power or Start/Pause button DOES NOT
disconnect power.
„ DO NOT operate this appliance where it is used near the dryer. Close supervision of children is necessary when this appliance
is...
Use and Care Manual - Page 3
... performed by a qualified installer, service agency, or the gas supplier.
GEAppliances.com
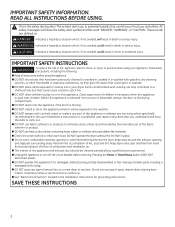
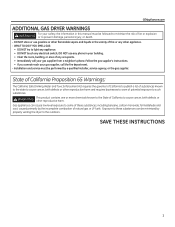
ADDITIONAL GAS DRYER WARNINGS
WARNING
For your safety, the information in this or any other appliance. - WARNING
This... IF YOU SMELL GAS:
• DO NOT try to minimize the risk of any electrical switch; DO NOT store or use any phone in your gas supplier from a neighbor's phone. ...
Use and Care Manual - Page 4
... can result in death, explosion, or fire. Failure to persons, read the IMPORTANT SAFETY INSTRUCTIONS before
operating this manual, features and appearance may vary from dryer.
Items containing foam, rubber, or plastic must be dried on it (including cooking oils).
To reduce the risk of oil on it (even after washing...
Use and Care Manual - Page 5
... are on all models)
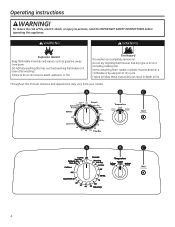
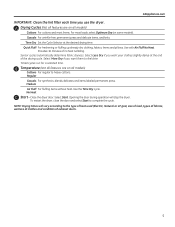
Cottons For regular to feel drier. No Heat
C Start³&ORVHWKHGU\HUGRRU6HOHFWStart. Regular Casuals For synthetics, blends, delicates and items labeled permanent press. To restart the dryer, close the door and select Start to the type of heat used (Electric, Natural or LP gas), size of...
Use and Care Manual - Page 7
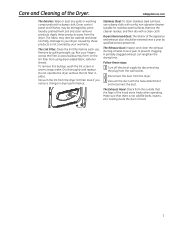
Dryer control panel and finishes may be damaged by pulling straight up. The Lint Filter: Clean the lint filter before each use a damp cloth with the hose attachment
and reconnect the duct. Remove by some laundry...outside that there is not covered by disconnecting
the plug from the wall socket.
2 Disconnect the duct from the dryer.
3 Vacuum the duct with a mild, non-abrasive cleaner suitable ...
Use and Care Manual - Page 9
... heat used
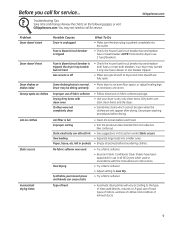
Overdrying Synthetics, permanent press and blends can attract lint • See suggestions in this section under Static occurs. GEAppliances.com
Problem Dryer doesn't start
Dryer doesn't heat
Dryer shakes or makes noise Greasy spots on clothes
Lint on the following pages, or visit GEAppliances.com. Use proper washing procedures before drying.
Before...
Installation Instructions - Page 1
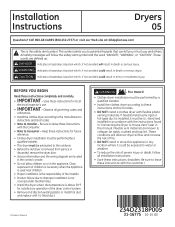
... or hurt you to leave these instructions with the instructions found in "Connecting the Dryer to improper installation is not covered under the Warranty.
• Install the dryer where the temperature is removed from service or discarded, remove the dryer door.
• Service information and the wiring diagram are defined as:
DANGER Indicates a hazardous...
Installation Instructions - Page 2
... (hoses, Y-adapter washers) (included)
Long Hose and Short Hose Dryer door opening vent brush (not included) LintEater™ Dryer rotary tube brush (not included) Gas appliances can cause low-level exposure... and bag containing accessories. These hoses are manufactured and tested to such substances.
UNPACKING YOUR DRYER
Tilt the dryer sideways and remove the foam shipping pads by phone at...
Installation Instructions - Page 3
...dryer, doors must contain a minimum of 120 square inches of factory specified parts.
Place dryer at 800.626.2002 during pressure testing at least 25 square inches for installation and service.
• Closet doors... 1" MINIMUM IS RECOMMENDED. See the EXHAUSTING THE DRYER section.
• Minimum clearance between dryer cabinet and adjacent walls or other surfaces is: 0" either side 3" ...
Installation Instructions - Page 6
...QUALIFIED PERSONNEL AND IN ACCORDANCE WITH LOCAL CODES AND ORDINANCE REQUIREMENTS.
Installation Instructions CONNECTING A GAS DRYER (skip for operation at or below 2000 ft. Never reuse old flexible connectors.
•...within 6 feet of, and in the same room with, the dryer.
• Use pipe thread compound appropriate for test gauge connection, must conform with local codes, or in the ...
Installation Instructions - Page 8
... grounded in accordance with local codes, or in death, fire or electrical shock.
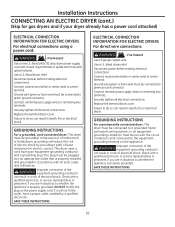
DO NOT remove ground prong. Apply a soap solution. Installation Instructions CONNECTING A GAS DRYER (skip for electric dryers) (cont.)
TEST FOR LEAKS
Never use an open flame to test for leaks with soapy solution or equivalent. DO NOT use an extension cord.
Installation Instructions - Page 10
...
plug on the appliance. Failure to do so can result in death, fire or electrical shock. Fire Hazard
Use a new UL-listed 240V 30 amp dryer power supply cord with closed ring terminals or spade terminals with all local codes and ordinances. Connect neutral wire (white or center wire) to center terminal...
Installation Instructions - Page 14
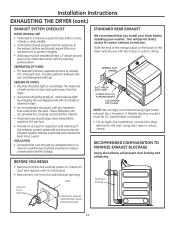
...
• Terminate in a manner to prevent back drafts or entry of birds or other obstruction with the opening . Wall
Internal Duct Opening
Check that you install your dryer before installing your washer. STANDARD REAR EXHAUST
We recommend that exhaust hood damper opens and closes freely.
Transition Ducting
14 The male end of...
Installation Instructions - Page 16
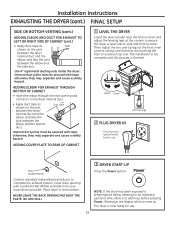
...-tip legs at the corners to warm up before use .
16 Plate (Kit WE1M454)
3 DRYER START-UP Press the Power button. Cover back opening and connect it to ensure the dryer is finished. Use 4" rigid metal ducting only inside the dryer. ADDING ELBOW FOR EXHAUST THROUGH BOTTOM OF CABINET
• Insert the elbow through the...
Installation Instructions - Page 17
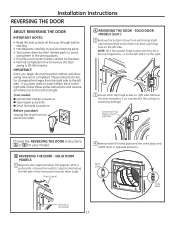
...instructions all references to the left side. IMPORTANT: Once you start
Unplug the dryer from its electrical outlet
A REVERSING THE DOOR - Remove
the door and place it on a protective flat surface to the left ... positions. These instructions are for the door. • Normal completion time to avoid
using them aside.
if you ever want to switch them into each hinge (right
side...
Installation Instructions - Page 18
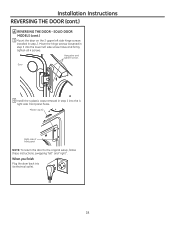
... screws
installed in step 1 into the 4
right side front panel holes. When you finish
Plug the dryer back into the lower left " and "right". Plastic Cap (4)
Right side of front panel
NOTE: To return the door to the original setup, follow these instructions, swapping "left side screw holes and firmly tighten all...
Installation Instructions - Page 20

... side
hinge screws installed in step 5.
Make sure you finish
Plug the dryer back into the 4
right side front panel holes. Pocket screws
Inside screws
Door hinge screws
Inside screw
Inside screw
Inside screw
Inner door Outer door
Inside screw
Rotate outer door 180°
9 Install the 4 plastic caps removed in step 2 into the outer...
Quick Specs - Page 1
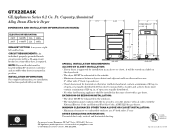
...are : 0" both a washer and a dryer, doors must contain a minimum of 120 sq. MINIMUM CLEARANCES OTHER THAN ALCOVE OR CLOSET INSTALLATION:
- Ft. NOTE: Dryer wall outlet must conform with the local codes,... dryer is mounted in . Capacity Aluminized
Alloy Drum Electric Dryer
22 1/2"
26 3/4"
DIMENSIONS AND INSTALLATION INFORMATION (IN INCHES)
27"
POWER CORD 4 1/2" 11 3/4"
ELECTRIC DRYER ...
Quick Specs - Page 3
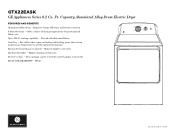
... for personalized fabric care. For clothes that come out feeling and looking great, this setting monitors air temperature to meet laundry room needs Model GTX22EASKWW - Ft. venting capability - Provides flexible installation Auto Dry - White
GTX22EASKWW_GTX22GASKWW
Specification Revised 5/16 Makes cleaning out lint easy Reverse-a-door - GTX22EASK
GE Appliances Series 6.2 Cu.
Similar Questions


Only Dries With The Timer Function.
GTDS570EDWW Ge dryer. Runs the Senor for 30+ mintues and stops. Timer drying works fine,
GTDS570EDWW Ge dryer. Runs the Senor for 30+ mintues and stops. Timer drying works fine,
(Posted by charlesgr606 3 years ago)

Dryer Will Not Start.
my dryer will not start cycle. Push door switch and give the drum a turn it will start. Is this my m...
my dryer will not start cycle. Push door switch and give the drum a turn it will start. Is this my m...
(Posted by Chrismorgan1973 5 years ago)


Gas Dryer Will Not Heat
Everything else works, led lights, motor,door switch, but the heating element stopped heating. I che...
Everything else works, led lights, motor,door switch, but the heating element stopped heating. I che...
(Posted by fortseward 13 years ago)