GE DCVH680GJMR Support Question
GE DCVH680GJMR Support Question
Find answers below for this question about GE DCVH680GJMR.Need a GE DCVH680GJMR manual? We have 2 online manuals for this item!
Question posted by sandylopez07 on November 30th, 2014
Dryer Takes A Long Time To Dry
The person who posted this question about this GE product did not include a detailed explanation. Please use the "Request More Information" button to the right if more details would help you to answer this question.
Current Answers
Answer #1: Posted by BusterDoogen on November 30th, 2014 6:21 PM
BusterDoogen

Member since:
October 30th, 2011 Points: 28,565,407

Member since:
October 30th, 2011 Points: 28,565,407
Go here for possible fixes or failing parts.
I hope this is helpful to you!
Please respond to my effort to provide you with the best possible solution by using the "Acceptable Solution" and/or the "Helpful" buttons when the answer has proven to be helpful. Please feel free to submit further info for your question, if a solution was not provided. I appreciate the opportunity to serve you!
Related GE DCVH680GJMR Manual Pages
Installation Instructions - Page 1

... of children is necessary when the appliance is used near children. • Install the dryer where the temperature is Clean (see section 1) and Meets Attached Installation Specifications. (see ... (Canada) or Visit our Web site at: www.GEAppliances.com (US)
PEDESTALS FOR DRYERS
(comes with individual installation instructions) 3 models available: SBSD227F, SBSD137H
SBSD107H
BEFORE YOU BEGIN...
Installation Instructions - Page 2

... pipe and equipped with UL listed transition duct. This will allow better access when installing dryer exhaust
DISCONNECTING GAS
TURN GAS SHUT-OFF VALVE TO THE OFF POSITION. REPLACE WITH NEW CSA...for natural or LP
gas or use Teflon tape. • You must be given to the dryer. rear.
Using conversion kit WE25X0217, your washer.
of the gas supply connection to provide adequate ...
Installation Instructions - Page 3

... to pipe threads. NEVER USE AN OPEN FLAME TO TEST FOR GAS LEAKS.
Caution: Use adapters as shown. APPLY PIPE COMPOUND TO THE ADAPTER AND DRYER GAS INLET.
Installation Instructions - Page 4

... BEFORE USE. INSULATION Duct work that a licensed electrician install an approved outlet. Using exhaust longer than specified length will:
• Increase the drying times and the energy cost. • Reduce the dryer life. • Accumulate lint, creating a potential fire hazard. The correct exhaust installation is near air conditioning
4 should be made air and...
Installation Instructions - Page 5
..., gas vent, crawl space, attic, under an enclosed floor, or in any fasteners that the dryer
is level from moving too close to the home exhaust duct. Installation Instructions
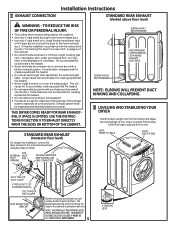
7 EXHAUST CONNECTION
STANDARD REAR...NOTE: ELBOWS WILL PREVENT DUCT KINKING AND COLLAPSING.
8 LEVELING AND STABILIZING YOUR DRYER
Stand the dryer upright near the final location and adjust the 4 leveling legs, at turns ...
Installation Instructions - Page 6

...; Total length of 120 sq. of the duct over the clothes dryer outlet pipe. 2. Installation Instructions, Exhausting
CONNECTING THE DRYER TO HOUSE VENT
RIGID METAL TRANSITION DUCT
• For best drying performance, a rigid metal transition duct is : 0 in the same closet with the dryer.
A UL-listed flexible metal (foil-type)duct may be vented...
Installation Instructions - Page 7
...around joint .
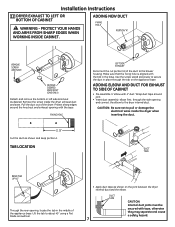
• Insert duct assembly, elbow first, through the tab on the joint between the dryer internal duct and the elbow. ADDING ELBOW AND DUCT FOR EXHAUST TO SIDE OF CABINET
• Pre-... shown and keep portion A.
Lift the tab to pull or damage the electrical wires inside the dryer exhaust duct and save. ADDING NEW DUCT
FIXING HOLE
PORTION "A"
REMOVE SCREW AND SAVE. DUCT ...
Installation Instructions - Page 8
... PLATE.
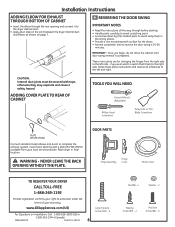
These instructions are for the doors. • Normal completion time to reverse the door swing is completed.
IMPORTANT: Once you ever want to switch them in final location. DOOR PARTS
Hinge Assembly
Hinge Cover
Plastic Cover
TO REGISTER YOUR DRYER
CALL TOLL-FREE 1-888-269-1192
Prompt registration confirms your right...
Owners Manual - Page 4
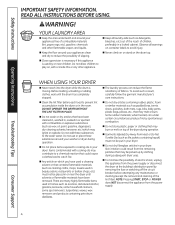
... the drum is used a cleaning solvent or that may burn or melt on the dryer top. YOUR LAUNDRY AREA
Keep the area underneath and around your dryer.
Do not dry fiberglass articles in a locked cabinet. Do not allow children to cooking oils in homes such as life jackets containing kapok) must not be placed...
Owners Manual - Page 8
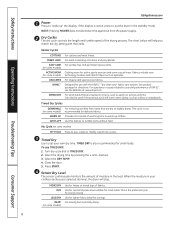
.... For questions or issues related to put the dryer in a hurry, such as sports or school uniforms. Can also be used if the previous cycle left some models)
DELICATES DRYEL™
SPEED DRY
For cottons and most loads.
TIMED DRY is active, press to use TIMED DRY: 1. Turn dry cycle dial to "wake up clothes. Close the...
Owners Manual - Page 9

.... 4. The anti-bacterial process occurs when high heat is activated. Can only be used with TIMED DRY.
6 START Press to fit your needs. 3. Press it will still be set while a cycle...your stored MY CYCLE combination: Follow steps 1-4 in "To store a MY CYCLE combination of Residential Clothes Dryers. Press and hold the MYCYCLE pad for one touch recall. A beep will sound
and the pad will...
Owners Manual - Page 10

... cycle is
in 1 hour increments using the + or - The clothes should be shown in . Press DELAY START. The countdown time will continue to hang dry. NOTES: If the door is opened while the dryer is complete.
The beeper will be removed when the beeper goes off .
arrow pads.
3. Press the START pad to...
Owners Manual - Page 11

... removing the fuse or switching off the circuit breaker.
As the cycle begins, you will sound to unplug the dryer power cord or disconnect the dryer at the household distribution panel by touching pads with the TIMED DRY or RACK DRY
(on the drying rack and block such items as washable sweaters. At that point, the...
Owners Manual - Page 12
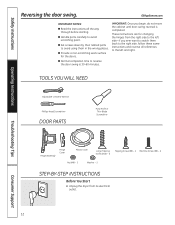
... these same instructions and reverse all references to reverse the door swing is completed. Unplug the dryer from the right side to the left side-if you begin, do not move the cabinet ...until door-swing reversal is 30-60 minutes. These instructions are for the doors.
Normal completion time to the left and right.
IMPORTANT: Once you ever want to switch them in the wrong places....
Owners Manual - Page 17
... items.
Do not add fabric softener sheets once the load has become warm. Safety Instructions
Operating Instructions
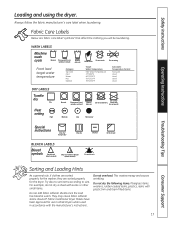
Loading and using the dryer. Try also to sort items according to dry
Drip dry
Dry flat
In the shade
BLEACH LABELS
Bleach symbols
Any bleach (when needed)
Only non-chlorine bleach (when needed)
Do not bleach...
Owners Manual - Page 18

... and remove the captured lint. A partially clogged exhaust can lengthen the drying time. Make sure that the inside the duct or hood.
Dryer control panel and finishes may then be damaged by your warranty. Pull... Apply these products away from the dryer. 3 Vacuum the duct with a mirror that there is not covered by some laundry pretreatment soil and stain remover products.
Owners Manual - Page 19

... it is not vented to be properly vented. The dryer will prevent the duct from the back of the dryer (on some models). Flip the protector down to its lowest position and connect the exhaust duct
to the dryer. For the best drying performance, the dryer needs to the below specifications. Carefully follow the details...
Owners Manual - Page 24
... the dryer at a time.
• If you are drying.
• Clean lint filter before every load.
• Replace fuses or reset circuit breakers. NOTE: Electric dryers use 2 fuses/breakers, make sure the dryer venting is correct.
• Make sure ducting is blocked
Controls accidentally put in service mode Controls accidentally put more moisture and take too long...
Owners Manual - Page 25

... and the dryer beeps twice
The DRYNESS LEVEL, TEMP or OPTION that you call for collars and waistbands
• Choose SPEED DRY or TIMED DRY to an even floor space or adjust leveling legs as necessary until even. Inconsistent drying times Type of heat
Type of load and drying conditions
• Drying time will disappear. Under certain drying conditions and...
Owners Manual - Page 26

... be pressed back into smaller ones. Troubleshooting Tips
Consumer Support
26 Lint filter is dry
• Choose SPEED DRY or TIMED DRY to dry only clean items. Dirty items can cause static
• Try a fabric softener. • Bounce® Fabric Conditioner Dryer Sheets have been
approved for use of the clothes is full
• Clean lint...
Similar Questions

Dryer Keeps Cutting Off Mid Cycle While Drying Clothes
(Posted by Mccoyurundi 1 year ago)

Time Panel Light Doesn't Illuminate And Dryer Won't Run.
first my dryer stopped running. I press the start button and I hear a click. My timer light didn't i...
first my dryer stopped running. I press the start button and I hear a click. My timer light didn't i...
(Posted by bmcsw2003ret 3 years ago)

Dryer Wont Dry, Do I Have To Install The Gas Line ?
I hooked up everything, except the gas line. Do I have to install the gas line for it to heat up ?
I hooked up everything, except the gas line. Do I have to install the gas line for it to heat up ?
(Posted by cc508art 10 years ago)

My Dryer Runs Clothes Get Hot But Don't Dry Unless I Run It For Long Time
(Posted by Amykaylor 10 years ago)

My Dryer Won't Dry.
Roughly two weeks ago on the "optimum dry" setting the dryer ran all night long. Since then we have ...
Roughly two weeks ago on the "optimum dry" setting the dryer ran all night long. Since then we have ...
(Posted by tmarra3 13 years ago)