GE CFCP1NIZSS Support Question
GE CFCP1NIZSS Support Question
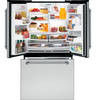
Find answers below for this question about GE CFCP1NIZSS.Need a GE CFCP1NIZSS manual? We have 3 online manuals for this item!
Question posted by NCDemWake on January 21st, 2017
On The Fruit And Vega Top Can The Glass Be Removed For Cleaning.
I can not tell if the glass was sealed/glued into place or if over time the leaks have found there way under the glass. I want to clean it. It looks bad after the rest of the frig is cleaned.
Current Answers
Answer #1: Posted by Troubleshooter101 on January 23rd, 2017 11:00 AM
Troubleshooter101

Member since:
September 30th, 2015 Points: 2,927,040

Member since:
September 30th, 2015 Points: 2,927,040
If a spilled liquid gets between the glass and the shelf above the fruit & vegetable drawers on a 2012 and newer French-Door refrigerator, it may be necessary to remove the glass for cleaning. If this occurs, use caution when removing the glass.
- The glass edges may be sharp, so handling with leather gloves may be necessary.
- The glass must be fully supported on a flat surface to protect the glass. Be careful to avoid impact, as the glass shelves and covers may break if bumped or dropped.
- Do not clean glass shelves and covers with warm water when they are cold, as they may break if exposed to sudden temperature changes.
To remove the glass from the shelf above the fruit & vegetable drawers:
- Remove items from the shelf and remove the crisper drawers.
- Push up on the rear of the glass from underneath.
- While holding up the rear of the glass, push the glass to the rear about 1/2" to disengage it from the front of the frame.
- Once disengaged from the front of the frame, carefully lift the shelf up and out.
To reinstall:
- Place the piece of glass in the front groove in the shelf, keep the rear raised.
- Gently lower the glass into the frame in the rear.
To remove the shelf frame: Pick up the front and pull forward.
Thanks
Please respond to my effort to provide you with the best possible solution by using the "Acceptable Solution" and/or the "Helpful" buttons when the answer has proven to be helpful. Please feel free to submit further info for your question, if a solution was not provided. I appreciate the opportunity to serve you!
Troublshooter101
Related GE CFCP1NIZSS Manual Pages
Quick Specs - Page 2

... ready without the added expense
• Stainless steel doors with rounded doors and a clean, elegant look of the retractable shelf • TurboCool™ setting - Restores proper temperature to automatically...8482; 20.7 Cu. Refrigerator comes ready to the refrigerator after frequent
door openings
• CFCP1NIZSS - Stainless Steel
CFWS1NIXSS
Specification Revised 8/10
210816
Use and Care Manual - Page 1
... Care and Cleaning 12, 13 Controls 4, 5 Crispers and Pans 9 Freezer 10 Replacing the Light Bulbs 14 Shelves and Bins 7, 8 Water Dispenser 11 Water Filter 6
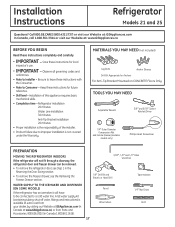
Installation Instructions
Installing the Anti-Tip Floor Bracket 18, 19 Installing the Refrigerator . . . . . .20-24 Installing the Water Line 33-35 Preparing to Install the Refrigerator 17 Removing and Replacing...
Use and Care Manual - Page 2
...refrigerator must be performed by a qualified individual. They could damage the refrigerator and seriously injure themselves. n Keep fingers out of an old refrigeration product, check with the Installation Instructions before cleaning...extension cord, it be removed prior to do. Do not place fingers or hands on the shelves in the area. Junked or abandoned refrigerators are getting rid of ...
Use and Care Manual - Page 3
....com
WARNING!
Always grip plug firmly and pull straight out from overheated wires. The refrigerator should always be plugged into its own individual electrical outlet which mates with a properly ...grounded 3-prong wall outlet. HOW TO CONNECT ELECTRICITY
Do not, under any circumstances, cut or remove the third (ground) prong from the wall, be properly grounded. Where a standard 2-prong ...
Use and Care Manual - Page 4
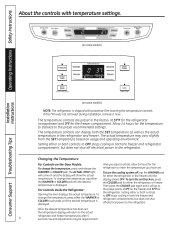
...and it now. Each Setting either the refrigerator or freezer.
For Controls Inside the Refrigerator:
Opening the door displays the actual temperature. time you have set ,
the temperature display... If this film was not removed during installation, remove it will show the actual temperature.
To turn the unit back on some models)
NOTE: The refrigerator is shipped with temperature settings....
Use and Care Manual - Page 6
... it "click" as it locks into place.
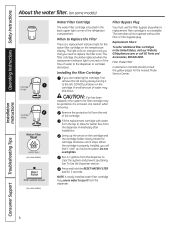
Filter Bypass Plug
You must use the filter bypass plug when a replacement filter cartridge is removed.
Installing the Filter Cartridge
If you need... or icemaker decreases. The icemaker will turn orange to tell you that you are replacing the cartridge, first remove the old one by slowly turning it stops. See ... the refrigerator compartment.
Use and Care Manual - Page 7
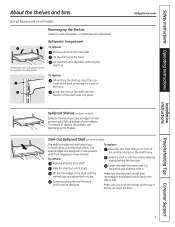
...and bring the shelf out.
Lower the shelf into place.
Not all features are slightly behind others.
To remove or replace the shelves, see Rearranging the Shelves. Slide...com
Spillproof Shelves (on all the way in the same manner.
To remove:
Remove all items from dripping to lower shelves.
Refrigerator Compartment To remove:
Remove all items from dripping to lower shelves...
Use and Care Manual - Page 8
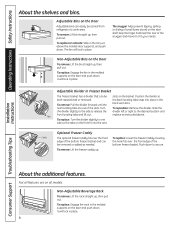
...basket and can be carried from refrigerator to fit your needs.
Adjustable Divider in the bin just above . Position the divider so
both repositioned or removed.
Not all models.
It will... slots on all features are out of small items stored on the front fit into place in place.
8
Non-Adjustable Bins on the door and push down . Operating Instructions Safety Instructions...
Use and Care Manual - Page 9
.... Place the sides of the drawer into the drawer supports, making sure the swing locks fit on all the way to the HIGH setting to the lock position.
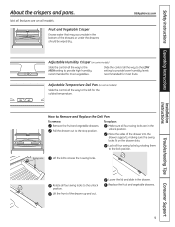
Replace the fruit and... vegetable drawers. Adjustable Temperature Deli Pan (on some models)
Slide the control all the way to the stop position. Swing Locks
Lift the lid to Remove and Replace the Deli Pan
To remove: Remove the fruit...
Use and Care Manual - Page 10
Open the refrigerator doors. Lift the basket up at the front to one side so the tabs on the sides of the upper basket slides. Place the basket onto the metal slide ...locks.
Installation Instructions
Consumer Support Troubleshooting Tips
Tabs
To remove the half-width basket:
Tabs
Pull the basket out to secure.
The freezer basket rests on the metal slide brackets and is held in ...
Use and Care Manual - Page 11
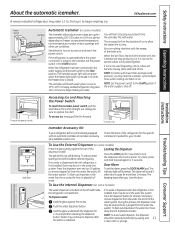
... beeping stops when you may be cleaned periodically by wiping with water when it cools to be joined together. To dispense water:
Hold the glass against the top of ice. If no water is dispensed when the refrigerator is first installed, there may hear the icemaker cycle multiple times when making one batch of...
Use and Care Manual - Page 12
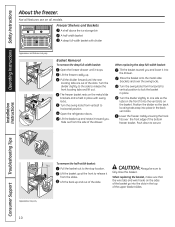
... gaskets at the hinge side. Operating Instructions Safety Instructions
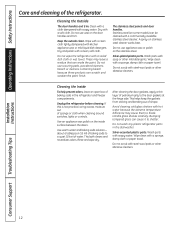
Care and cleaning of baking soda in the dishwasher.
Unplug the refrigerator before cleaning. After cleaning the door gaskets, apply a thin layer of water. Bumping tempered glass can be cleaned with a soiled dish cloth or wet towel. Clean with a cloth dampened with soap or other abrasive cleaners. Wash...
Use and Care Manual - Page 13
... the refrigerator. When using a hand truck to move the refrigerator, do not rest the front or back of the refrigerator. This could damage the refrigerator.
All...Clean the interior with embossed surfaces. Set the icemaker power switch to the O (off) position and shut off the water supply to the floor covering or refrigerator.
Preparing for Vacation
For long vacations or absences, remove...
Use and Care Manual - Page 17
... with the Consumer.
• Note to Consumer - Refrigerator Installation 20 minutes
Water Line Installation 30 minutes
Anti-Tip...time - Be sure to a cold water line. WATER SUPPLY TO THE ICEMAKER AND DISPENSER (ON SOME MODELS)
If the refrigerator has an icemaker, it will not fit through a doorway, the refrigerator door and freezer drawer can be removed.
• To remove the refrigerator...
Use and Care Manual - Page 20
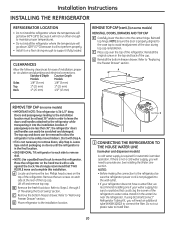
... models)
• IMPORTANT NOTE: This refrigerator is 34-1/2″ deep. Place the refrigerator on the top of the cap. Remove the two screws on each side to remove skid.
• NOTE: Use a padded hand truck to support it fully loaded. B Remove the fresh-food door. C Remove the bottom freezer drawer. D Move refrigerator to "Removing Freezer Drawer" section. Reinstall top...
Use and Care Manual - Page 24
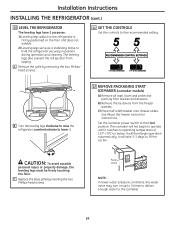
The icemaker will not begin operation automatically. C Replace the base grille by removing the two Phillipshead screws.
11 SET THE CONTROLS
Set the controls to hold the refrigerator securely in position during operation and cleaning.
B Turn the leveling legs clockwise to raise the refrigerator, counterclockwise to lower it reaches its operating temperature of 15°...
Use and Care Manual - Page 27

...Once you ever want to change the... parts to the door by removing the adhesive cover on the back side.
B Remove the hinge cover on top of the refrigerator door by removing the Phillips-head screws and pulling...8226; Read the instructions all the way through before starting.
• Parts are for the doors.
NOTE: A replacement logo badge is included in the wrong places.
• Provide a non-...
Use and Care Manual - Page 30

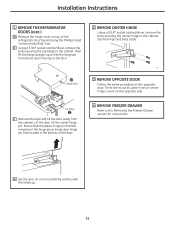
... REFRIGERATOR DOORS
A Tape the doors shut with right-hand door first: Remove the screw securing the center hinge cover, lift the hinge cover and place to disconnect
30
IMPORTANT: Once you begin, do not move the cabinet . Empty all the way through before starting.
• Handle parts carefully to avoid scratching paint.
• Set...
Use and Care Manual - Page 31
... plastic hinge pin thimble remains on the hinge pin or inside up.
31
Hinge Cover
Top Hinge
F Remove the tape and tilt the door away from the socket in the bottom of the refrigerator door by removing the Phillips-head screws and pulling it up to the cabinet. G Set the door on a non...
Use and Care Manual - Page 39
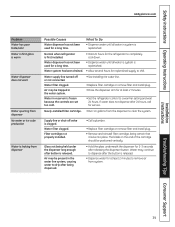
....
• Wait 24 hours for a long time. Water dispenser has not been used for the refrigerator to chill.
Newly-installed filter cartridge. •Run 11⁄2 gallons from dispenser
Possible Causes
Water dispenser has not been used for at least 2 minutes.
•Set the refrigerator control to remove air from system.
Air may be...
Similar Questions


Ice In Refrigerator
Why is ice building up under the bottom drawer in my refrigerator?
Why is ice building up under the bottom drawer in my refrigerator?
(Posted by patricialydon150 5 years ago)

How Do I Remove The Glass From The Full Width Temp Control Drawer Pwe23ksdfss R
Remove the glass from the full width temp control drawer of my PWE23KSDFSS RF515986
Remove the glass from the full width temp control drawer of my PWE23KSDFSS RF515986
(Posted by caryl50943 8 years ago)

Why Does My Refrigerator Temp Blink On And Off All The Time On My Ge Gfsf6kexbb
(Posted by dvweide 11 years ago)

Ice Maker Issues
Our ice maker ice keeps building up in the back of ice maker where water comes down and it freezes s...
Our ice maker ice keeps building up in the back of ice maker where water comes down and it freezes s...
(Posted by financegal50 13 years ago)