GE A1250 Support Question
GE A1250 Support Question
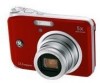
Find answers below for this question about GE A1250 - Digital Camera - Compact.Need a GE A1250 manual? We have 5 online manuals for this item!
Question posted by Anonymous-16114 on June 5th, 2010
When Taken Photo How Do You Get Rid Of Writeing Of Screen
The person who posted this question about this GE product did not include a detailed explanation. Please use the "Request More Information" button to the right if more details would help you to answer this question.
Current Answers
Related GE A1250 Manual Pages
User Manual (English) - Page 6

... quickly and easily. Extreme environments may be taken while operating the camera.
Wipe the camera with instructions on how to use your camera or damage the batteries.
• Do not use abrasive cleansers, alcohol-based, or solvent-based cleaners to ensure that the contents of your GE digital camera.
Indicates the precautions to be damaged.
•...
User Manual (English) - Page 26

... two types of zoom: optical zoom and digital zoom.
Compose your picture on your photos for best results. Using the zoom function
Your camera is in focus, the green colored focus
frame appears on the center of the camera to zoom in or out on the LCD screen and press
the shutter button halfway to...
User Manual (English) - Page 32
...Please refer to page 30 for a list of recorded pixels becomes smaller, you to the various GE digital camera models.
3. As the number of image sizes that are available to print that image in pixels. ...Use the Up/Down navigation buttons to record more frames on the screen. Press the
28
button to enter the Function menu. 2. Press the button to confirm your ...
User Manual (English) - Page 45

... shot is taken, the camera will make a calculation and two icons will commence automatically.
4. Use "Stitching Mode" selected from the Menu. Turn the mode dial to playback mode to finish manual stitching. 3.
You can use this image to compose your first view on the LDC screen. Once they appear, move the camera and the...
User Manual (English) - Page 48

While in a photo so that the faces will be as clear as possible.)
3. Press Shutter fully to start the face detection process. Face Detection
The Face Detection mode will detect faces of the subject should be relatively large on the LCD screen, and the subject should be facing the camera as front on as...
User Manual (English) - Page 49

... is in order for the subject to occupy most of the screen space.
45 The camera will automatically release the shutter and capture the photo.
4. Note: • A face must be framed to smile.
3.
This icon indicates that the camera is detected and bracketed by the camera in Smile Detection mode.
2. When the subject smiles, the...
User Manual (English) - Page 50

...screen space.
46
Note: • For optimal results, the subject should be framed to confirm the setting and exit the menu.
5. Use the Right navigation buttons to select "Blink detection" setting.
3. The "Blink detection" indicator appears on by default, and after taking each photo...4. Press the shutter button fully to enter the Photo menu.
2. Blink Detection
The Blink Detection feature ...
User Manual (English) - Page 51

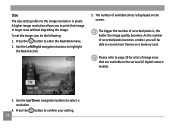
...select a program button and press the button to enter the movie playback mode. Turn your camera to scroll through the photos or video clips stored in the following.
12 3 45 6 7
1 Exit 2 Play ...3 Slow motion 4 First frame
5 Previous frame 6 Next frame 7 Edit Movie
47 The last recorded photo or video clip is described in the internal memory or memory card.
3. The function of each button is...
User Manual (English) - Page 55

... to pan across the image. 6. The
zoom indicator and pan box appear on the screen.
5.
Movie images cannot be used during playback. Using zoom playback (for still pictures...Use the navigation buttons to the Tele position
( ) once. 4. This allows you to magnify photos up to Playback mode. 2. Turn your camera to 8X.
1. Press the button to return the image to magnify. 3. Use the Left...
User Manual (English) - Page 56

... to delete. 3. The indicator appears if the picture has a sound file attached. Then press the button to Playback mode. 2.
The Delete screen appears.
4. To delete a photo or video:
1. Turn your camera to confirm. You can choose to delete the attached sound file alone or to delete both the picture and the sound file...
User Manual (English) - Page 60
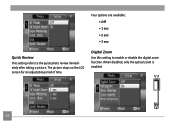
When disabled, only the optical zoom is enabled.
56 Digital Zoom
Use this setting to the quick photo review immediately after taking a picture. Four options are available: • Off • 1 sec • 2 sec • 3 sec
Quick Review
This setting refers to enable or disable the digital zoom function. The picture stays on the LCD screen for an adjustable period of time.
User Manual (English) - Page 68
... wheel and navigation buttons to
adjust the trimming box to fit the location and size of the photo you want to crop and have it as a new photo. The following information will be displayed on the screen: histogram display, aperture value, shutter speed, exposure value, image size, image quality, and ISO value. (Please...
User Manual (English) - Page 71

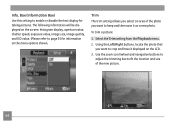
....
4. Select the Red-eye removal setting from the Playback menu as possible, and the red eyes should be facing the camera as front on the LCD screen, the subject should be removed.
3. Press the button to remove red-eye effect in your photos.
1. Red-eye removal Use this setting to confirm the setting.
User Manual (English) - Page 74
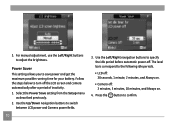
...3. For manual adjustment, use the Left/Right buttons to switch
between LCD power and Camera power fields.
70
3.
Use the Up/Down navigation buttons to adjust the brightness. ...Setup menu
as described previously. 2. Use the Left/Right navigation buttons to turn off the LCD screen and camera automatically after a period of inactivity. 1. Follow the steps below to specify the idle period ...
User Manual (English) - Page 75

The world time screen appears. 2. Use the Up/Down navigation buttons to confirm.
Then press the
button to switch between the hometown ( ) and travel destination ( ) fields. 3. Date/Time See "Setting the Date and Time" section on your overseas trips. File Numbering After capturing photos or videos, the camera will automatically save the file with...
User Manual (English) - Page 76
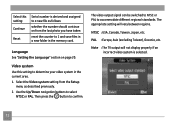
... properly if an incorrect video system is derived and assigned to a new file as described previously. 2. Select the Video system setting from the last photo you have taken
reset the counter to 1 and save files in a new folder in the current area. 1.
Use the Up/Down navigation buttons to confirm. NTSC : USA...
User Manual (English) - Page 83

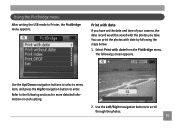
Connecting to a PictBridge compatible printer
PictBridge allows printing images from a memory card in a digital camera directly to confirm the setting.
Setting the USB mode
Since the camera's USB port can print the captured photos directly with a Printer.
1.
Every time the camera is correctly configured to PC mode.
79 Press the button to a printer, regardless of brand...
User Manual (English) - Page 85
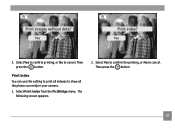
...following the steps below.
1. You can print the photos with date by following screen appears. Print with date
If you have set the date and time of your camera, the date record would be saved with date from ... setting.
2. Use the Left/Right navigation buttons to enter. Select Print with the photos you take.
Use the Up/Down navigation buttons to select a menu item, and press the Right ...
User Manual (English) - Page 87
5. Then press the button.
83 Select Yes to confirm printing, or No to cancel. Then press the button. Select Yes to confirm the printing, or No to cancel. Select Print index from the PictBridge menu.
Print index You can use this setting to print all indexes to show all the photos currently in your camera. 1. The
following screen appears.
2.
User Manual (English) - Page 88

...camera and printer.
2. The "Remove USB cable" message will be displayed.
Select Yes to confirm the printing, or No to cancel. Then press the button.
84 The following screen appears. Print DPOF (Digital... Print Order Format) To use DPOF printing, you must make the selection of photos for printing using the DPOF settings before...
Similar Questions


How Do You See The Pictures You've Taken On A G.e Digital Camera Model A1455
(Posted by luckyirishman 9 years ago)

I Have A Ge A735 And I Am Having Trouble Switching The Display Mode.
it will only stay on camera mode. it will not give me the option to view the taken pictures or switc...
it will only stay on camera mode. it will not give me the option to view the taken pictures or switc...
(Posted by dksaluckey 12 years ago)

Camera Display Screen Is Black In Picture Taking Mode. Pictures Come Out Black.
Everything appears to be working the shutter, flash etc. But I am not able to take pictures, they co...
Everything appears to be working the shutter, flash etc. But I am not able to take pictures, they co...
(Posted by Alisamied 13 years ago)

Write Protect Keeps Appearing On Screen, When Camera Is Turned On.
(Posted by esand01 13 years ago)