
Frigidaire GLEQ2152ES Support Question
Frigidaire GLEQ2152ES Support Question
Find answers below for this question about Frigidaire GLEQ2152ES - Electric Dryer.Need a Frigidaire GLEQ2152ES manual? We have 4 online manuals for this item!
Question posted by jmaue360 on September 6th, 2010
Load 'thumping' Noise During Operation.
As the drum rotates there is a loud thumping noise during the entire drying cycle. I removed a large dried clup of lint at the entrance to the fan (I think) but the thump is still there. We clean the filter with each ;oad so where is the lint buildup coming from and what is the correct procedure to remove the front panel so I can visually examine the fan/lint/noise problem? There is a slight vibration but the drum seems to be rotating properly.
Current Answers

Related Frigidaire GLEQ2152ES Manual Pages
Use and Care Manual - Page 2

......2
Important Safety Instructions...2-4 Drying Procedures...4 Features...5 Care and Cleaning...5-6 Common Drying Problems...6 Avoid Service Checklist...8226; Do not try to hazards that this or any electrical switch;
Follow the gas supplier's instructions. • If...and Care Guide, Operating Instructions, Installation Instructions and on the dryer • Operation
serial plate located...
Use and Care Manual - Page 3

.... The interior of fire, electrical shock, or injury to an exhaust outdoors. See Care and Cleaning. • Do not operate the dryer if the lint screen is used near children. As children grow, teach them for play on product labels. • Before the dryer is unpacked. SAVE THESE INSTRUCTIONS
3
Printed in inefficient drying and possible fire. Failure...
Use and Care Manual - Page 4

... Fill dryer drum 1/3 to persons, read and follow fabric care labels and laundry product labels.
To reduce the risk of similar fabric, weight and construction in the dryer for drying. • Dry items of fire, electrical shock, or injury to 1/2 full.
• Follow the guidelines below for preparing the load for drying. • Read the Operating Instructions for easy removal.
2. If...
Use and Care Manual - Page 5

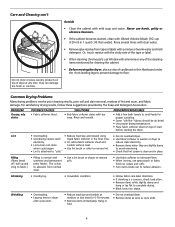
... and Cleaning
Clean lint screen after every load. End of Cycle Signal A signal will come on changing the door. Place the front bar under the lip of the rack. The screen is opened to illuminate the dryer drum during Extended Tumble at the volume level selected. (some models) Drum Light (some models) Use the drying rack to avoid electrical shock...
Use and Care Manual - Page 6
....
6 Wrinkling
• Overloading. • Leaving items in washer or dryer to
electricity.
• Or, add a fabric softener sheet and
reduce static electricity.
• Lint screen not clean
tumble without heat.
• Remove items when they are slightly damp
when cycle began.
• Use lint brush or roller to remove lint. Never use Windex with a mixture of warm water and mild...
Use and Care Manual - Page 7

... to the dryer.
Dryer is not covered by the warranty.
7 Drum damage caused by foreign objects or permanently attached items is overloaded.
Drying time will not operate.
Drying temperature too high.
Drying cycle takes too long, outside of items.
See Drying Procedures.
Use a dehumidifier near the dryer.
Make sure electrical line is not overloaded and the dryer is not...
Technical Data Sheet - Page 1

Position cycle selector knob to HIGH HEAT and touch START. Immediately after, press and hold the START and Pause Cancel buttons simultaneously for the second digit. On better model dryers, the error code will flash four times indicating the 4. On good models, the five indicator lights of Drying, Cool Down, Wrinkle Rid, and Clean Lint Filter Spin...
Technical Data Sheet - Page 2
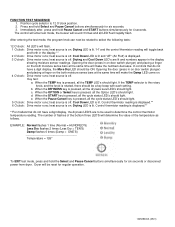
...cycle status LED's should light. heat source is off . Control thermistor reading is lit. Drying LED is displayed.** 6 O'clock: Drive motor runs; Dryer... Select and Pause Cancel buttons simultaneously for regular operation.
134509400A (0501) Drying LED is displayed. 3 O'clock: Drive motor...source is lit. e. Control thermistor reading is rotated, there should light. 5 O'clock: Drive ...
Installation Instructions - Page 2

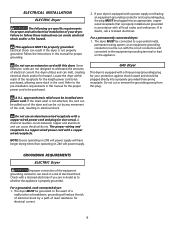
... call the fire department. Carpenter's level. 4. Duct tape. 6. ELECTRICAL REQUIREMENTS
ELECTRIC Dryer
CIRCUIT -
For your safety the information in this or any other ...remove grounding prong from a neighbor's phone. do not use with clothes dryers. Installation and service must be located so the power supply cord is accessible when the dryer is equipped with clothes dryers...
Installation Instructions - Page 3

.... Do not allow combustible materials (for proper and safe operation of water column, the system is too restrictive and the installation is not exhausted outdoors, some fine lint will increase dryer times. Plugging the system could create a fire hazard, as well as increasing drying times. Do not screen the exhaust ends of the vent...
Installation Instructions - Page 4

...and cleaned a minimum of the door, is required.
LOCATION OF YOUR DRYER
DO NOT INSTALL YOUR DRYER: ... your dryer in vent restriction. • Running the exhaust system through your dryer to the dryer.
6. However, on electric dryers, exhausting... vertical through a roof may cause condensation and faster accumulation of lint. • Compression or crimping of the gas supply connection to...
Installation Instructions - Page 5
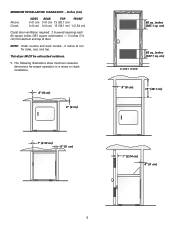
... square inches (387 square centimeters) - 3 inches (7.6 cm) from bottom and top of door. This dryer MUST be exhausted outdoors.
5. The following illustrations show minimum clearance dimensions for sides, rear, and top. ...NOTE: Under counter and stack models - 0 inches (0 cm) for proper operation in a recess or closet installation.
0" (0 cm)
0" (0 cm)
1" (2.54 cm)
0" (0 cm)
60 sq. cm)
60 sq...
Installation Instructions - Page 6

... (70.49cm) 28.5 to clear door handle (72.39cm)
2.375" (6.03cm)
(34.29cm) 13.5" To rear & base exhausts
27.0"
(68.58cm)
Stacked Dryer Installation Dimensions
(68.58cm) 27.0"
Electrical supply on rear of unit
28.25" to front of cabinet(71.76cm)
28.75" to clear knobs (73.03cm) 29.5" to clear...
Installation Instructions - Page 7
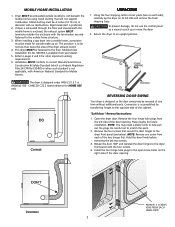
...open screw holes on its left side of the door opening . NOTE: Remove one screw from your dealer.
5. When installing a gas dryer into a mobile home, a provision must be reversed at any time without ...6. This provision is available from each side), carefully lay the dryer on the right side of the dryer exhaust outlet.
4. Rotate the door 180° and reinstall the door hinges to an ...
Installation Instructions - Page 9
...remove the grounding prong from this dryer.
The proper wiring and receptacle is not properly grounded. NOTE: Dryers operating on 208 volt power supply will reduce the risk of electrical...longer drying times than operating on the appliance. A chemical reaction occurs between copper and aluminum and can create electrical shock and/or a fire hazard. GROUNDING REQUIREMENTS
ELECTRIC Dryer
...
Installation Instructions - Page 10
...
BLACK TIGHTEN
NUT
WHITE
TO THESE THREADS
NUT
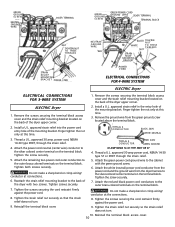
STRAIN RELIEF MOUNTING BRACKET
STRAIN RELIEF MOUNTING B R A C K E T POWER CORD
POWER CORD
ELECTRICAL CONNECTIONS FOR 4-WIRE SYSTEM
ELECTRIC Dryer
ELECTRICAL CONNECTIONS FOR 3-WIRE SYSTEM
ELECTRIC Dryer
1. Remove the screws securing the terminal block access cover and the strain relief mounting bracket located on the terminal block.
Installation Instructions - Page 11

... to light.
6. conversion kit must be applied when installing, operating and maintaining any appliance. NEVER test for future reference.
If this dryer are needed for your dryer, contact the source where you purchased your Use and Care Guide before making another attempt to children.
Remove the shipping cap from gas supply line to be...
Operating Instructions - Page 1
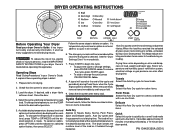
... steps to Towels, Bulky, Normal, Perm Press, Sport and Delicate cycles. Clean the lint screen after every load.
Auto Dry Applies to delete an option. Auto Dry cycles take the guesswork out of the load as it tumbles through heated air. The dryer senses the moisture level of drying time. This helps reduce wrinkling and makes items easier to persons...
Operating Instructions - Page 2
...remembered each cycle.
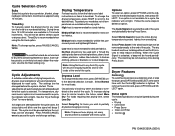
Cycle Adjustments
A suitable combination of the cycle. The cycle must be removed promptly at the end of drying temperature, dryness level and options will not light.
Occasionally a load may seem too damp or overdried at the end of the cycle and periodically during the cycle: • Drying • Cool Down • Press Saver • Clean Lint Filter •...
Operating Instructions - Page 3
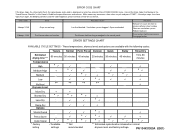
..., please contact service for the possible cause and solution. Dryer overloaded. wash lint filter to 90 minutes
*
More Dry
Normal Dry
*
*
*
Less Dry
*
Damp Dry Options
Shrink Guard
Press Saver
Cycle Signal * Factory
setting
*
Available settings
*
*
*
** Not recommended
*
*
*
*
*
*
*** Estimated cycle duration is displayed, an error has occured.
These temperatures...
Similar Questions

Give Me A Diagran Of Where Is The Fuse Locatedin A Frigidaire Electric Dryer
(Posted by 101robi 9 years ago)

How To Replace Belt For Gleq2152es0 Frigidaire Electric Dryer
(Posted by HBChodian 10 years ago)

Frigidaire Electric Dryer Fer641fs. No Heat. Timer Not Advancing.
My electric dryer has no heat and the timer is not advancing like it suppose to. It just keeps spinn...
My electric dryer has no heat and the timer is not advancing like it suppose to. It just keeps spinn...
(Posted by mouatech 10 years ago)

Fridgidaire Electric Dryer Model Fase703lwo Not Starting
Our dryer is not starting and reads door open. An error code did appear however disappeard and has n...
Our dryer is not starting and reads door open. An error code did appear however disappeard and has n...
(Posted by juliemccleskey 11 years ago)

Frigidaire Gleq2152es Electric Dryer Runs A While, Heats On Then Stops After 10m
(Posted by thespen691 14 years ago)