
Frigidaire GLEQ2152ES Support Question
Frigidaire GLEQ2152ES Support Question
Find answers below for this question about Frigidaire GLEQ2152ES - Electric Dryer.Need a Frigidaire GLEQ2152ES manual? We have 4 online manuals for this item!
Question posted by GinaL on May 24th, 2013
How Do You Replace The Fuses For A Frigidaire Gleq2152es
Could someone please tell me where to find the fuses and how to change them my dryer runs but does not heat
Current Answers
Answer #1: Posted by OnlineOutreachSpecialist on May 29th, 2013 7:24 AM
OnlineOutreachSpecialist

Member since:
March 30th, 2011 Points: 2,848,320

Member since:
March 30th, 2011 Points: 2,848,320
Hello GinaL - Generally speaking, the thermal fuse is typically located in the back panel towards the left near the blower wheel housing inside the rear panel to the exhaust duct. However, keep in mind that the unit may possibly have a faulty heating coil/element. Due to liability and safety reasons it is very rare to find enough information to do it yourself. Typically this is something that you want a certified professional to repair, remove, or install. Consider contacting your manufacturer for more details on who in your area can properly guide you through this process.
Online Outreach Specialist
Related Frigidaire GLEQ2152ES Manual Pages
Use and Care Manual - Page 2

... and the word "DANGER" or "WARNING". All safety messages will identify the hazard, tell you how to the applicable collection point for the recycling of electrical and electronic equipment. You can happen if the instructions are found on the dryer • Operation
serial plate located of the left side of the door opening...
Use and Care Manual - Page 3

... a drying rack, always replace the lint screen when finished using this way ONLY
Important Safety Instructions Con't
Avoid fire hazard or electrical shock. A clothes dryer produces combustible lint. Protect Children • Do not allow children to cooking oils in U.S.A.
Some rubber materials, when heated, can occur.
Do not store these areas could ignite or...
Use and Care Manual - Page 4

... 1/3 to the dryer: - Hazardous fumes or electrical shock could result in serious personal injuries. Wait until the dryer has stopped completely before operating this Owner's
Guide. All repairs and servicing must replace the thermal limiter switch after correcting the fault. • Failure to persons, read and follow fabric care labels and laundry product labels. Do...
Use and Care Manual - Page 5

... is opened to be tumble dried. 1.
Remove by pulling straight up may form on changing the door. Dry thoroughly and replace. Features
Place the front bar under the lip of the lint screen opening . Reversible Dryer Door Your dryer is located at the bottom of the rack. Place the front bar under the lip...
Use and Care Manual - Page 6
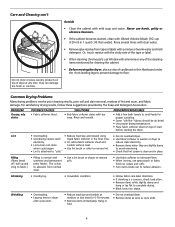
Care and Cleaning con't
Do not store or place laundry products on top of warm water and mild detergent.
Outside
• ... fabric softener in place. This is clean and in washer or dryer to
electricity.
• Or, add a fabric softener sheet and
reduce static electricity.
• Lint screen not clean
tumble without heat.
• Remove items when they are slightly damp
when cycle ...
Use and Care Manual - Page 7

... been a utility interruption of the drum. Electric dryer is connected to make sure supply valve is not open . High humidity. Drying time will not operate.
See Drying Procedures.
or buttons are inside of natural gas (gas models).
It may be clogged or restricted.
Thermal limiter tripped.
Replace fuse. Drying cycle takes too long, outside...
Technical Data Sheet - Page 1

... or its wiring is
Circuit
open . Heater Fault (no heat, restricted vent, blower fan blade broken or loose, dryer installed in a period of control thermistor has not changed in the Product for a number higher than nine.
If reading is not 50 K (± 10%), replace thermistor. Reconnect power and measure voltage drop between EEPROM and...
Technical Data Sheet - Page 2
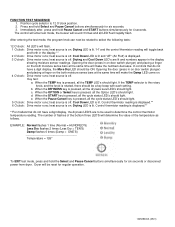
... and hold Pause Cancel and START buttons simultaneously for six seconds or disconnect power from dryer.
Drying LED is displayed.** 6 O'clock: Drive motor runs; heat source is pressed, all the dryness level LED's should light. 5 O'clock: Drive motor runs;
Opening the door (press in on door switch plunger) and placing a finger on . 4 O'clock: Drive...
Installation Instructions - Page 2

..., 240 volt, single phase, 60 Hz, Alternating Current. Vent hood. 8. branch circuit fused with clothes dryers.
Rigid or flexible metal 4 inch (10.2 cm) duct. 7. The dryer is in the installed position.
If being installed in U.S.A. See ELECTRICAL CONNECTIONS for Installation: 1. ELECTRICAL REQUIREMENTS
ELECTRIC Dryer
CIRCUIT - WHAT TO DO IF YOU SMELL GAS · Do not try to...
Installation Instructions - Page 3

...hood and the ground or any area of plastic duct or metal foil duct, replace it must be used to installing dryer duct. The system back pressure MUST NOT be expelled into a chimney, a...well as increase drying times.
All male duct pipe fittings MUST be exhausted into the laundry area. When the dryer stops, the dampers automatically close to the outside of 18 inches (45.7 cm) above...
Installation Instructions - Page 4

...electric dryers, exhausting can be constructed of stainless steel or plasticcoated brass.
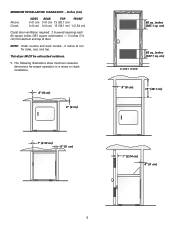
4. EXHAUST DUCT LOCATING DIMENSIONS
SAME AS OTHER SIDE
3 3/4" (9.5 cm)
5 7/8" (15 cm)
13 1/2" (34 cm)
4 3/8" (11 cm) 3 3/4" (9.5 cm()9.5 cm)
GAS SUPPLY REQUIREMENTS
Replace... restriction. • Running the exhaust system through your parts distributor. EXHAUST DIRECTION All dryers shipped from the gas...
Installation Instructions - Page 5
...)
1" (2.54 cm) 0" (0 cm)
5
inches (387.1 sq. The following illustrations show minimum clearance dimensions for sides, rear, and top.
inches (387.1 sq. cm)
60 sq. This dryer MUST be exhausted outdoors.
5. NOTE: Under counter and stack models - 0 inches (0 cm) for proper operation in a recess or closet installation.
0" (0 cm)
0" (0 cm)
1" (2.54 cm)
0" (0 cm...
Installation Instructions - Page 6

... (70.49cm) 28.5 to clear door handle (72.39cm)
2.375" (6.03cm)
(34.29cm) 13.5" To rear & base exhausts
27.0"
(68.58cm)
Stacked Dryer Installation Dimensions
(68.58cm) 27.0"
Electrical supply on rear of unit
28.25" to front of cabinet(71.76cm)
28.75" to clear knobs (73.03cm) 29.5" to clear...
Installation Instructions - Page 7
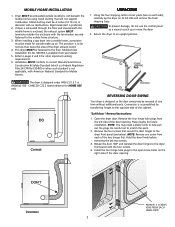
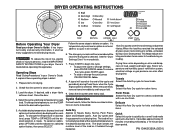
.... NOTE: Remove one screw from the left side and remove the foam shipping base. When installing a gas dryer into a mobile home, a provision must be fastened to the floor. CAN/CSA C22.2 (latest editions) ...side of the two hinges first. NOTE: You may be exhausted outside make up or move the dryer.
2. REMOVE 4 SCREWS (ONE FROM EACH HINGE FIRST)
7 MOBILE HOME INSTALLATION
1. Rigid metal ...
Installation Instructions - Page 8
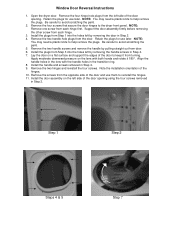
Open the dryer door. Be careful to avoid scratching the paint. 5. Remove the two handle screws and remove the handle ...Step 3 into the holes left by removing the door in the transition ring. 8. NOTE: You may need a plastic knife to the dryer front panel. Lay the door on a flat surface and support the edges of the door opening . Remove the two hinges and reinstall ...
Installation Instructions - Page 9
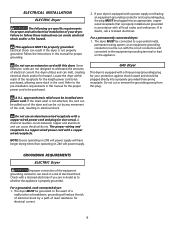
... dryer. approved strain relief must be run with a licensed electrician if you are in doubt as to whether the appliance is not properly grounded.
Refer to the pre-installation requirements in this dryer. Check with the circuit conductors and connected to the equipment-grounding terminal or lead on 240 volt power supply.
ELECTRICAL INSTALLATION
ELECTRIC Dryer...
Installation Instructions - Page 10
...
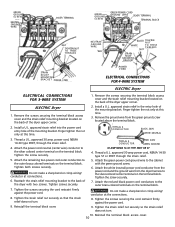
RED
BLACK TIGHTEN
NUT
WHITE
TO THESE THREADS
NUT
STRAIN RELIEF MOUNTING BRACKET
STRAIN RELIEF MOUNTING B R A C K E T POWER CORD
POWER CORD
ELECTRICAL CONNECTIONS FOR 4-WIRE SYSTEM
ELECTRIC Dryer
ELECTRICAL CONNECTIONS FOR 3-WIRE SYSTEM
ELECTRIC Dryer
1. Do not make a sharp bend or crimp wiring/ conductor at connections.
6. Install a U.L. Finger tighten the nut only at this time...
Installation Instructions - Page 11

...circuit breaker/fuse box.
5. Run the dryer through pipe...dryer. Before operating the dryer, make materials inaccessible to cover every possible condition and situation that may occur.
An L.P. REPLACEMENT PARTS
If replacements parts are not meant to children. Verify proper operation after the dryer is located inside the dryer...dryer to 0.96 cm) reducer for the Frigidaire...
Operating Instructions - Page 1
...ventillation system, electrical voltage or ...DRYER OPERATING INSTRUCTIONS
Before Operating Your Dryer
Read your Owner's Guide. To reduce the risk of fire, electric... in your dryer Owner's Guide... (0501)
The changes you make will ...add a dryer fabric softener sheet. To change the temperature,...change settings, press PAUSE/CANCEL once.To resume the cycle, press START again. • To stop or change...
Operating Instructions - Page 2
....
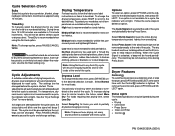
Cycle Adjustments
A suitable combination of the cycle. See the "Dryer Settings Chart" for a cycle, the indicator will not be dried. Drying Temperature
For best results, follow the fabric care label instructions on items to be able to the desired heat.
Dryness Level
To change the drying temperature, press TEMP to scroll to select...
Similar Questions


Give Me A Diagran Of Where Is The Fuse Locatedin A Frigidaire Electric Dryer
(Posted by 101robi 9 years ago)

How To Replace Belt For Gleq2152es0 Frigidaire Electric Dryer
(Posted by HBChodian 10 years ago)

Frigidaire Electric Dryer Fer641fs. No Heat. Timer Not Advancing.
My electric dryer has no heat and the timer is not advancing like it suppose to. It just keeps spinn...
My electric dryer has no heat and the timer is not advancing like it suppose to. It just keeps spinn...
(Posted by mouatech 10 years ago)

Frigidaire Gleq2152es Electric Dryer Runs A While, Heats On Then Stops After 10m
(Posted by thespen691 13 years ago)