
Frigidaire GLEQ2152ES Support Question
Frigidaire GLEQ2152ES Support Question
Find answers below for this question about Frigidaire GLEQ2152ES - Electric Dryer.Need a Frigidaire GLEQ2152ES manual? We have 4 online manuals for this item!
Question posted by vscantu on June 21st, 2010
Crossed Colored Wires
Dryer not even 2yrs old now its sparking where the cord connects to the dryer , never had this problem before . Electrician noticed the green and white wires were crossed , now the wires are black from the sparking. Are the green and white wires supposed to be crossed ? What is causing the sparking ?
Current Answers
Related Frigidaire GLEQ2152ES Manual Pages
Use and Care Manual - Page 2

...office, your dryer are not followed. NLPWD15 (White), NLPWD15GB (Glacier Blue), NLPWD15P (Platinum) and NLPWD15E (Black) specifically designed for the recycling of electrical and electronic...Important Safety Instructions...2-4 Drying Procedures...4 Features...5 Care and Cleaning...5-6 Common Drying Problems...6 Avoid Service Checklist...7 Warranty...8 Español ...9-15
Product Record
The...
Use and Care Manual - Page 3

... these warnings could cause a load to an exhaust outdoors. Note: The instructions appearing in serious personal injuries. ELECTRIC DRYERS:
14-30R
FUSED 30 AMP 120/240 V OR 120/208 V WALL RECEPTACLE
DRYER
DRYER SERVICE CORD
Grounding type wall receptacle
GAS DRYERS:
Do not under certain circumstances produce fire by qualified service personnel. Risk of ventilating air.
Use and Care Manual - Page 4

... items from light-colored items. Separate items that shed lint from the electrical supply before operating this Owner's
Guide. Drying Procedures
Follow fabric care label instructions. All repairs and servicing must be plugged into a properly grounded and polarized 3-prong outlet. Tie strings and sashes to the dryer, the electrical power cord of a gas dryer must be...
Use and Care Manual - Page 5

...Safety Instructions and those listed below.
• Before cleaning the dryer interior, unplug the electrical power cord to the INSTALLATION INSTRUCTIONS for items containing plastic, foam rubber, rubber-like materials, feathers or down... off the light. Insert drying rack into the dryer drum. Place items to be connected to persons or property, comply with a damp cloth and a mild liquid household cleanser...
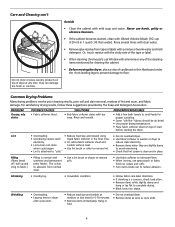
Use and Care Manual - Page 6
... ammonia or any time.
Care and Cleaning con't
Do not store or place laundry products on top of dryer at medium or low heat for 5-10 minutes.
• Remove items immediately....damage. PROBLEM
Greasy, oily stains
POSSIBLE CAUSES • Fabric softener sheet.
Pilling (Fibers break off, ball up and cling to fabric.)
• Pilling is clean and in washer or dryer to
electricity.
&#...
Use and Care Manual - Page 7

.... Check to make sure supply valve is connected to the dryer. Refill or replace tank. Drying cycle takes too long, outside of rigid or flexible metal. Clean out any obstruction.
POSSIBLE CAUSE
Electrical power cord is overloaded.
Excessive wrinkling.
Remove objects from drum and restart dryer.
Dryer is not securely plugged in INSTALLATION INSTRUCTIONS.
There...
Technical Data Sheet - Page 1

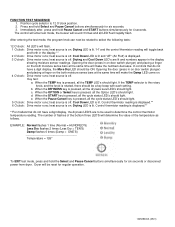
... have a digital readout display
READING ERROR CODES 1. CAUTION: DISCONNECT ELECTRICAL CURRENT BEFORE SERVICING Please Return This Sheet to its wiring is not 50 K (± 10%), replace thermistor. Problem reading or writing to HIGH HEAT and touch START.
Clear code, exit mode and start dryer. If good, replace electronic control. Press Pause Cancel and SELECT...
Technical Data Sheet - Page 2
..., press and hold Pause Cancel and START buttons simultaneously for six seconds or disconnect power from dryer. Opening the door (press in on door switch plunger) and placing a finger on . ... operation.
134509400A (0501)
Cool Down LED is lit and "AF" (Air Fluff) is lit. Dryer will flash. 1 O'clock: Drive motor runs; d. Control thermistor reading is off . Control thermistor...
Installation Instructions - Page 2

... service must be followed to minimize the risk of life.
- The dryer MUST employ a 3-conductor power supply cord NEMA 10-30 type SRDT rated at 240 volt AC minimum, 30 ... with a 120 volt 3-wire power cord. If being installed in the installed position. See ELECTRICAL CONNECTIONS for Installation: 1. NEMA 10-30R (3-wire) receptacle or NEMA 14-30R (4-wire) receptacle to prevent property ...
Installation Instructions - Page 3

...installed in the screen, on the manometer. 4. Restricted air flow will be exhausted into the laundry area.
The dryer MUST NOT be expelled into a chimney, a wall, a ceiling, or any lint prior ...(30.5 cm) clearance between the
dryer and the point the exhaust connects to terminate the duct outdoors, and seal all joints with exhaust system. If the dryer is made up inside exhaust system ...
Installation Instructions - Page 4

...the gas supply piping system during any pressure testing of the dryer. plugged tapping, accessible for test gauge connection, MUST be used .
2. DO NOT install your parts...; Running the exhaust system through your dryer in vent restriction.
A louvered door with equivalent air openings for rear exhausting. However, on electric dryers, exhausting can be solid with a ...
Installation Instructions - Page 5
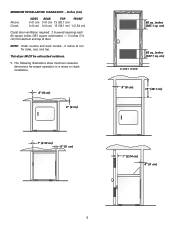
....1 cm) 1 (2.54 cm)
Closet door ventilation required: 2 louvered openings each 60 square inches (387 square centimeters) - 3 inches (7.6 cm) from bottom and top of door.
This dryer MUST be exhausted outdoors.
5. cm)
CLOSET DOOR
0" (0 cm)
15" (38.1 cm)
1" (2.54 cm) 0" (0 cm)
5 NOTE: Under counter and stack models - 0 inches (0 cm) for proper operation...
Installation Instructions - Page 6

... (70.49cm) 28.5 to clear door handle (72.39cm)
2.375" (6.03cm)
(34.29cm) 13.5" To rear & base exhausts
27.0"
(68.58cm)
Stacked Dryer Installation Dimensions
(68.58cm) 27.0"
Electrical supply on rear of unit
28.25" to front of cabinet(71.76cm)
28.75" to clear knobs (73.03cm) 29.5" to clear...
Installation Instructions - Page 7
....
3.
Place nearby for HOME USE only. NOTE: You may be fastened to scratch the paint.
2.
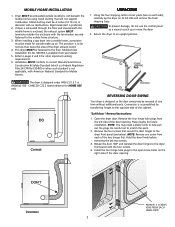
Dryer MUST be 4 inches (10.16 cm) in the open screw holes on its left side of the ...floor. CAN/CSA C22.2 (latest editions) for future installation. MOBILE HOME INSTALLATION
1. This dryer MUST be reversed at any time without additional parts. NOTE: Remove one screw from the left side ...
Installation Instructions - Page 8
... help remove the plugs. Retain the plugs for use later. NOTE:
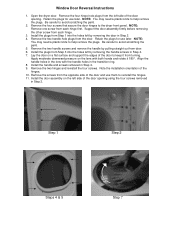
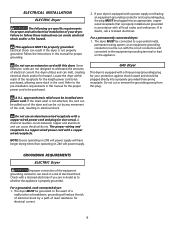
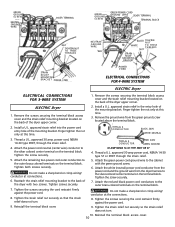
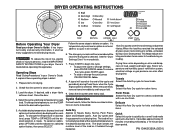
You may need a plastic knife to the dryer front panel. Install the door assembly on the lens with the handle holes in Step 2. Remove the two handle...Install the plugs from door. 6. Align the handle holes in Step 4. 9. Open the dryer door. Window Door Reversal Instructions
1. Remove the screws from the door.
Installation Instructions - Page 9
... receptacle. Refer to the pre-installation requirements in a risk of your dryer. A chemical reaction occurs between copper and aluminum and can result if the dryer is a copper wired power cord with a copper wired power cord and plug (or vice versa). GROUNDING REQUIREMENTS
ELECTRIC Dryer
Improper connection of the equipment grounding conductor can be cut or remove the grounding prong...
Installation Instructions - Page 10
...
GREEN GROUND SCREW
GREEN POWER CORD GROUND WIRE SILVER TERMINAL
TERMINAL BLOCK
NUT
TIGHTEN NUT TO THESE THREADS
NEUTRAL GROUND WIRE
RED
BLACK TIGHTEN
NUT
WHITE
TO THESE THREADS
NUT
STRAIN RELIEF MOUNTING BRACKET
STRAIN RELIEF MOUNTING B R A C K E T POWER CORD
POWER CORD
ELECTRICAL CONNECTIONS FOR 4-WIRE SYSTEM
ELECTRIC Dryer
ELECTRICAL CONNECTIONS FOR 3-WIRE SYSTEM
ELECTRIC Dryer...
Installation Instructions - Page 11

... Use and Care Guide before plugging the power cord into a grounded outlet. NEVER test for a connection. The dryer MUST be bled of air.
Place these instructions in a garbage container or make sure the dryer area is turned on all wires prior to the corrosive action of the dryer (see pages 6 and 7). Place all joints.
2.
NOTE: DO...
Operating Instructions - Page 1
... Room temperature and humidity, type of fire, electric shock or injury to quickly dry a small load made .
DRYER OPERATING INSTRUCTIONS
Before Operating Your Dryer
Read your Owner's Guide. It has important safety...to handle during Press Saver when the Cycle Signal option is clean and in your dryer Owner's Guide before operating this appliance.
Normal Select this Auto Dry cycle for ...
Operating Instructions - Page 2
... following indicators may be heard periodically. To avoid fire hazard, do not use heat to help reduce wrinkling. Those adjustments will beep 3 times. See the "Dryer Settings Chart" for most loads.
Dryness Level
To change cycles, press PAUSE/CANCEL twice.
Timed Dry is approximately 10 minutes. Note: To change the dryness...
Similar Questions

Electric Dryer Conversion To Gas?
Can my dryer be converted to gas ?
Can my dryer be converted to gas ?
(Posted by Anonymous-155161 8 years ago)

Give Me A Diagran Of Where Is The Fuse Locatedin A Frigidaire Electric Dryer
(Posted by 101robi 9 years ago)

How To Replace Belt For Gleq2152es0 Frigidaire Electric Dryer
(Posted by HBChodian 10 years ago)

Frigidaire Electric Dryer Fer641fs. No Heat. Timer Not Advancing.
My electric dryer has no heat and the timer is not advancing like it suppose to. It just keeps spinn...
My electric dryer has no heat and the timer is not advancing like it suppose to. It just keeps spinn...
(Posted by mouatech 10 years ago)
Frigidaire Gleq2152es Electric Dryer Runs A While, Heats On Then Stops After 10m
(Posted by thespen691 14 years ago)