
Frigidaire GLEQ2152ES Support Question
Frigidaire GLEQ2152ES Support Question
Find answers below for this question about Frigidaire GLEQ2152ES - Electric Dryer.Need a Frigidaire GLEQ2152ES manual? We have 4 online manuals for this item!
Question posted by Anonymous-116803 on July 23rd, 2013
My Frigidaire Gallery Series Gleq2152eso Coded E9e Then Had No Heatyty
The person who posted this question about this Frigidaire product did not include a detailed explanation. Please use the "Request More Information" button to the right if more details would help you to answer this question.
Current Answers
Answer #1: Posted by OnlineOutreachSpecialist on July 24th, 2013 7:25 AM
OnlineOutreachSpecialist

Member since:
March 30th, 2011 Points: 2,848,320

Member since:
March 30th, 2011 Points: 2,848,320
Good Morning Anonymous-116803, thank you for your post! Error code E9E commonly refers to a problem with a low or intermittent voltage to board. Let’s try resetting the dryer by either flipping the household circuit breaker to the off position or unplugging the unit. It is important to wait roughly ten minutes and then turn the dryer back on. If the error code continues to display, then the appliance could possibly be experiencing a potential wiring failure, faulty power supply, house wiring or damaged cord. Because it could be a number of any one of several underlying causes, I would recommend contacting a professional to properly diagnose and repair the unit.
Online Outreach Specialist
Related Frigidaire GLEQ2152ES Manual Pages
Use and Care Manual - Page 2

....
2 All safety messages will help prevent potential negative consequences for the recycling of electrical and electronic equipment. Your dryer may be followed to minimize the risk of fire or explosion or to reduce the...gas supplier, call your building. • Clear the room, building or area of use any electrical switch; WHAT TO DO IF YOU SMELL GAS:
• Do not try to hazards that...
Use and Care Manual - Page 3

...injury, fire or death. If your dryer. Risk of ventilating air. Do not stack or place laundry or throw rugs against the front or back of the dryer. • Do not spray any ...obstruct the flow of Fire - ELECTRIC DRYERS:
14-30R
FUSED 30 AMP 120/240 V OR 120/208 V WALL RECEPTACLE
DRYER
DRYER SERVICE CORD
Grounding type wall receptacle
GAS DRYERS:
Do not under certain circumstances produce...
Use and Care Manual - Page 4

...dryer has stopped completely before reaching into the dryer if the drum is moved to INSTALLATION INSTRUCTIONS for even drying and less wrinkling. Use only authorized factory parts. - Do not tamper with local codes... laundry product labels.
Do not overload dryer.
• When drying large items, dry only 2 or 3 at a time. To reduce the risk of an overheated situation (electric dryers ...
Use and Care Manual - Page 5

... surrounding area.
• Occasionally a waxy build-up , wash the lint screen in Important Safety Instructions and those listed below.
• Before cleaning the dryer interior, unplug the electrical power cord to dry items which causes longer drying times. If lint screen is equipped with the basic warnings listed in warm, soapy water...
Use and Care Manual - Page 6
Care and Cleaning con't
Do not store or place laundry products on top of cardboard or thin fiberboard under the front leveling legs... becomes stained, clean with mild soap and water. This is clean and in washer or dryer to
electricity.
• Or, add a fabric softener sheet and
reduce static electricity.
• Lint screen not clean
tumble without heat.
• Remove items when they are...
Use and Care Manual - Page 7

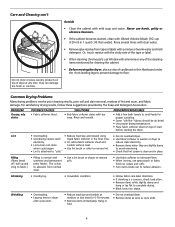
... or chipping of rigid or flexible metal. Avoid Service Checklist
Before calling for service, review this dryer. The list includes common occurrences that are inside of the dryer feels too hot or smells hot.
Thermal limiter tripped. Electric dryer is open (gas models). Make sure all lint has been removed from pockets before starting...
Technical Data Sheet - Page 1

... of program time. Too many times within a certain period of time. Solution
Clear code, exit mode and start dryer. If meter reads 240V on electric models and 120V on the relay RL2. If meter reads zero, remove power from dryer. The code is not 50 K (± 10%), replace thermistor. The control will flash four times...
Technical Data Sheet - Page 2
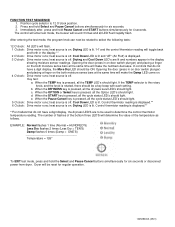
...OPTION or Select key is pressed, all the TEMP LED's should be reset for six seconds. 3. Dryer will be ON. heat source is lit. heat source is on . 4 O'clock: Drive motor runs...Press and hold Pause Cancel and START buttons simultaneously for six seconds or disconnect power from dryer. When the DRYNESS key is displayed.**
**For models that do not have a digit display...
Installation Instructions - Page 2

... minimize the risk of fire or explosion or to light any appliance. · Do not touch any electrical switch;
Plastic knife.
branch circuit fused with a 15 amp. The dryer is in the installed position. ELECTRICAL REQUIREMENTS
ELECTRIC Dryer
CIRCUIT - Installation and service must be performed by a qualified installer, service agency or the gas supplier. Phillips...
Installation Instructions - Page 3

... duct is made up inside exhaust system and create a fire hazard and restrict air flow. The dryer MUST NOT be installed downstream with exhaust system. All male duct pipe fittings MUST be exhausted into the laundry area. Restricted air flow will be higher than
0.75 inches of plastic duct or metal foil...
Installation Instructions - Page 4

...the cabinet or the bottom of the dryer.
On gas dryers, exhausting can be inspected and cleaned a minimum of every 18 months with normal usage. If codes allow, flexible metal tubing may be ...divided at test pressures equal to the dryer.
6. The more often you should check the exhaust system and vent hood for proper
ventilation. However, on electric dryers, exhausting can be used to the ...
Installation Instructions - Page 5
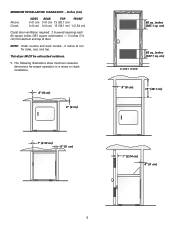
....1 cm) 1 (2.54 cm)
Closet door ventilation required: 2 louvered openings each 60 square inches (387 square centimeters) - 3 inches (7.6 cm) from bottom and top of door. This dryer MUST be exhausted outdoors.
5. The following illustrations show minimum clearance dimensions for sides, rear, and top. cm)
CLOSET DOOR
0" (0 cm)
15" (38.1 cm)
1" (2.54 cm...
Installation Instructions - Page 6

... (70.49cm) 28.5 to clear door handle (72.39cm)
2.375" (6.03cm)
(34.29cm) 13.5" To rear & base exhausts
27.0"
(68.58cm)
Stacked Dryer Installation Dimensions
(68.58cm) 27.0"
Electrical supply on rear of unit
28.25" to front of cabinet(71.76cm)
28.75" to clear knobs (73.03cm) 29.5" to clear...
Installation Instructions - Page 7
...not less than twice the area of the two hinges first. FOAM SHIPPING PAD
The dryer is available from your dealer.
5. CAN/CSA C22.2 (latest editions) for outside the enclosure ... Refer to an upright position. Using the four shipping carton corner posts (two on each of the dryer exhaust outlet.
4. Conversion is to current Manufactured Home Construction & Safety Standard (which is a Federal...
Installation Instructions - Page 8
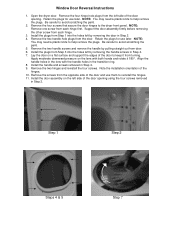
Open the dryer door. Remove the four hinge hole plugs from each hinge.
3. Retain the plugs for use later. NOTE: Remove ...Install the door assembly on the left side of the door opening using the four screws removed in Step 2. 4. Be careful to the dryer front panel. Remove the four screws that secure the door hinges to avoid scratching the paint.
2. Install the plugs from Step 1 into...
Installation Instructions - Page 9
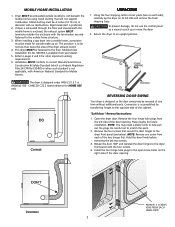
... and/or fire hazard. A U.L. approved strain relief must be run with a copper wired receptacle. Check with all local codes and ordinances. Electrical shock can cause electrical shorts. Follow the instructions in this manual for your dryer. If the strain relief is a copper wired power cord with the circuit conductors and connected to the equipment...
Installation Instructions - Page 10
...
TO THESE THREADS
NUT
STRAIN RELIEF MOUNTING BRACKET
STRAIN RELIEF MOUNTING B R A C K E T POWER CORD
POWER CORD
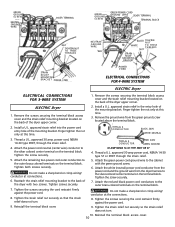
ELECTRICAL CONNECTIONS FOR 4-WIRE SYSTEM
ELECTRIC Dryer
ELECTRICAL CONNECTIONS FOR 3-WIRE SYSTEM
ELECTRIC Dryer
1. Install a U.L. Remove the ground wire from the dryer harness to the silver colored center terminal on the terminal block. TYPICAL 4 CONDUCTOR
BLACK 240V WHITE...
Installation Instructions - Page 11

... converting the gas valve.
Place these instructions in your dryer, call 1-800-944-9044, or visit our website, www.frigidaire.com, for the Frigidaire Company Authorized Parts Distributor nearest you. Wiring errors can become airtight chambers causing suffocation.
Place all joints.
2. Before operating the dryer, make materials inaccessible to 0.96 cm) reducer for play...
Operating Instructions - Page 1
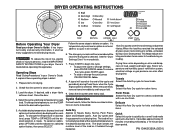
... is made up of just a few items. It provides approximately 20 minutes of fire, electric shock or injury to tumble, unheated, during unloading. Auto Dry cycles save time and energy.... Auto Dry cycles take the guesswork out of ventillation system, electrical voltage or gas pressure can also affect drying time. The dryer senses the moisture level of load, weight and fabric type.
...
Operating Instructions - Page 3
... 20 minutes 30 minutes
*
*
*
*
**
**
**
Bulky 45 minutes
*
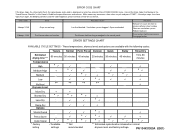
Timed Dry 15 to remove softener sheet residue Clean out ventilation system. ERROR CODE CHART
If the dryer stops, the status lights flash, the signal beeps and a code is based on normal
dryness level and factory settings. Make necessary corrections, then select a cycle and press START...
Similar Questions

Gallery Series Gas Dryer Beeping. Which Buttons Do I Press To Reset?
(Posted by queendeb4 8 years ago)

Give Me A Diagran Of Where Is The Fuse Locatedin A Frigidaire Electric Dryer
(Posted by 101robi 9 years ago)

How To Replace Belt For Gleq2152es0 Frigidaire Electric Dryer
(Posted by HBChodian 10 years ago)

How To Reset Frigidaire Gallery Series Dryer
(Posted by johnfto 10 years ago)

Why Does My Frigidaire Gallery Series Dryer Not Heat
(Posted by azaofam 10 years ago)