Get support for Frigidaire FRT18HS6JS - 18 Cu Ft Refrigerator

Frigidaire FRT18HS6JS Support Question

Frigidaire FRT18HS6JS Support Question

Find answers below for this question about Frigidaire FRT18HS6JS - 18 Cu Ft Refrigerator.
Need a Frigidaire FRT18HS6JS manual? We have 3 online manuals for this item!
Question posted by mtully on September 11th, 2013

Condensation

how to i repair?

Current Answers

Answer #1: Posted by OnlineOutreachSpecialist on September 13th, 2013 3:59 AM
This answer was accepted by the poster of the original question.
OnlineOutreachSpecialist

Member since:
March 30th, 2011

Points: 2,848,320
1,100
points
Good Morning mtully, I am happy to assist you.

If you have water accumulating on the ceiling of the refrigerator, it is usually caused by a clogged drain in the freezer section beneath the evaporator. The clogged drain will cause water from the self-defrost cycle to leak into the divider between the freezer and refrigerator. This water may then freeze and cause condensation buildup on the refrigerator ceiling. The solution to this problem begins with unclogging the drain. Generally, appliance repair techs would unclog the drain first, but it may also be necessary for them to remove the entire freezer/refrigerator divider to thoroughly dry the insulation in the divider. Occasionally they may replace the insulation to prevent a recurrence of the problem. This can be a complicated job – you may want to seek assistance from a qualified appliance repair technician.


Online Outreach Specialist

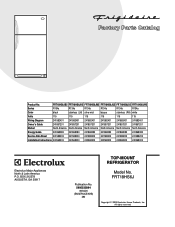
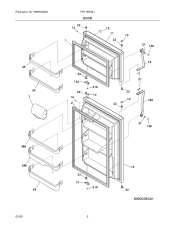
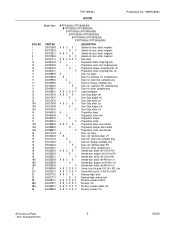
Related Frigidaire FRT18HS6JS Manual Pages

Use and Care Manual - Page 1

Before Calling Your Local Repair Service - CALL: Solutions Hotline (United States) 1-800-944-9044 (Canada) 1-800-668-4606 √ Resolve many service issues over the phone at your convenience! √ ... Cleaning 10 Warranty 12 Before you Call 13 READ AND SAVE THESE INSTRUCTIONS P/N 241857201 (Sept 2007) Need Parts or Service? Use & Care Manual Top Mount Refrigerator Got Questions?
Use and Care Manual - Page 2

...past. WARNING These Guidelines Must Be Followed To Ensure That Safety Mechanisms In This Refrigerator Will Operate Properly. The receptacle must be plugged directly into an outlet controlled ... to avoid electrical shock. • Performance may not easily climb inside. • Have refrigerant removed by a qualified service technician. Always grip the plug firmly, and pull straight out ...
Use and Care Manual - Page 3

..., dishwasher or other unheated area, you install your refrigerator (air-cooled condenser) leave 3" clearance at top of refrigerator. Do Not block the toe grille on the lower front of your refrigerator must be installed on the back of your refrigerator. LEVELING All four corners of your refrigerator in this possible, the direction in which the doors...
Use and Care Manual - Page 4

... connected to electrical power source. 10. Then add approximately 7 feet (2.1 meters), so the refrigerator can damage the ice maker. To Connect Water Supply Line To Ice Maker Inlet Valve 1. Coil ... your appliance dealer at shutoff valve. 3. Turn ON water supply at the back of refrigerator as shown. 5. Manufacturer will need to the ice maker inlet valve. Unscrew plastic cap...
Use and Care Manual - Page 5

... save for reassembly. Before starting screws, use an awl to opposite side. 15. Position refrigerator door onto bottom hinge pin and screw center hinge pin through center hinge into top of ...electrical power cord from step 7. 9. Flip toe grille and reinstall. 18. Plug in electrical power cord and turn the refrigerator temperature control to install top hinge. 17. Reversing the door swing ...
Use and Care Manual - Page 6

...of the handle (Figure 2). TO ATTACH FREEZER HANDLE: 1. Reinstall handle on the face of refrigerator door. 2. TO REMOVE FREEZER HANDLE: (Handles may be easier to reverse while doors are...bottom of dovetail button. 3. Swing bottom of handle away from front of refrigerator door. 2. TO REMOVE REFRIGERATOR HANDLE: (Handles may be easier to reverse while doors are off of door...
Use and Care Manual - Page 7

...locations. 4. Remove button plug using edge of handle with screws. Handle Reversal TO ATTACH REFRIGERATOR HANDLE: 1. Ensure plastic washer stays on other side, moving hole plugs from old ... on side of handle with screws. Insert new adhesive trim locks contained in figure 3. Refrigerator Door Without Trim NOTE Trim lock must be easier to opposite side. Set door aside...
Use and Care Manual - Page 8

... to be adjusted to a warmer setting. For good circulation, do not block cold air vents with food items. * IMPORTANT Turning the refrigerator temperature control to "0" turns off power to your refrigerator, you must unplug the power cord from cooling, but does not disconnect the power to the light bulb and other electrical...
Use and Care Manual - Page 9

...two days to be produced during the first 24 hours. ICE SERVICE If your refrigerator has an automatic ice maker, it clicks and locks in the UP position. During the initial startup of your... refrigerator, no usage, it clicks and locks in your local dealer for normal use. Call your dishwasher...
Use and Care Manual - Page 10

... cycle. These are descriptions of some models) home, it may be located on top of the compressor for maximum efficiency. 10 Condenser Fan If condenser coils are located underneath your refrigerator is significant pet traffic in your Defrost Water Pan (some of the most common sounds you . The drain pan will become familiar...
Use and Care Manual - Page 11

... wall outlet before cleaning around controls, light bulb or any electrical part. Be sure to wring excess water out of air-cooled refrigerators only. Condenser Coils (Fan-cooled models only) • Condenser Cleaning Brush is NOT removable. Wipe water pan with a clean soft cloth. Use warm soapy water to clean Easy Care surfaces...
Use and Care Manual - Page 12

...contacting Electrolux at the addresses or phone numbers below. Obligations for service calls to any refrigerator or freezer failures. 6. Damages caused by: services performed by Electrolux Major Appliances North ... REMEDIES CUSTOMER'S SOLE AND EXCLUSIVE REMEDY UNDER THIS LIMITED WARRANTY SHALL BE PRODUCT REPAIR OR REPLACEMENT AS PROVIDED HEREIN. Rust on the interior or exterior of God...
Use and Care Manual - Page 13

... (Canada) Visit our web site at www.frigidaire.com. Freezer temperature is satisfactory. Refrigerator is tightly pushed into electrical outlet. • Light switch may save you time and...not working . (some models) Before calling for the temperature to stabilize. • Set refrigerator control to stabilize. Reset circuit breaker. • The temperature control is turned to 3 ...
Installation Instructions - Page 1

... Grille NOTE Adjustable Front Roller (some models) Raise Stationary Front Roller with adjustable front rollers or front leveling screws to allow for ease of the refrigerator enough so the doors close freely when opened halfway. Turn icemaker OFF if water supply is not recommended. q L K e äáåÉ t K WATER SUPPLY 4 INSTALLATION...
Parts Catalog - Page 1

... 241588203 Installation Instructions 240568303 240568303 240568303 240568303 240568303 240568303 N05L00003.eps N05DCDBCA1.eps N05BBAABA17.eps N05SAAAFI21.eps N05CAABAD4.eps W241582401.eps S241582801.eps TOP-MOUNT REFRIGERATOR Electrolux Major Appliances North & Latin America P.O. All rights reserved. Product No. FRT18HS6J Copyright © 2009 Electrolux Home Products, Inc.
Parts Catalog - Page 2

Publication No: 5995535894 49 49 7 FRT18HS6J DOOR 22 14 1 12 11 10 22 21 14B 22 13A 21C 22 14 14 2 18 21 22 10 18A 22 21 14B 48B 48A 48 03/09 22 13 21C 2 15 22 N05DCDBCA1
Parts Catalog - Page 3

... 14 14 14B 14B 14B 15 15 15 15 15 15 18 18 18 18A 18A 18A 21 21C 22 22 48 48A 48B 49 PART... 240339201 240339208 240339209 240339206 240383406 218252201 240527102 240527101 240338101 240337901 240338001 240495804 A FRT18HS6J (FRT18HS6JB5) B FRT18HS6J (FRT18HS6JK5) C FRT18HS6J (FRT18HS6JM5) D FRT18HS6J (FRT18HS6JQ5) E FRT18HS6J (FRT18HS6JS5) F FRT18HS6J (FRT18HS6JW5) ABC- E- - - F A B C D E F...
Parts Catalog - Page 5

... 240442706 241839407 A FRT18HS6J (FRT18HS6JB5) B FRT18HS6J (FRT18HS6JK5) C FRT18HS6J (FRT18HS6JM5) D FRT18HS6J (FRT18HS6JQ5) E FRT18HS6J (FRT18HS6JS5) F FRT18HS6J (FRT18HS6JW5) A B C D E F A B C D E F A B C D E F A B C D E F A B C D E F A B C D E F A B C D E F A B C D E F A B C D E F A B C D E F A B C D E ... Bracket-motor mtg, rear Screw, hex washer head, 8-18 x 5/16 Screw, #8 truss hd, 10-32CA x...
Parts Catalog - Page 8

Publication No: 5995535894 11 FRT18HS6J SHELVES 24A 31 03/09 12 13 17 58 15 16 25 22A 23 21 18 58 14 47 25B 25C 24 26 8 26 N05SAAAFI21
Parts Catalog - Page 11

...harness Screw, 8-18 x 0.500 Shroud-cond fan Tape-foam seal, shroud Screw-fan shroud, (2) Bracket-support, cond mtr, (3) Grommet-bracket, (3) Motor-condenser fan Blade-condenser fan Roller, compressor... Kit, suction line * 5303918222 A B C D E F Hot Tube Repair Kit, service # Functional Parts 11 * Non-Illustrated Parts 03/09 FRT18HS6J SYSTEM Publication No: 5995535894 Model Index: POS.

Similar Questions

Ask a New Question
Use the box below to post a new question about this Frigidaire product .
Points & Prizes
  • You can earn points for nearly everything you do on HelpOwl.com
  • You can trade in those points for gift cards at leading retailers such as Amazon.com and Walmart
  • It's that simple!
See How it Works
Create a Free Account

Frigidaire Manuals

Find free Frigidaire FRT18HS6JS - 18 Cu Ft Refrigerator manuals and user guides available at ManualOwl.com. Try out our unique manual viewer allowing you to interact with manuals from directly within your browser!

Frigidaire Reviews

View thousands of Frigidaire user reviews and customer ratings available at ReviewOwl.com.

Contact Information

Complete Frigidaire customer service contact information including steps to reach representatives, hours of operation, customer support links and more from ContactHelp.com.

Scoreboard Ratings

See detailed Frigidaire customer service rankings, employee comments and much more from our sister site.

Frigidaire Recalls

Find comprehensive Frigidaire recall information updated hourly on RecallOwl.com.