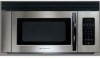
Frigidaire FMV157GS Support Question
Frigidaire FMV157GS Support Question
Find answers below for this question about Frigidaire FMV157GS - Microwave.Need a Frigidaire FMV157GS manual? We have 1 online manual for this item!
Question posted by tasc41 on November 6th, 2014
How Do I Get The Door Off To Replace It?
The handle broke and I had to order a new door. Now I need to take the old one off anf replace it. Show me how.
Current Answers
Answer #1: Posted by TommyKervz on November 7th, 2014 12:02 AM
TommyKervz

Member since:
January 10th, 2013 Points: 17,776,843

Member since:
January 10th, 2013 Points: 17,776,843
Download a free service manual below to assist you
http://elektrotanya.com/frigidaire_fmv157g.pdf/download.html
Related Frigidaire FMV157GS Manual Pages
Installation Instructions - Page 1
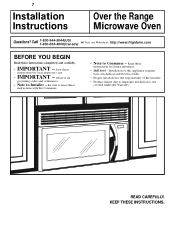
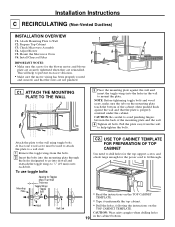
...; Note to improper installation is not covered under the Warranty. Keep these instructions completely and carefully.
• IMPORTANT -
7
Installation Instructions
Over the Range Microwave Oven
Questions?
KEEP THESE INSTRUCTIONS. Installation of this appliance requires basic mechanical and electrical skills.
• Proper installation is the responsibility of the installer.
•...
Installation Instructions - Page 2

...Requirements 3 Hood Exhaust 4, 5 Damage - Shipment/Installation 6 Parts Included 6 Tools You Will Need 7 Mounting Space 7
Step-by-step installation guide
Placement of Mounting Plate 8-10 Removing the ...Wall 12 Preparation of Top Cabinet 13 Checking for Proper Damper Operation 13 Mount the Microwave Oven ..........13, 14 Adjust the Exhaust Adaptor 14 Connecting Ductwork 14
B Outside Back ...
Installation Instructions - Page 3
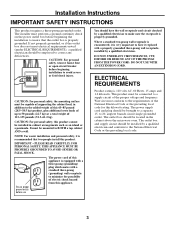
.... The outlet box should be located in the cabinet above the microwave oven. It must be mounted to 50 pounds (22.7 kg) or a total weight of 113-135 pounds (51.3-61.2 kg).
Where a standard two-prong wall receptacle is encountered, it replaced with a standard three-prong (grounding) wall receptacle to minimize the possibility...
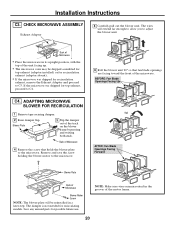
Installation Instructions - Page 7
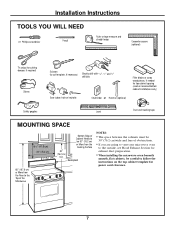
... drill with 3⁄16", 1⁄2" and 5⁄8" drill bits
Filler blocks or scrap wood pieces, if needed for top cabinet spacing (used on the top cabinet template for exhaust duct preparation.
• When installing the microwave oven beneath
smooth, flat cabinets, be careful to be 30″ (76.2 cm) or More from the...
Installation Instructions - Page 8
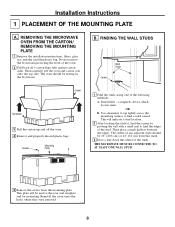
....
OR
B.
REMOVING THE MICROWAVE
OVEN FROM THE CARTON/ REMOVING THE MOUNTING PLATE
1 Remove the installation instructions, filters, glass tray and the small hardware bag. The oven should be 16″ ...Use a hammer to tap lightly across the mounting surface to find a solid sound.
THE MICROWAVE MUST BE CONNECTED TO AT LEAST ONE WALL STUD.
5 Remove the screws from this mark...
Installation Instructions - Page 9
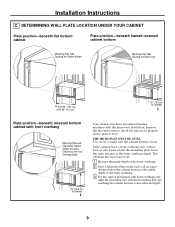
This will keep the microwave level.
1 Measure the inside depth of the front overhang.
2 Draw a horizontal line on ...same distance as the front overhang depth.
THE MICROWAVE MUST BE LEVEL.
Remove the decorative trim to install the microwave properly and to Cooktop
Your cabinets may have decorative trim that interferes with the microwave installation. If the cabinets have a front overhang ...
Installation Instructions - Page 10
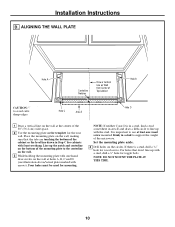
...;8″ hole for wood screws.
Four holes must be used for the rear wall. For holes that the tabs are touching the bottom of the microwave. NOTE: DO NOT MOUNT THE PLATE AT THIS TIME.
10 Installation Instructions
D. Hole C
Area E
Hole D
1 Draw a vertical line on the wall at holes A, B, C and D (see...
Installation Instructions - Page 11
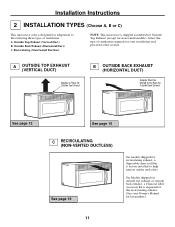
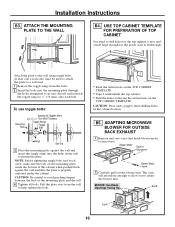
... Top Exhaust (except for recirculating exhaust, a disposable charcoal filter is factory installed to help remove smoke and odors. Installation Instructions
2 INSTALLATION TYPES (Choose A, B or C)
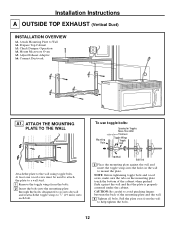
This microwave oven is designed for adaptation to that section. A OUTSIDE TOP EXHAUST (VERTICAL DUCT)
Adaptor in Place for Outside Top Exhaust
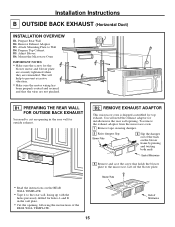
B OUTSIDE BACK EXHAUST (HORIZONTAL DUCT)
Adaptor...
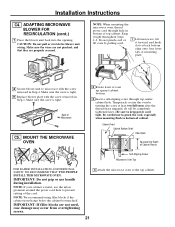
Installation Instructions - Page 12
... the back of the cabinet when pushed flush against the wall and that the plate is properly centered under the cabinet. Connect Ductwork
A1.
Mount Microwave Oven A5. At least one wood screw must be used to attach the plate to a wall stud.
1 Remove the toggle wings from the wall to Wall...
Installation Instructions - Page 13
....
13 Installation Instructions
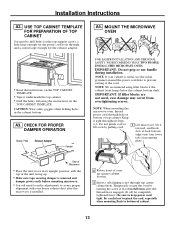
A2. USE TOP CABINET TEMPLATE FOR PREPARATION OF TOP CABINET
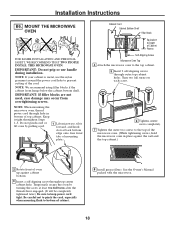
You need to make adjustments to bottom of mounting plate. MOUNT THE MICROWAVE OVEN
FOR EASIER INSTALLATION AND PERSONAL SAFETY, WE RECOMMEND THAT TWO PEOPLE INSTALL THIS MICROWAVE OVEN.
Be careful not to pinch the cord, especially when mounting flush to assure...
Installation Instructions - Page 14
... tightening screws, hold the microwave oven in place against the wall and the top cabinet.)
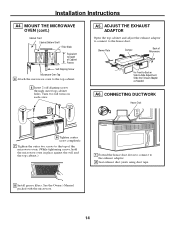
1 Extend the house duct down to connect to -Side Adjustment, Slide the Exhaust Adaptor as Needed
A6. CONNECTING DUCTWORK
House Duct
6 Tighten center screw completely.
7 Tighten the outer two screws to the top of Microwave
For Front-to-Back...
Installation Instructions - Page 15
... when they are not pinched. To remove the exhaust adaptor from the microwave oven:
1 Remove tape securing damper.
2 Raise damper flap. Blower Plate
...Microwave
4 Remove and save the screw that the wires are reinstalled. Back of Microwave PREPARING THE REAR WALL FOR OUTSIDE BACK EXHAUST
You need the exhaust adaptor for top exhaust. Prepare Rear Wall B2. Mount the Microwave Oven...
Installation Instructions - Page 16
...:
Mounting Plate
Spacing for the power cord to fit through the holes designated to microwave.
ADAPTING MICROWAVE BLOWER FOR OUTSIDE BACK EXHAUST
1 Remove and save screw that the plate is properly... centered under the cabinet. USE TOP CABINET TEMPLATE FOR PREPARATION OF TOP CABINET
You need to...
Installation Instructions - Page 17
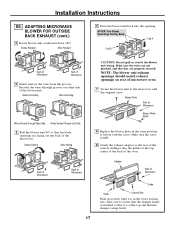
... Plate Back of Microwave
Blower Motor Screw
8 Replace the blower plate in the same position as before with the original screw. Before Rotation
After Rotation
6 Place the blower unit back into the guides at the top and that the damper swings freely.
17 Back of Microwave
Back of Microwave
Adaptor
Back of microwave oven.
7 Secure the...
Installation Instructions - Page 18
... grommet around the power cord hole to prevent cutting of Cabinet Recess Self-Aligning Screw Microwave Oven Top 4 Attach the microwave oven to keep power cord tight. NOTE: If your cabinet is metal, use handle during installation. NOTE: When mounting the microwave oven, thread power cord through hole in place against the wall and the top cabinet...
Installation Instructions - Page 19
... Be careful to the wall using toggle bolts.
Prepare Top Cabinet C3.
USE TOP CABINET TEMPLATE FOR PREPARATION OF TOP CABINET
You need to drill holes for the top support screws and a hole large enough for Toggles More Than Wall Thickness
Toggle Wings Toggle Bolt...Mounting Plate to fit through the holes designated to go into the holes in the cabinet bottom. Mount the Microwave Oven C6.
Installation Instructions - Page 20
...microwave. Back of Microwave
4 Remove the screw that fan blade openings are facing toward the front of Microwave
• Place the microwave in a later step. The damper is not needed for possible future use. If the microwave...top of the unit facing up.
• The microwave oven may be shipped assembled for
top exhaust (adaptor installed) or for recirculation exhaust (adaptor absent).
&#...
Installation Instructions - Page 21
Make sure the screw is metal, use handle during installation.
NOTE: We recommend using filler blocks if the cabinet front hangs below... NOTE: If your cabinet is tight.
9 Replace blower plate with the screw removed in bottom of cabinet. CAUTION: Do not pull or stretch the blower unit wiring. NOTE: When mounting the microwave oven, thread power cord through top center cabinet hole....
Installation Instructions - Page 22
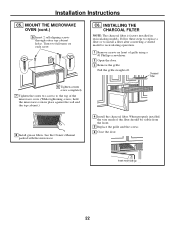
....
5 Replace the grille and the screws.
6 Close the door. C6.
See the Owner's Manual packed with the microwave.
4 Install the charcoal filter. Insert mesh-side up
22 Installation Instructions
C5. Turn two full turns on front of grille using a #1 Phillips screwdriver.
2 Open the door.
3 Remove the grille. Pull the grille straight off.
MOUNT THE MICROWAVE OVEN...
Installation Instructions - Page 23

... cord into a dedicated 15- Installation Instructions BEFORE YOU USE YOUR MICROWAVE
1.
Ensure proper ground exists before use
23 Replace house fuse or turn breaker back on.
7.
Remove all packing material from the
microwave oven.
3.
Install turntable and ring in cavity. 4. Make sure the microwave oven has been installed according to 20-amp
electrical outlet. KEEP INSTALLATION...
Similar Questions

Where Can I Find The Door Lock Assembly On My Frigidaire Microwave Fmv157gs
(Posted by careycloud9 3 years ago)

Unit Runs And Heats When The Door Is Closed.
No response from buttons to cancel or change settings. Light and turntable operate only if I push up...
No response from buttons to cancel or change settings. Light and turntable operate only if I push up...
(Posted by davelendon 9 years ago)

Frigidaire Microwave Oven Model Fgmv174kfa Door Wont Latch
(Posted by dpellhutchi 10 years ago)

How To Change The Handle On Microwave
Fmv157gs
(Posted by ljilja12 11 years ago)

Microwave Oven Not Working Unless I Hold & Push Up The Door. What's Wrong?
Model FMV156DSB. I had both switches checked & are OK. Now it does not work any more even when ...
Model FMV156DSB. I had both switches checked & are OK. Now it does not work any more even when ...
(Posted by xjtran87 11 years ago)