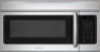
Frigidaire FFMV164LS Support Question
Frigidaire FFMV164LS Support Question
Find answers below for this question about Frigidaire FFMV164LS.Need a Frigidaire FFMV164LS manual? We have 5 online manuals for this item!
Question posted by eckdlevi on January 22nd, 2014
My Frigidaire Microwave Ffmv164lsa Wont Start
The person who posted this question about this Frigidaire product did not include a detailed explanation. Please use the "Request More Information" button to the right if more details would help you to answer this question.
Current Answers
Related Frigidaire FFMV164LS Manual Pages
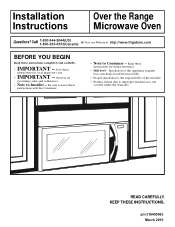
Installation Instructions (All Languages) - Page 1
... under the Warranty. Installation of the installer.
• Product failure due to Installer -
p/n 316495063 March 2010 Be sure to Consumer - Installation Instructions
Over the Range Microwave Oven
Questions? Keep these instructions completely and carefully.
• IMPORTANT -
Call
1-800-944-9044(US) 1-800-265-8352(Canada)
or Visit our Website at: KWWS
ZZZ...
Installation Instructions (All Languages) - Page 2

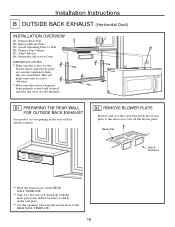
... for Outside Back Exhaust 16 Remove Blower Plate 16 Attach Mounting Plate to Wall 17 Preparation of Top Cabinet 17
Adapting Microwave Blower for Outside Back Exhaust 17-18
Mount the Microwave Oven 19
C Recirculating 20 -22
Attach Mounting Plate to Wall 20 Preparation of Top Cabinet 20 Check Blower Plate 21 Mount...
Installation Instructions (All Languages) - Page 3
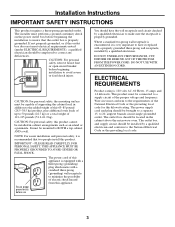
...electric shock hazard from this 63-85 pound (28.5-38.5 kg) product, plus additional oven loads of this appliance. CAUTION: For personal safety, remove house fuse or open circuit.... This product must be capable of supporting the cabinet load, in the cabinet above the microwave oven. to a supply circuit of this product. ampere branch circuit single grounded outlet. PLEASE READ...
Installation Instructions (All Languages) - Page 5
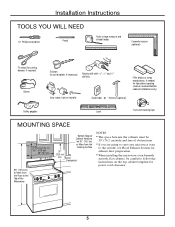
...obstructions.
• If you are going to vent your microwave oven
to the outside, see Hood Exhaust Section for exhaust duct preparation.
• When installing the microwave oven beneath
smooth, flat cabinets, be 30w (76.2 cm)... and masking tape
MOUNTING SPACE
66w (167.6 cm) or More from the Floor to the Top of the Microwave
13"Maximum (33 cm) 161⁄2" (41.9 cm)
30" (76.2 cm)
2" (5.1 cm)
...
Installation Instructions (All Languages) - Page 6
... Styrofoam. OR
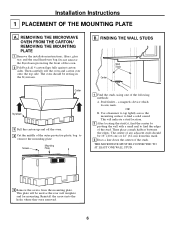
B. Installation Instructions 1 PLACEMENT OF THE MOUNTING PLATE
A. This will be 16w (40.6 cm) or 24w (61 cm) from the mounting plate. REMOVING THE MICROWAVE
OVEN FROM THE CARTON/ REMOVING THE MOUNTING PLATE
1 Remove the installation instructions, filters, glass tray and the small hardware bag. The...
Installation Instructions (All Languages) - Page 9
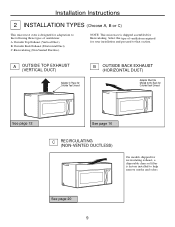
Recirculating (Non-Vented Ductless)
NOTE: This microwave is factory installed to help remove smoke and odors. A OUTSIDE TOP...ventilation: A.
See page 20
9 Installation Instructions
2 INSTALLATION TYPES (Choose A, B or C)
This microwave oven is designed for adaptation to the following three types of ventilation required for Recirculating.
Outside Back Exhaust (Horizontal Duct) C.
Installation Instructions (All Languages) - Page 12
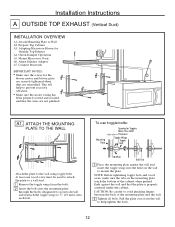
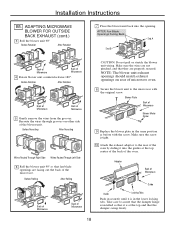
Adapting Microwave Blower for Toggles More Than Wall Thickness
Toggle Wings Toggle Bolt
Attach the plate to avoid pinching... has
been properly routed and secured, and that the plate is properly centered under the cabinet. Prepare Top Cabinet A3. Mount Microwave Oven A6. This will help tighten the bolts.
12
Wall Bolt End
3 Place the mounting plate against the wall and that the...
Installation Instructions (All Languages) - Page 14

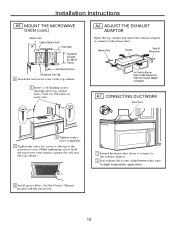
... back bottom edge onto four lower tabs of mounting plate.
2 Rotate front of cabinet.
14
Temporarily secure the oven by pulling cord.
1 Lift microwave, tilt it into the guides of the cord. Back of Microwave
7 Attach the exhaust adaptor to prevent cutting of the blower plate. Adaptor
Guide
Back of top cabinet. IMPORTANT...
Installation Instructions (All Languages) - Page 15
... applications.
8 Install grease filters. CONNECTING DUCTWORK
House Duct
6 Tighten center screw completely.
7 Tighten the outer two screws to the top of the microwave oven. (While tightening screws, hold the microwave oven in place against the wall and the top cabinet.)
1 Extend the house duct down to connect to the house duct. See the Owner...
Installation Instructions (All Languages) - Page 16
...Back of the
REAR WALL TEMPLATE.
16 Prepare Rear Wall B2. B2. Prepare Top Cabinet B5. Mount the Microwave Oven
IMPORTANT NOTES:
• Make sure the screws for outside exhaust.
Remove Blower Plate B3. Attach Mounting Plate....
• Cut the opening, following the instructions of Microwave
• Read the instructions on the REAR
WALL TEMPLATE.
• Tape it to Wall B4. B1.
Installation Instructions (All Languages) - Page 18
....
10 Attach the exhaust adaptor to assure that the damper hinge is at the top center of the back of the oven by sliding it into the opening. Adaptor
Back of Microwave
Guide
Guide
Locking Tabs
Push in the same position as before with the original screw. NOTE: The blower unit exhaust...
Installation Instructions (All Languages) - Page 19
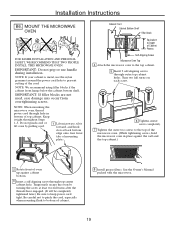
...Tighten the outer two screws to keep power cord tight. Temporarily secure the oven by pulling cord.
1 Lift microwave, tilt it tight throughout Steps 1-3. NOTE: We recommend using filler blocks ... completely tightened later.) Be sure to the top of the microwave oven. (While tightening screws, hold the microwave oven in bottom of oven up against cabinet bottom.
3 Insert a self-aligning screw ...
Complete Owner's Guide (English) - Page 1

All about the
Use &Care
of your Microwave Oven
316902416 (April 2010)
TABLE OF CONTENTS
WELCOME & CONGRATULATION 2 IMPORTANT SAFETY INSTRUCTIONS 2 PART NAMES 8 BEFORE OPERATING 10 MANUAL COOKING 11 AUTO COOKING 17
COOKING CHARTS 19 CLEANING AND CARE 21 SERVICE CALL CHECK 24 SPECIFICATIONS 24 WARRANTY 25
www.frigidaire.com USA 1-800-944-9044
www.frigidaire.ca Canada 1-800-265-8352
Complete Owner's Guide (English) - Page 2
...service numbers is only a phone call Frigidaire Customer Services at : http://www.frigidaire.com
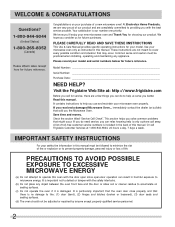
Before you better. Or call away. PRECAUTIONS TO AVOID POSSIBLE EXPOSURE TO EXCESSIVE MICROWAVE ENERGY
(a) Do not attempt to microwave energy. It is important not to providing you can relax knowing help you received a damaged Microwave Oven... Your satisfaction is damaged. Congratulations...
Complete Owner's Guide (English) - Page 4
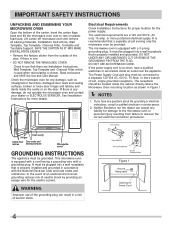
...grounded. The receptacle should be plugged into a wall receptacle that a separate circuit serving only the microwave oven be grounded. NOTES
1. It must be plugged into a wall receptacle that is properly installed and...
defrost wt/time
power level
1 2 3 ready
set
4
5
6
7
8
9
stop
0
start
cancel
+ 30 sec
exhaust hi·lo·off
light on plastic foam pad. DO NOT UNDER...
Complete Owner's Guide (English) - Page 11

... LOW setting to turn the light off
Note: If the temperature gets too hot around the microwave oven, the fan in the exhaust vent hood will hear beep alerts indicating the timer has run ...Exhaust High / Low / Off
The exhaust ventilation moves steam and other cooking vapors from being accidentally started or used by weight) feature.
11 Touch Timer pad once. Touch Timer pad. The lock will ...
Complete Owner's Guide (English) - Page 18
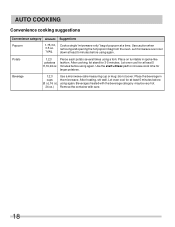
... suggestions
Convenience category Amount Suggestions
Popcorn
1.75,3.0, 3.5 oz. 1 pkg.
Place on turntable in
cups the microwave. Beverage
1,2,3
Use a microwave-safe measuring cup or mug; Use the start/+30sec pad to increase cook time for 3-5 minutes.
do not cover. Let oven cool for at least 5 minutes before
(8 oz,16 oz, using again.
Potato
1,2,3 potatoes 8,16...
Complete Owner's Guide (English) - Page 24

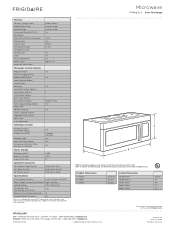
... USA or Canada. Complies with standards set for FFMV164LS, FFMV162L(B,M,W,S,Q), CFMV164LS, CFMV162L(B,M,W,S,Q) )
1000 W 2450 MHz (Class B/Group2)** 29 .88 "(W) x 15.75 "(H) x 15.04 "(D) 20.24 "(W) x 8.94 "(H) x 14.41 "(D) 1.6 Cu.Ft. This symbol on the nameplate means the product is listed by :
FCC
- A Does the microwave oven light come on page 22 and cancel...
Wiring Diagram (All Languages) - Page 1

...by producers. Remove wire leads. 2. Normal: Infinite. Measure continuity. Ventilation Motor
1. C/FFMV162L;C/FFMV164L
Wiring Diagram
Warning : Power must be repaired. Check from the common terminal to or loosening of...of the high voltage transformer before servicing this manual before operating The microwave oven. The output power is in the
Discharge the high voltage capacitor ...
Product Specifications Sheet (English) - Page 2
... Sensor Delay Start User Preferences
Ready-Select™ Stainless Steel Stainless Steel 1.6
1,000 Yes White 13-1/2"
Yes
Yes
Over-the-Range 23
High (1 - 9)
Microwave
Oven
Frigidaire Baseline
Yes
... 28262 • 1-800-FRIGIDAIRE • frigidaire.com CANADA • 5855 Terry Fox Way • Mississauga, ON L5V 3E4 • 1-800-265-8352 • frigidaire.ca
FFMV164L 07/10
© 2010...
Similar Questions

What Is The Part Number Of Mounting Bracket For Microwave Model Ffmv164ls
What is the part number of Mounting bracket for MicrowaveModel FFMV164LS
What is the part number of Mounting bracket for MicrowaveModel FFMV164LS
(Posted by balajipurush 6 years ago)

Frigidaire Microwave Fmv157gc Wont Start
(Posted by princLand 9 years ago)
Is A Grease Filter Important In A Microwave Oven
(Posted by Jdeander 9 years ago)

Frigidaire Microwave Oven Model Fgmv174kfa Door Wont Latch
(Posted by dpellhutchi 10 years ago)

How To Clean Inside Door Frigidaire Microwave Ffmv164lsa
(Posted by TITILhe 10 years ago)