Frigidaire FEX831FS Support Question
Frigidaire FEX831FS Support Question
Find answers below for this question about Frigidaire FEX831FS - 27" Electric Laundry Center.Need a Frigidaire FEX831FS manual? We have 4 online manuals for this item!
Question posted by ClaytMamaK on April 1st, 2014
Why Is So Much Lint Build Up In The Frigidaire Dryer Filter
The person who posted this question about this Frigidaire product did not include a detailed explanation. Please use the "Request More Information" button to the right if more details would help you to answer this question.
Current Answers
Related Frigidaire FEX831FS Manual Pages
Installation Instructions (All Languages) - Page 2
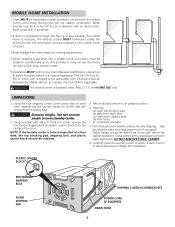
... lint. This Laundry Center ...electrical service to the Laundry Center must conform with local codes and ordinances and the latest edition of injury, and tell you cannot reach your safety the information in your building. • Clear the room, building...Laundry Center with rugs, bedspreads, or plasic sheets can kill or hurt you to children. • Installations must conform with this dryer...
Installation Instructions (All Languages) - Page 3

Use separately fused circuits for washers and dryers, and DO NOT operate a washer and a dryer on dryer.)
WATER SUPPLY REQUIREMENTS
Hot and cold ...of your water pressure.
POWER SUPPLY CORD -The gas laundry center is installed on the same circuit. USE COPPER CONDUCTOR ONLY.
1. ELECTRICAL REQUIREMENTS
ELECTRIC Laundry Center
NOTE: Do not under any circumstances remove grounding prong ...
Installation Instructions (All Languages) - Page 4
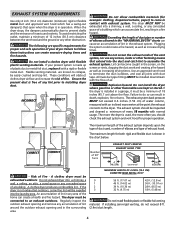
... every 18 months with flexible plastic venting materials. The dryer MUST NOT be easily crushed and trap lint. The maximum length for example: clothing, draperies/curtains, paper) to prevent drafts and the entrance of a building. The dryer must be connected to collapse, be exhausted into the laundry area. Use an approved vent hood to assemble...
Installation Instructions (All Languages) - Page 5

... are required to be used to connect your dryer to the dryer.
6.The dryer and its individual manual shutoff valve during any pressure testing of 1/2 inch (1.27 cm) pipe.
3.If codes allow, flexible metal tubing may be unobstructed when a door is required. T. INSTALLATION IN RECESS OR CLOSET
1.A laundry center installed in a bedroom, bathroom, recess or closet...
Installation Instructions (All Languages) - Page 6
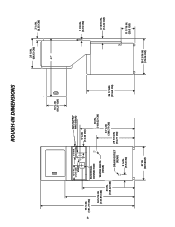
6
ROUGH-IN DIMENSIONS
16 ¼ IN. (41.27 CM)
12 ½ IN.
(31.75 CM)
VENT
9 3/8 IN. (23.81 CM)
75 ½ IN. (191.77 CM)
ELECTRICAL CONNECTION
54 5/16 IN. (137.95 CM)
43 IN. (109.22 CM)
WATER INLETS (REAR...¼ IN (104.77 CM) 29 7/16 IN (74.77 CM)
3 ¾ IN. (9.52 CM)
36 1/16IN. (91.60 CM)
27 IN. (68.58CM)
25 ¼ IN. (64.13 CM)
47"
2 ½ IN. (6.35 CM)
1 7/8 IN. (4.76 CM)
4...
Installation Instructions (All Languages) - Page 7
... tub blocking pad. (b) tape from the center of the washer backsheet. Plastic clamps secure the drain hose to page 4 for other important venting requirements.
4.When installing a gas dryer into a mobile home, a provision must be made for Mobile Homes. These clamps form a standpipe to an upright position.
4.
Return laundry center to prevent water syphoning. Rigid metal...
Installation Instructions (All Languages) - Page 8
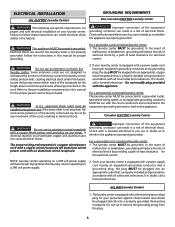
.... If in doubt as to follow these instructions can cause electrical shorts. Check with a three-prong (grounding) plug for your laundry center. Follow the instructions in this manual for proper grounding. ELECTRICAL INSTALLATION
ALL ELECTRIC Laundry Centers
GROUNDING REQUIREMENTS
Non-Canadian ELECTRIC Laundry Center
WARNING The following are specific requirements for proper and safe...
Installation Instructions (All Languages) - Page 9

... TERMINAL
NEUTRAL GROUND WIRE
NEUTRAL GROUND WIRE
5. Remove the screw securing the terminal block access cover to the rear panel and remove cover.
2. NON-CANADIAN ELECTRIC Laundry Center
1. Attach the green power cord ground wire to the outer brass-colored terminals on the terminal block. Tighten both screws securely.
6. Reinstall the terminal access...
Installation Instructions (All Languages) - Page 10

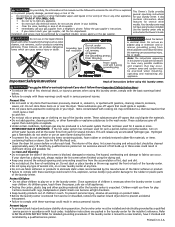
.... NOTE: DO NOT connect the laundry center to the dryer cabinet. NEVER TEST FOR GAS LEAKS WITH AN OPEN FLAME.
8. Place a level on the back of the drain hose with pliers. Connect a 1/2 inch (1.27 cm) I.D. Test all pipe connections.
10
Access Panel Screws WATER WILL SYPHON FROM THE WASHER IF THE ABOVE INSTRUCTIONS ARE NOT...
Installation Instructions (All Languages) - Page 11

... prior to light.
15. Wiring errors can become airtight chambers causing suffocation. Run the washer and dryer though a cycle. Maximum benefits and enjoyment are understood and practiced as boxes, clothing, etc.) obstructs the flow of air. If this laundry center are needed for play. If your Owner's Guide before the burner will shut the...
Complete Owner's Guide (English) - Page 2
... ammonia. instructed in the laundry center for several other appliance. These mixtures can produce dangerous fumes which can become airtight chambers. • Keep laundry products out of lint build-up in these Important Safety Instructions:
• To reduce the risk of the dryer, lint screen housing and exhaust duct should be installed and electrically grounded by qualified service...
Complete Owner's Guide (English) - Page 3

... lint. Add a measured amount of a gas laundry center must...Washer Operating Instructions for extra-large loads.
• Then add 1 cup (240 ml) water to the empty tub. Place delicate items in 1 quart (.95 L) water.
Pretreat stains and heavy soil. Do not pour bleach directly on
some models)
To reduce the risk of fire, electrical shock, or injury to the laundry center, the electrical...
Complete Owner's Guide (English) - Page 4

... left ). If fabric softener builds up the ribs and grooves and snapping it clockwise to balance the load.
7. Excess wrinkling, color transfer or odors may develop in automatic dryer, line dry, or dry flat as directed by lining up in the washer after the cycle has ended. Add laundry load to washer.
• Dry load...
Complete Owner's Guide (English) - Page 6
...8226;For an ongoing problem, install an iron
filter in pocket. water temperature, water level, and
preparing the wash load.
•Overloading the washer.
Rewash.
•Rub fabric softener stains with... in detergent booster or product containing enzymes.
•Wash in dryer.
•Load washed too long
•Remove lint with 1 quart (.95 L) water in plastic container. Common ...
Complete Owner's Guide (English) - Page 7
...lint screen is opened.
• Allow the drum to come to OFF.
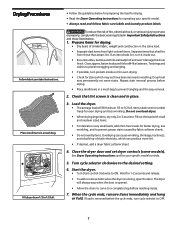
7 Hold for your specific model. • Always read and follow fabric care labels and laundry product labels. See Dryer Operating Instructions card for 1-2 seconds and release.
• To add or remove items when the dryer...a build-up of fire, electrical shock, or serious injury to 1/2 full. Do not overload dryer.
&#...
Complete Owner's Guide (English) - Page 8
... liquid fabric softener in the final rinse.
•Or, add a fabric softener sheet and tumble without heat.
•Use lint brush or roller to remove lint.
•Do not overload dryer. •Use fabric softener in washer or dryer to reduce
static electricity. •Remove items when they are dry, remove the rack and replace the...
Complete Owner's Guide (English) - Page 9

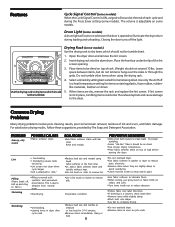
... door opening , and the underside of lint build-up . Remove cleanser residue before drying...Dryer
• Clean the dryer lint screen after every load. Hazardous fumes or electrical shock could result in place.
• If the dryer drum becomes stained from the washer as soon as the cycle ends. Or, touch residue with the sticky side of the tape or label.
• Before moving the laundry center...
Complete Owner's Guide (English) - Page 12

... models). Outside exhaust hood or exhaust duct Clean out any obstruction.
Make sure electrical line is not overloaded and the dryer is restored. Thermal limiter tripped. If 1 of rigid or flexible metal. Make sure all lint has been removed from the dryer lint screen before starting each cycle. When in place, the duct must have...
Operating Instructions (Operating Instructions) - Page 1
... makes items easier to desired setting. This cycle is best for regular and permanent press items that lint screen is best for items of fire, electric shock, or injury to desired cycle and setting.
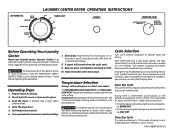
LAUNDRY CENTER DRYER OPERATING INSTRUCTIONS
AUTOMATIC
COOL DOWN
LESS DRY
MORE DRY
COOL DOWN
10
20
100
TIMED DRY
90
80...
Operating Instructions (Operating Instructions) - Page 2
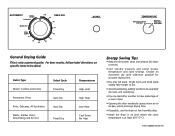
... Auto Dry
Timed Dry
Temperatures High Heat High Heat Low Heat Cool Down No Heat
Energy Saving Tips
• Keep the lint screen clean and exhaust the dryer correctly.
• Sort laundry properly and select proper temperature and cycle settings. For best results, follow label directions on specific items to escape, which prolongs...
Similar Questions


Frigidaire Laundry Center Glet1031cs0 Dryer Spins But Won't Heat
(Posted by krld2diegof 10 years ago)

Washer Dryer Combo, Washer Won't Agitate, Dryer Wont Heat Up
(Posted by sakparr25 10 years ago)

Frigidaire Laundry Center Dryer Won't Start
(Posted by indvm 10 years ago)

Frigidaire Dryer - Softener Sheet Drops Into Dryer Lint Filter Hole
While I was washing another load in the washing machine, I opened the dryer and took away the dryer ...
While I was washing another load in the washing machine, I opened the dryer and took away the dryer ...
(Posted by katrinahoi 11 years ago)