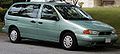
1998 Ford Windstar Support Question
1998 Ford Windstar Support Question
Find answers below for this question about 1998 Ford Windstar.Need a 1998 Ford Windstar manual? We have 3 online manuals for this item!
Question posted by rpafelipo on March 12th, 2014
How To Remove Center Seat On 1998 Windstar
The person who posted this question about this Ford automobile did not include a detailed explanation. Please use the "Request More Information" button to the right if more details would help you to answer this question.
Current Answers
Related Manual Pages
Owner Guide 1st Printing - Page 17

... that the fuel cap is not properly installed, pull off when the key is charging. Remove and replace the cap, making sure it is safely possible and turn off when the self...a qualified technician. The charging system light
15 The light should turn your battery is properly seated.
The light illuminates briefly during the display self-test every time you suspect that your ignition ...
Owner Guide 1st Printing - Page 40
... and/or ignition is on or off. Electronic Sound Systems
s Automatic Disc Storage
If the disc is ejected from the CD player but is not removed from the center out to the edges.
Owner Guide 1st Printing - Page 77
...the flow of air are also directed to R (FLOOR). Turn the Fan Speed Knob to the back seats. They could block the air intake. 77 To defrost the windshield and side windows:
s Turn the ... until the engine has been running for sufficient time as indicated by the engine coolant temperature gauge. Remove any snow, ice, or leaves from the area below the windshield on the outside of your vehicle...
Owner Guide 1st Printing - Page 124

... be sure that it from the four retainers.
124 To remove the cargo net, remove the loops from moving around the cargo area. The cargo ...restrained in the net must not exceed 50 lbs. (22.5 kg) or the net may not stay secured. Cargo Net (If equipped)
The cargo net is designed to hold your cargo upright between the third row bench seat...
Owner Guide 1st Printing - Page 141

... in whatever position they are vertically adjustable. If so, stop pushing the seatback momentarily, then resume. Your Windstar tip slide seat has been equipped with head restraints which prevents the seatback from returning to unlatch the seat. To adjust the head restraints up, simply pull up on them back downward, push down. RWARNING...
Owner Guide 1st Printing - Page 144

... on the head restraint guides and lift the head restraints out.
2nd Row Seat
To convert the seat to a bed. Push the seatback down .
2. Seat/Bed Conversion (If equipped)
The head restraints must be removed before converting the seat to a bed:
1. To remove the head restraints, pull the head restraints all the way up, then push...
Owner Guide 1st Printing - Page 148

3rd row seat (bed position)
Removing the Seats
Quick release second row bucket seats (If equipped)
To remove the second row bucket seats:
1. Pull the seat rearward to disengage from the front floor
pins.
148 While lifting the handles, lift the seat at the rear of floor attachments, release the latch handles.
3. When seat latches are clear of the seat
near...
Owner Guide 1st Printing - Page 149

... into the vehicle. 2. Two and Three Passenger Bench Seat Assemblies
NOTE: It is in position. Lift the seat assemblies into the slot provided on to the pins in the rear seating compartments before seat removal.
RWARNING Check to remove/reinstall both the second and third row bench seats through the sliding door. Never attempt to wind up...
Owner Guide 1st Printing - Page 153

... latch handles is not required for bench seats equipped with built-in child safety seat), place the seat assembly in your vehicle. Seating and Safety Restraints
Figure 3: Removal and installation of debris around the seat floor attachments. 2. To install the seat assembly:
1. Tip the seat assembly forward and engage the front seat hooks onto the forward attachment pins in...
Owner Guide 1st Printing - Page 154

... increase the risk of injury.
RWARNING When reinstalling a rear seat in your vehicle it is not twisted. Remove any twist, then insert the tongue end of the seat will reduce effort on the latch. Whenever the second row bench seat is using the outboard seating position (nearest the sliding door), the lap/shoulder safety belt...
Owner Guide 1st Printing - Page 161

...operation.
161 When this seat. Seating and Safety Restraints
In addition to safety belt anchorages in ...seat by inserting a key or
small screwdriver into the slot provided on the detachable anchor (see Figure 2). The safety belt should always remain attached to this anchor except when removing this shoulder belt assembly is free of the seat. When removing the second row bench seat...
Owner Guide 1st Printing - Page 163

... detachable anchor until you insert it into the detachable anchor. A twisted safety belt may cause the retractor to "Seats" in this section for information on removing and installing seats. After re-installing the second row bench seat, make sure that the safety belt is not twisted before you hear a "snap" and feel the latch...
Owner Guide 1st Printing - Page 165

... will switch back to shorten the belt, pull on the buckle.
165 See detailed instructions under Safety Seats for Children later in the automatic locking mode (child restraint mode).
3. This indicates that the retractor is...mode. Do not wear it to fit snugly and as low as the belt is in the center of the belt and pull downward
until it and tip the belt tongue at a right angle to...
Owner Guide 1st Printing - Page 166
...buckle support assemblies (slide bar) (if so equipped), child safety seat tether bracket assemblies (if so equipped), and attaching hardware, should ... in use during a collision should be inspected after any collision. Safety belt assemblies not in the center rear seating position
Safety Belt Maintenance
Check the safety belt systems periodically to be replaced.
Safety belt extensions are ...
Owner Guide 1st Printing - Page 169
... there.
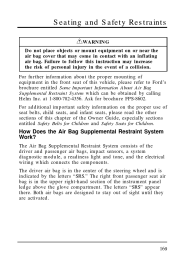
How Does the Air Bag Supplemental Restraint System Work? The right front passenger seat air bag is indicated by calling Helm Inc. The Air Bag Supplemental Restraint System consists of the steering wheel and is in the center of the driver and passenger air bags, impact sensors, a system diagnostic module, a readiness...
Owner Guide 1st Printing - Page 185
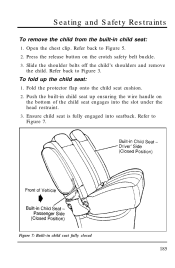
... to Figure 3. Slide the shoulder belts off the child's shoulders and remove
the child. Push the built-in child seat up the child seat:
1. Figure 7: Built-in child seat:
1. Refer back to Figure 5. 2. Seating and Safety Restraints
To remove the child from the built-in child seat fully closed
185 Refer to
Figure 7. Open the chest clip.
Owner Guide 1st Printing - Page 187

... tether straps see Attaching Safety Seats With Tether Straps in a seating position which is capable of the rear-facing seat against the vehicle seatback. REAR-FACING INFANT SEATS MUST ALWAYS BE SECURED IN THE REAR SEAT, and other child seats and 187 Moving the child closer to the center of a child safety seat having a top tether strap. Safety...
Owner Guide 1st Printing - Page 190

Pull down on shoulder belt, then grasp shoulder belt and lap
belt together. Position the child seat in the center of passenger seat. 2. See Figure 1.
190 For seating positions equipped with a dual-locking mode retractor, use the following procedure:
1.
Owner Guide 1st Printing - Page 198
... until you hear a snap and feel it latch. Push down on the child seat while pulling on tongue.
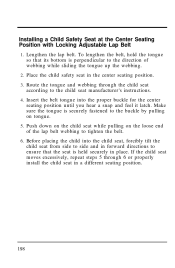
5. Installing a Child Safety Seat at the Center Seating Position with Locking Adjustable Lap Belt
1. Insert the belt tongue into the child seat, forcibly tilt the
child seat from side to side and in forward directions to the child...
Owner Guide 1st Printing - Page 277
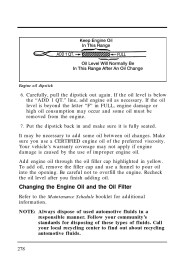
...add some oil must be removed from the engine.
7. Be careful not to the Maintenance Schedule booklet for disposing of these types of the preferred viscosity. Follow your local recycling center to pour oil into ..., engine damage or high oil consumption may not apply if engine damage is fully seated. To add oil, remove the filler cap and use of used automotive fluids in and make sure it is...
Similar Questions


How To Remove Door On2002 Ford Windstar Roof Console
(Posted by salehjka 10 years ago)

My 1998 Ford Windstar Won't Start. We Think It Is The Fuel Pump.
A friend said there is a ceramic resistor behind the right front headlamp, that if it is cracked, ke...
A friend said there is a ceramic resistor behind the right front headlamp, that if it is cracked, ke...
(Posted by timhav8tor 10 years ago)

Where Can I Get A Repair Manual For My 1998 Ford Windstar
I have a clanking noise in my engine (Ford Windstar 1998). Where can I get a repair manual online to...
I have a clanking noise in my engine (Ford Windstar 1998). Where can I get a repair manual online to...
(Posted by johannaaurelius 10 years ago)