
Electrolux PLMV169DC Support Question
Electrolux PLMV169DC Support Question
Find answers below for this question about Electrolux PLMV169DC.Need a Electrolux PLMV169DC manual? We have 3 online manuals for this item!
Question posted by andyfoley on January 28th, 2016
How Do You Remove Door?
The bottom screw that holds the lower hinge is stripped and I need to replace it.
Current Answers
Answer #1: Posted by Odin on January 28th, 2016 6:00 PM
Odin

Member since:
April 10th, 2010 Points: 41,236,650

Member since:
April 10th, 2010 Points: 41,236,650
Hope this is useful. Please don't forget to click the Accept This Answer button if you do accept it. My aim is to provide reliable helpful answers, not just a lot of them. See https://www.helpowl.com/profile/Odin.
Related Electrolux PLMV169DC Manual Pages
Use and Care Manual - Page 2
..., you better. Model Number
Serial Number
Purchase Date
NEED HELP? Visit the Frigidaire Web Site at 1-800-944-9044, 24 hours a day, 7 days a week. Check the section titled "Service Call Check". Or call for future reference. door seals and sealing surfaces.
• The Microwave Oven Should Not be followed to minimize the risk...
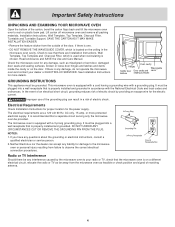
Use and Care Manual - Page 3
... paper or plastic bags before removing the container.
- Remove wire twist-ties from the microwave oven is necessary when used by children.
• Do not operate this appliance only for its intended use this appliance.
Grease should ignite, keep microwave oven door closed glass jars-are able to be overheated beyond the boiling point without...
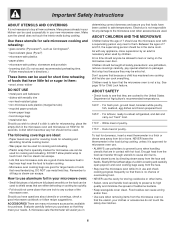
Use and Care Manual - Page 4
.... 2. It is equipped with a 3-prong grounding plug. SAVE THE CARTON AS IT MAY MAKE INSTALLATION EASIER. • Remove the feature sticker from the microwave oven as misaligned or bent door, damaged door seals and sealing surfaces, broken or loose door hinges and latches and dents inside the cavity or on plastic foam pad. Check the microwave...
Use and Care Manual - Page 5

... to boil during or shortly after the microwave oven has shut off. Remove food from hands and face.
• Do not overcook potatoes. Look for microwave cooking principles, techniques, hints and recipes. ABOUT FOODS
• Do not pop popcorn in narrownecked containers such as needed. It increases the heat around the magnetron and...
Use and Care Manual - Page 6
..., remove coverings carefully, pay special attention to packages that are in the same room. Children should anyone be
used to them :
• wood, straw, wicker
DO NOT USE
• metal pans and bakeware • dishes with hot food. NEVER leave the thermometer in the microwave oven and microwave on the microwave oven door. DO...
Use and Care Manual - Page 7
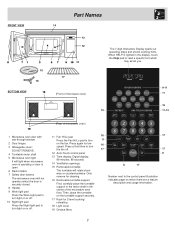
...
13 12
15 16 BOTTOM VIEW
17 (Front of microwave oven)
1 Microwave oven door with see-through window
2 Door hinges 3 Waveguide cover:
DO NOT REMOVE. 4 Turntable motor shaft 5 Microwave oven light
It will light when microwave oven is operating or door is open. 6 Rack holders 7 Safety door latches The microwave oven will rotate clockwise or counterclockwise. Press a third time to the...
Use and Care Manual - Page 8

...oven can be programmed with the door open except for 5 minutes at 30%.
1. Enter cooking time 5,0,0. 2.
MANUAL DEFROST
If the food that are both zeros.
• Suppose you need...program during cooking. 4. Using lower power levels increases the cooking ...eight times or hold down until totally ...oven periodically to remove or separate the portions that you want to your new microwave oven...
Use and Care Manual - Page 9
...and quantities.
Cover dish loosely; Be careful when removing any browning dish on the turntable with the rack ... paper, overlap two pieces at room temperature.
4. You don't need to calculate cooking time or power level.
• Suppose you ...open the microwave oven door or touch Clear/Off during any microwave cookbook.
6.
Touch Sensor Reheat pad.
Using a lower power level will...
Use and Care Manual - Page 10
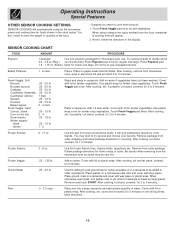
...or until all liquid has been absorbed.
10 You don't need to enter the weight or quantity of water. Press Popcorn pad once for microwave oven use.
Fresh Veggie: Soft
Broccoli
.25 - 2.0 lb
...
diced
.25 - 1.5 lb
halves
1 - 2
Wash and place in the display. Remove package from the microwave oven as patties or in a casserole and cover with lid or plastic wrap. Frozen Entrees
...
Use and Care Manual - Page 15
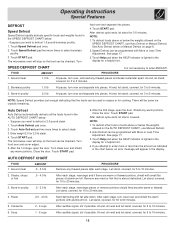
... 2.0 lb steak. 4. Enter weight 2,0 for 3 to 20 minutes. The microwave oven will appear in the display. After the 2nd stage, open the door. NOTE:
1. Steaks, chops or fish
.5 - 4.0 lb
3. After each stage... with More or Less Time Adjustment. Ground meat
1.0 lb
At pause, turn over , removed any warm portions. Touch Auto Defrost pad two more times to enter AMOUNT. After audible ...
Use and Care Manual - Page 17
...begin counting up to desired degree, remove finger from excessive temperature rise. START ...Clock, the number 0 and touch START and hold for the high fan speed. When the cheese... x 9 x 2 glass utility casserole, are needed, open and close door or touch Clear/Off pad. Touch Timer/Pause ...read cooking and operating hints.
17
Microwave oven stops immediately.
Touch Timer/Pause pad. ...
Use and Care Manual - Page 18
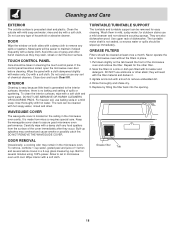
...oven door before cleaning. Wipe the panel with a cloth dampened slightly with a soft cloth and warm water. rinse thoroughly with a soft cloth.
To remove,...oven and remove the filter. Wipe interior with a soft cloth. WAVEGUIDE COVER
The waveguide cover is not sealed, so excess water or spills should be easier to remove any food spatters from mica so requires special care. Replace...
Use and Care Manual - Page 19
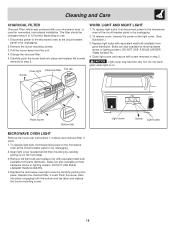
... back into place and replace the screws
removed in step 2.
Replace light bulbs with your microwave oven, is on the light cover. (See illustration.)
3. To replace light bulb, first disconnect power to the microwave oven at the circuit breaker panel or by unplugging.
2. Light cover
Screw Light bulbs
19 Oven light Charcoal filter Top tab Screw
WORK LIGHT AND NIGHT...
Use and Care Manual - Page 20
...15/16"(W) x 16 3/8"(H) x 16 15/16"(D) 21"(W) x 8 7/8"(H) x 14 7/16"(D) 1.6 Cu.Ft.
If time appearing in the microwave oven and close the door securely. each (incandescent light bulbs)
* The International Electrotechnical Commission's standardized method for holding food is listed by Underwriters Laboratories, Inc.
- Actual capacity for measuring output wattage. These microwave...
Use and Care Manual - Page 21
...causes such as abuse, misuse, inadequate power supply or acts of shipping the replacement part to any part of the microwave oven which proves Cost of the U.S.A., Puerto Rico, and Canada. Box 212378 ... have been removed or altered and cannot be defective in ordinary household use of the appliance when it is warranted by Electrolux Home Products, Inc. IF YOU NEED SERVICE
Keep your...
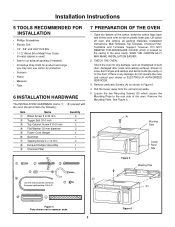
Installation Instructions - Page 3
... oven and contact your dealer or ELECTROLUX AUTHORIZED SERVICER.
3. CHECK THE OVEN. If there is used) • Saw to cut exhaust opening (if needed)...oven over to common scale.
3
Figure 6 Loosen the two Mounting Screws (D) which is located on plastic foam pad.
Remove and save Screws (A) as misaligned or bent door, damaged door seals and sealing surfaces, broken or loose door hinges...
Installation Instructions - Page 4
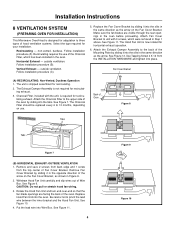
...SYSTEM
(PREPARING OVEN FOR INSTALLATION)
This Microwave Oven/Hood is now rotated for horizontal exhaust operation.
6. non-vented, ductless.
The Charcoal Filter should be replaced every 6 to... of Oven
Figure 8
Tabs
Tabs
Figure 7
(B) HORIZONTAL EXHAUST: OUTSIDE VENTILATION 1. Follow installation procedure (C).
5. Remove and save 2 screws from back edge and 1 screw
from the...
Installation Instructions - Page 5

... in Figure 8.
2. Align the Mounting Plate carefully and hold in the INSTALLATION HARDWARE, from the Toggle Nuts.
2. ...Replace the Fan Cover Bracket by sliding it into A, B, C and D where appropriate (these correspond to instructions in Step 1 above. See Figure 11. NOTE: THIS OVEN SHOULD BE ATTACHED TO AT LEAST ONE WALL STUD. Use wood screws to attach mounting plate to tighten.
Remove...
Installation Instructions - Page 6
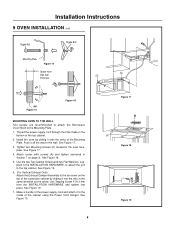
... 19 Installation Instructions
9 OVEN INSTALLATION cont. See Figure...OVEN TO THE WALL Two people are recommended to attach the Microwave Oven/Hood to the top cabinet. See Figure 17.
3. Install the oven by sliding it to the wall.
Thread the power supply cord through the hole made in the same direction as the arrow. Attach louver with screws (A) and tighten (removed in the oven...
Parts Catalog - Page 7

..., door, white Handle, door, stainless steel Screw, 4mm x 8mm Screw, 4mm x 12mm Hardware, installation, kit Sleeve, power cord, grommet Screw, toggle Hook, screw-in, cord holder Screw, 5mm x 60mm Screw, 4mm x 12mm Screw, wood, 5mm x 35 mm, (6) Washer, flat, 30mm, (2) Template, installation, top Template, installation, wall Wire, high voltage-A Wiring Harness, main-A Rack, microwave oven, wire Screw...
Similar Questions

Front Door Removal And Repair.
How can I remove the front door or take it apart so that I can tighten the handle that operates the ...
How can I remove the front door or take it apart so that I can tighten the handle that operates the ...
(Posted by carl15445 8 years ago)

Microwave Door Hinges
I own this microwave and the door hinges have almost detached themselves from the unit. Can I access...
I own this microwave and the door hinges have almost detached themselves from the unit. Can I access...
(Posted by steveharrall 9 years ago)

My Electrolux Ew30ew65gs Has Shut Down And Showing A F10 Error Code And Beeping?
I shut off breaker overnight and turned back on in the morning. It was fine until I was about 30 min...
I shut off breaker overnight and turned back on in the morning. It was fine until I was about 30 min...
(Posted by sharonlvillars 10 years ago)

What Does An Error Code F20 Mean On An Electrolux Double Wall Oven?
(Posted by Anonymous-112936 10 years ago)
Error F24
When I turn on the lower oven I get beeping and an F24 error. Beeping stops when I hit cancel. When ...
When I turn on the lower oven I get beeping and an F24 error. Beeping stops when I hit cancel. When ...
(Posted by twinmom2x2n1 11 years ago)