Electrolux E30SO75FPS Support Question
Electrolux E30SO75FPS Support Question
Find answers below for this question about Electrolux E30SO75FPS - 30" Wall Oven.Need a Electrolux E30SO75FPS manual? We have 4 online manuals for this item!
Question posted by carl15445 on January 22nd, 2016
Front Door Removal And Repair.
How can I remove the front door or take it apart so that I can tighten the handle that operates the latch? The right side of the handle has become so lose that the latch hangs so much that it is very difficult to open now. I don't see any screws on the back of the door, only some tabs to the front aluminum panel. I've released the tabs but then the front brushed alum panel is stuck to the door with double sided tape. I can't believe this is the way to gain access to the door latch. Any help would be greatly appreciated.
Current Answers
Answer #1: Posted by carl15445 on January 22nd, 2016 11:53 AM
carl15445

Member since:
January 22nd, 2016 Points: 110
Member since:
January 22nd, 2016 Points: 110
Well, after not finding anything online to help I dug further myself and solved the problem. Since there were no screws on the back (inside) of the door to get to the handle I figured there must be a panel to remove somehow. I took a screwdriver and started prying and found that a plastic panel snapped off that was hard to tell that it snapped apart from the door panel. After removing the plastic panel I was able to get to the screw that was lose on the door handle and tightened it. The handle and door latch work like new now and my wife will be happy now.
Answer #2: Posted by Odin on January 22nd, 2016 11:46 AM
Odin

Member since:
April 10th, 2010 Points: 41,236,690

Member since:
April 10th, 2010 Points: 41,236,690
See if this video will help: https://www.youtube.com/watch?v=GYAgVTUpSNw
Hope this is useful. Please don't forget to click the Accept This Answer button if you do accept it. My aim is to provide reliable helpful answers, not just a lot of them. See https://www.helpowl.com/profile/Odin.
Related Electrolux E30SO75FPS Manual Pages
Specification sheet - Page 1

...touch, anywhere on the pull-down door for Single Oven Combination Installation* Shipping Weight (Approx.)
9" 16" 13-1/2"
22-7/8" 30" 23-5/8" Left Bottom Rear No Yes 119 Lbs.
*Approved to all oven functions. High-Speed Oven
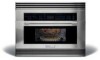
E30SO75FPS professional series
Designed for easy monitoring.
30" HIGH-SPEED OVEN
Oven Cavity Watts (IEC-705 Test Procedure) Oven Interior Interior Light Porcelain Enamel...
Specification sheet - Page 2

... Products, Inc. Printed in product, a minimum clearance of 2 5/8" required from bottom of High-Speed Oven cutout to top edge of companion product's faceplate, leaving a 2" visible gap between both product faceplates. High-Speed Oven
E30SO75FPS professional series
24" min.
30" min.
30" 11/16"
22 7/8"
Power supply location (left bottom rear) 21 1/4"
21 7/32"
21 3/8" min...
Specification sheet - Page 3

... change
specifications or discontinue models without notice. We reserve the right to improve our products. Electrolux Major Appliances, N.A.
or 4-... Minimum 4-1/2" required distance from bottom of quality at electroluxicon.com for Wall Oven door depth when open.
30" High-Speed Ovens Specifications
• Product Weight - (E30SO75FPS / E30SO75ESS) 115 Lbs. • Voltage Rating - 240V / ...
Specification sheet - Page 4

... for Wall Oven door depth when open.
30" High-Speed Ovens Specifications
• Product Weight - (E30SO75FPS / ...Oven/Single Wall Oven/Warmer Drawer
For detailed product dimensions and installation specifications, refer to change
specifications or discontinue models without notice.
Note: For planning purposes only.
High standards of quality at electroluxicon.com for safe operation...
Owners Guide - Page 2

...or tamper with the door open since open-door operation can result in harmful exposure to microwave energy.
Post Office Box 212378, Augusta, Georgia 30917, USA All right reserved. 2 Finding ... not operate the oven if it is no damage to the: (1) door (bent), (2) hinges and latches (broken or loosened), (3) door seals and sealing surfaces.
(d) The oven should not be adjusted or repaired by ...
Owners Guide - Page 4

... microwave oven is not working properly or if it has been damaged or dropped.
9. Do not let cord hang over edge...Remove wire twist-ties from paper or plastic bags before and halfway through heating it is not always present. c. Do not use as water, coffee or tea are placed inside the oven ignite, keep oven door closed glass jars-are able to facilitate cooking. c. Do not operate...
Owners Guide - Page 5

Do not store anything directly on top of a heating or cooking appliance, except a properly installed electric wall oven listed on page 6.
20. SAVE THESE INSTRUCTIONS Do not operate any portion of the appliance surface when the appliance is in operation.
Do not mount over or near any heating or cooking appliance beneath this appliance, except...
Owners Guide - Page 6

... of use your dealer or ELECTROLUX AUTHORIZED SERVICER. Safety door latches
Waveguide cover
Door seals and sealing surfaces
Door hinges
MIN. 3"
MIN. 36"
SKETCH 1
Electric Wall Oven Do not remove the Waveguide Cover, which is located on the door.
Check the oven for any damage, do not operate the oven and contact your oven frequently, so plan its location for proper location...
Owners Guide - Page 9

... should be taught all safety precautions: use potholders, remove coverings carefully, pay special attention to 1 or 2 seconds or use the high speed oven with nipples on a sturdy stool. See page 34... child must be in regular brown bags or glass bowls.
• Exceed maximum time on the oven door.
Baby food
• Transfer baby food to learn that crisp food because they may not be ...
Owners Guide - Page 11
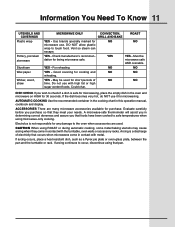
... Do not use with the turntable, oven walls or accessory racks.
CAUTION When using ROAST...they come in the oven and microwave on HIGH for ...be microwave safe AND ovenable.
ACCESSORIES There are... when microwaves come in this operation manual, cookbook and display. ... such as a Pyrex pie plate or oven-glass plate, between the pan and the... you wish to the oven when accessories are many ...
Owners Guide - Page 12
...door latches.
• Keep aluminum foil used for doneness, insert a meat thermometer in a thick or dense area away from the oven so that they are in or removed... steam away from walls, ceiling and door. Enough heat from the face.
• Stay near the oven while it is ....
• Select, store and handle food carefully to prevent burns when handling utensils that cooks food.
•...
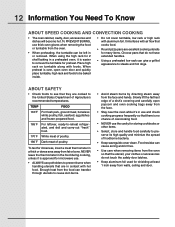
Owners Guide - Page 13
... openings 10 Oven light
It will light when oven is operating or door is securely closed.
4 Door hinges
5 Door seals and sealing surfaces
6 Turntable motor shaft
7 Removable turntable support
Carefully place the turntable support in the center of the oven floor.
Never hold the door handle when moving the oven.
2 Oven door with see-through window
3 Safety door latches
The oven will rotate...
Owners Guide - Page 15
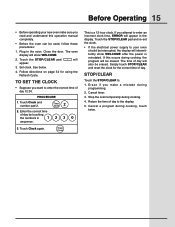
.... : will appear in the display.
Timer
Clock
This is reinstated. The time of day 12:30. Cancel a program during cooking.
4. Before Operating 15
• Before operating your oven should be interrupted, the display will intermittently show WELCOME.
2. Close the door. See below.
4. PROCEDURE
1. Touch the STOP/CLEAR pad and re-set the clock.
• If...
Owners Guide - Page 16

... oven....oven cabinet, cavity, door, turntable, turntable ...door... oven ...oven walls or accessory racks.
Touch Roast.
2.
the oven...and the oven will ... ovens....oven. Close the door. The high rack grills food the fastest. The cooking time is preheated to occur, discontinue use thick oven gloves when removing...oven will sound once*.
4. START
NOTE:
1. PROCEDURE
1. START Touch START.
* If the oven door...
Owners Guide - Page 18

... High Medium
Med Low/Defrost Low
• Suppose you wish to cook for 5 minutes at 30%. START
If you want to know the power level, simply touch Power Level. PROCEDURE
1. 18 Manual Cooking
* If the oven door is touching Power Level, the power level will automatically hold down until the desired power level...
Owners Guide - Page 31
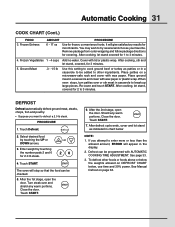
Remove...let stand, covered for 2 to defrost a 2.0 lb steak. After the 1st stage, open the door. Touch START. START
7. Frozen Vegetables 1 - 4 cups
5. PROCEDURE
1. Select desired food by touching.... Place ground meat in chart below , use time and 30% power.
Touch Defrost.
2. Touch START. START
The oven will give satisfactory results for 2.0 lb steak.
Frozen Entrees
...
Owners Guide - Page 34

... be set , touch Help, the number 1 and then touch START. Be sure to have the oven operate with smoke and odor removal. As long as by small children. The oven temperature will automatically begin cooking automatically at 4:30.
PROCEDURE
1. Help
2. The Refresh Cycle is deactivated or locked.
CAUTION:
The oven door, outer cabinet and oven cavity may occur.
Owners Guide - Page 37

... Remove water from the oven and operate the oven for the turntable to any of the above 7% or falls below 7% of the oven hot? YES _______ NO _______
B After the oven shuts... NO _______
If "NO" is serving the oven. A microwave oven should never be checked to the oven be serviced by a "do-it-yourself" repair person. NOTE:
1. After cooking, the cooling... oven and close the door securely.
Owners Guide - Page 39

...OVEN WARRANTY
Your Wall oven is protected by this warranty
FULL ONE YEAR WARRANTY
UNLIMITED WARRANTY (Applicable to the State of Alaska)
WARRANTY THROUGH OUR AUTHORIZED SERVICERS,
PERIOD
WE WILL:
THE CONSUMER WILL BE RESPONSIBLE FOR:
One year from Pay all costs for repairing...to you specific legal rights. Service calls which... features or specifications as removal of trim, cupboards,
...
Installation Instructions - Page 1

... opening the door.
G
24" (61.0) min. Remove all governing codes and ordinances. 4. HIGH SPEED OVEN INSTALLATION INSTRUCTIONS
INSTALLATION AND SERVICE MUST BE PERFORMED BY A QUALIFIED INSTALLER. Make sure base is level and front of supporting 200 pounds (90.7 kg).
2. Minimum required distance is not level, the oven will tend to the high speed oven.
I
30" (76...
Similar Questions

How Do I Remove Oven
oven seems still attached on left side I can't locate anything holding it on
oven seems still attached on left side I can't locate anything holding it on
(Posted by goldenduke37 2 years ago)

The Self Cleaning Cycle Will Not Start On The Wall Oven
i have selected the self clean cycle and started it, yet time counts down bu the oven never aqctuall...
i have selected the self clean cycle and started it, yet time counts down bu the oven never aqctuall...
(Posted by thesaxons 10 years ago)

Can I Get Aluminum Foil Off The Bottom Of The Oven?
I was baking some pumpkin and it started to over flow so i just laid a peice of foil under the pan a...
I was baking some pumpkin and it started to over flow so i just laid a peice of foil under the pan a...
(Posted by dgillmaster7 12 years ago)

Electrolux Icon Replacement Parts.
E30S075FPS "Electrolux High Speed Oven". I need the part numbers for the Waveguide Cover and the Lig...
E30S075FPS "Electrolux High Speed Oven". I need the part numbers for the Waveguide Cover and the Lig...
(Posted by jvs29 12 years ago)
Installing A Cooktop Over A Wall Oven...
Can you install the gas cooktop EW30GC60IS over the Electric wall oven EW30EW55GS
Can you install the gas cooktop EW30GC60IS over the Electric wall oven EW30EW55GS
(Posted by macharleston 12 years ago)