Electrolux EWFLW65H Support Question
Electrolux EWFLW65H Support Question
Find answers below for this question about Electrolux EWFLW65H - 27'' Front-Load Washer.Need a Electrolux EWFLW65H manual? We have 1 online manual for this item!
Question posted by coooker1 on January 14th, 2011
Are There Any Known Problems With This Washer?
Electrolux EWFLW65HTS
Current Answers
Related Electrolux EWFLW65H Manual Pages
Installation Instructions - Page 2
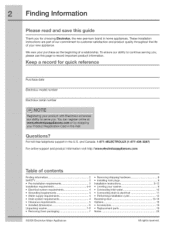
... 7-8
Removing foam packaging 7
Removing shipping hardware 8
Installing hole plugs 8 Installation instructions 9-12
Leveling your washer 9
Connecting inlet water 10
Connecting drain & electrical 11
Performing installation cycle 12 Reversing door 13-18
Options
19
Accessories 19
Replacement parts 19
Notes
20
©2008 Electrolux Major Appliances
All rights reserved.
Installation Instructions - Page 3

...; Do not try to situations that may cause bodily injury or property damage.
Save these instructions for installation:
OR
OR
OR
Universal wrench
supplied wkh washer
Adjustable wrench
3/8" or 10 mm box wrench
Ratchet and socket set
AND
Adjustable plbrs
AND
Carpenter's level Safety
[mpoAant Safety Instructions
Recognize safety symbols, words...
Installation Instructions - Page 4
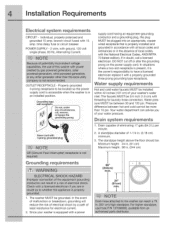
... an appropriate, copper wired receptacle that is equipped with the National Electrical Codes, ANSI/NFPA 70 (latest edition). The washer MUST be installed within 42 inches (107 cm) of least resistance for laundry hose connection.
Individual, properly polarized and grounded 15 amp. POWER SUPPLY - 2 wire, with a properly grounded three prong grounding type...
Installation Instructions - Page 5
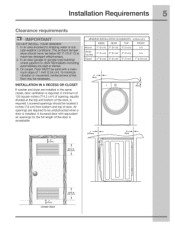
Counter 0" (0 cm) 0" (0 cm)* 0" (0 cm)
n/a
Closet
0" (0 cm) 0" (0 cm)* 0" (0 cm) 1" (2.54 cm)
iNSTALLATiON iN A RECESS OR CLOSET
If washer and dryer are required to be located 3 inches (7.6 cm) from bottom and top of door. A Iouvered door with equivalent air openings for the full length ...
Installation Instructions - Page 6
...90 ° elbow.
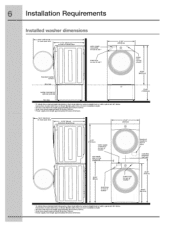
50.6" (128.5cm) _ to clear open door
(80.01cm) to front of closed door
27.00 (68.5cm)
power cord on rear of unit 3
38.00"
!(96.52cm)
53.00" (134.62cm)...
59 inches (150cm).
3 Power supply cord length approximately
60 inches (152.5cm).
installation Requirements
Installed washer dimensions
(128.53cm)* to clear open door
31.50" (80cm)* -to front of closed door
water...
Installation Instructions - Page 7
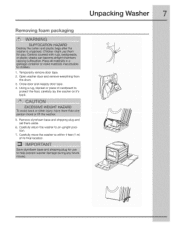
... and shipping plug and set them aside.
6. Carefully return the washer to protect the floor, carefully lay the washer on it's back.
!
5. Temporarily remove door tape.
2. Close door and reapply door tape.
4. Open washer door and remove everything from the drum.
3. Carefully move the washer to within 4 feet (1 m) of cardboard to an upright position...
Installation Instructions - Page 8
... holes in the small bag supplied with washer instruction guides. Unpacking Washer
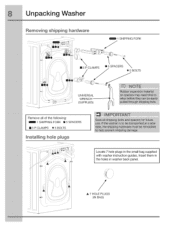
Removing shipping hardware
1 SHIPPING FORK
[] 5 P CLAMPS
sX
® 5 SPACER
• BOLTS
UNWERSAI WRENCH
" ®_
(SUPPLIED)
_/_
Remove all of the following: 1 SHIPPING FORK ® 5 SPACERS
[]5PCLAMPS
05BOLTS
Installing hole pmugs
Locate 7 hole plugs in washer back panel.
/
A 7 HOLE PLUGS (IN BAG...
Installation Instructions - Page 9
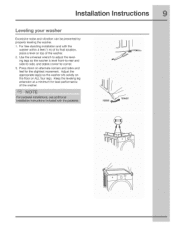
... the washer sits solidly on the floor on top of the washer. 2. Installation instructions
Leveling your washer
Excessive noise and vibration can be prevented by properly leveling the washer. 1. Use the universal wrench to adjust the leveling legs so the washer is level... at a minimum for the slightest movement. For free standing installation and with the
washer within 4 feet (1 m) of the...
Installation Instructions - Page 10
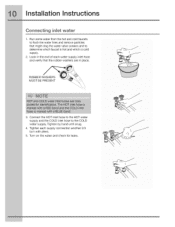
... in place. Look in the end of each supply connection another 2/3 turn with pliers.
5.
Turn on the water and check for leaks. RUBBER WASHERS MUST BE PRESENT
3. Connect the HOT inlet hose to the HOT water supply and the COLD inlet hose to determine which faucet is hot and ...
Installation Instructions - Page 11
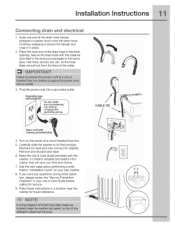
Place the hook end of the drain hose in the enclosure package) to the standpipe, inlet hose, laundry tub, etc. Plug the power cord into a grounded outlet. ¸wall
CABLE T[ E II Secure the drain hose with the cable ... (shipped in place.
. Installation Instructions
Connecting drain and electrical
1. Continue wrapping it around the hanger and snap it in washer drum) onto the drain hose.
Installation Instructions - Page 12
...operation the next time you wake it up .
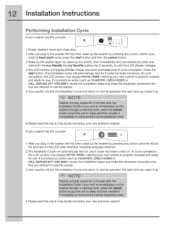
4.Please read the Use & Care Guide and enjoy your washer has this console:
{
f
L_ _@
=,=_=,=o Oo
1 .After you attempt to hand wash cycle, ..., the LCD window may display INSTAL PASS!, meaning your new washer is properly installed and ready for use the washer.
3.Your washer will display INSTAL EMCLE and show estimated time of cycle completion...
Installation Instructions - Page 13
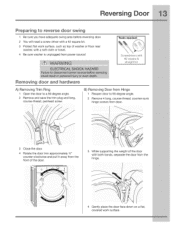
... door trim approximately 3/4" counter-clockwise and pull it away from the front of the door.
3 While supporting the weight of washer or floor near
washer, with a soft cloth or towel. 4 Be sure washer is unplugged from the hinge.
/ /
! /
t
4 Gently place the door face down on a flat, covered work surface, such as top of...
Installation Instructions - Page 18
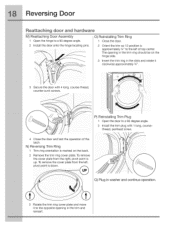
The opening in the trim and reinsert. To remove the cover plate from the left of the latch. Q) Plug in washer and continue operation.
3 Rotate the trim ring cover plate and move it clockwise approximately 3A".
\ \
3 Secure the door with 1 long, coursethread, panhead screw.
4 Close the ...
Installation Instructions - Page 19
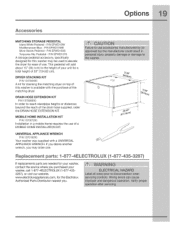
... height of a MOBILE HOME INSTALLATION KIT.
DRYER STACKING KiT P/N 134700400
A kit for the Electrolux Authorized Parts Distributor nearest you.
(1-877-435-3287} P/N EPWD15iW Mediterranean Blue -
Options
MATCHING ...the use . Repmacement paAs: 1-877-4ELECTROLUX
If replacements parts are needed for your washer, contact the source where you may be used to the height of your unit...
Similar Questions

Activate Clean Tub Cycle On My Electrolux Front Load Washer
how do I manually activate the clean tub cycle on my Electrolux front load washer
how do I manually activate the clean tub cycle on my Electrolux front load washer
(Posted by suesmet20 2 years ago)

Odor Problems In Washer
I have odor problems on my IQ Touch Electrolux Washer. I saw some mold in the gasket, do I need to r...
I have odor problems on my IQ Touch Electrolux Washer. I saw some mold in the gasket, do I need to r...
(Posted by strevi 9 years ago)

How To Clean Cold Water Filter Electrolux Front Load Washer
(Posted by franksteve3 10 years ago)
Fabric Softener Dispenser Will Not Drain On My Washer Model Eiflw55hmb
When doing a load of laundry my fabric softener dispenser will not drain the softener into the laund...
When doing a load of laundry my fabric softener dispenser will not drain the softener into the laund...
(Posted by srunfola 12 years ago)

Severe Knocking In Spin Cycle Only When Clothes Are In It.
when it was installed we tested it and it worked good but when i did two loads of laundry it started...
when it was installed we tested it and it worked good but when i did two loads of laundry it started...
(Posted by jodeed2000 13 years ago)