Electrolux EW30IS6CJS Support Question
Electrolux EW30IS6CJS Support Question
Find answers below for this question about Electrolux EW30IS6CJS.Need a Electrolux EW30IS6CJS manual? We have 3 online manuals for this item!
Question posted by rapm155 on December 7th, 2014
My Oven Works But The Induction Slide In Cook Top Shut Off While Cooking.
E35 shows at the stove but oven works????
Current Answers

Related Electrolux EW30IS6CJS Manual Pages
Use and Care Manual - Page 3
... 3
Safety 4 Important Safety Instructions 4-7
Feature Overview 8 Your Slide-In Range 8-9 Oven Rack Supports and Oven Vents 10 Removing and Replacing Oven Racks 11 Control Pad Functions 12-14
Getting Started 15 Setting ...Power Sharing 22 Operational Noises 22
Setting the Lower Oven 23 Lower Oven Operation 23
Cooking Modes 24 Baking 24 Cook Time 25 End Time 25 Broiling 26 Convection ...
Use and Care Manual - Page 9
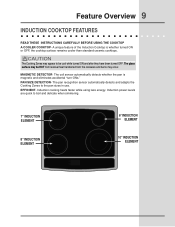
... less energy.
The pan recognition sensor automatically detects and adapts the Cooking Zones to boil and delicate when simmering.
7" INDUCTION ELEMENT
8" INDUCTION ELEMENT
UPPER OVEN LOW E R OVEN
6" INDUCTION ELEMENT
10" INDUCTION ELEMENT EFFICIENT- CAUTION
The Cooking Zones may occur. A unique feature of the Induction Cooktop is magnetic and eliminates accidental "turn-ONs."
Use and Care Manual - Page 10

... on , warm air is vented above each side of cooking. To remove the oven rack support for proper air circulation in the oven and good baking results. Oven Rack Positions
This oven is on each door.
Oven Vent
Warm Air
Rack positions
7 6
5
4
3
2
1
(NON-SLIDING RACK ONLY) To install oven rack support, insert the supports by pushing them from...
Use and Care Manual - Page 11

... the rack and the sliders at the same position on each oven rack support on how to clear the first bracket. 3. TOWARD FRONT OF OVEN TOWARD BACK OF OVEN
1st Bracket
2nd Bracket
Oven Rack Oven Rack Slider Oven Rack Support
Removing Non-Sliding Oven Rack
Simply pull the rack and slightly tilt it to clean the...
Use and Care Manual - Page 16

... . "00:00" will appear in the display.
+
-
2. The Timer feature can also be pressed to 5 minutes. Press again TIMER to the time of the other oven control functions and cooking modes.
To cancel the Timer before the set time has run out, "00:00" will turn on the control panel. The...
Use and Care Manual - Page 17
... Cooking Zone (Induction) rings.
5" 125mm
7 1/4" 180mm
7 1/4" 180mm
UPPER OVEN
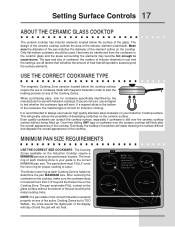
LOW E R OVEN...work. Even quality cookware can scratch the cooktop surface, especially if cookware is centered properly on the ceramic surface. The thicker outer ring at each location. USE THE CORRECT COOKWARE TYPE
The magnetic Cooking...sliding ANY type of the Cooking Zones. The inner ring of the active Cooking...
Use and Care Manual - Page 19
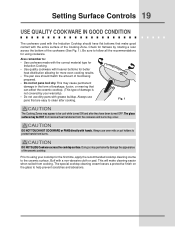
...ceramic cooktop. This will make good contact with the entire surface of the Cooking Zone. CAUTION
DO NOT SLIDE Cookware across the bottom of the cookware (See Fig. 1). The special cooktop...
Always use oven mitts or pot holders to help prevent scratches and abrasions. Setting Surface Controls 19
USE QUALITY COOKWARE IN GOOD CONDITION
The cookware used with the Induction Cooktop should...
Use and Care Manual - Page 22

... SHARING
Figure 1 To set to maintain at the fastest speed possible. Press the ON OFF pad to turn on the cooking
zone you selected.
UPPER OVEN LOW E R OVEN
Fig. 2
Your cooktop is equipped with Induction Cooking create some unusual background noises.
Press the "hi +" key pad and the PB will give you want to set...
Use and Care Manual - Page 23

... to contain food and any juices created from the upper oven. Pay close the drawer and turn the lower oven OFF. The cooking times for oven use oven mitts when removing food from sliding off.
• DO NOT LINE THE OVEN DRAWER WITH FOIL OR COVER THE OVEN RACK WITH FOIL. DO NOT put water or flour...
Use and Care Manual - Page 25

... will start and stop by itself at 6:00PM):
1. This oven can also be part of day needed ; 3 0 .
7.
Press BAKE . Press COOK TIME .
6. Enter time of a Multi-Stage sequence. The oven will shut off automatically. Press COOK OPTIONS to bring up the cook options items. 5. Press COOK TIME .
6. The cook time will start counting down for 30 minutes which...
Use and Care Manual - Page 26

... or use the broil pan without the insert. 26 Cooking Modes
BROILING
This mode is browned; The high heat cooks quickly and gives a rich, brown outer appearance. turn off the oven. To set a Broil Temperature of meat by pressing UPPER OVEN . Broiling Times
Electric Wall Oven Broiling Table Recommendations
Food Item
Rack Position
Temp Setting...
Use and Care Manual - Page 32
... probe cannot be used to keep them moist or use oven mitts when removing hot pans from the oven.
8. The Cook Time, Timer and End Time features can be set a Slow Cook:
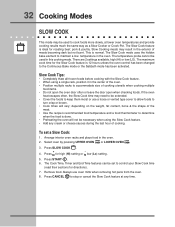
1. 32 Cooking Modes
SLOW COOK
This mode may be used in this cooking mode. The Slow Cook mode uses the hidden bake element to maintain a low...
Use and Care Manual - Page 36
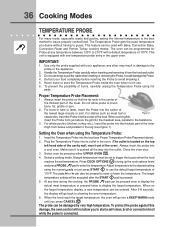
...probe or the appliance.
2. When the food reach the target temperature, the oven will not allow probe to showing the oven temperature.
6. This unit is located on
the target temperature display, a new... the Probe to avoid breaking it is the best method to the backbone.
3. UPPER
OVEN
4. When cooking fish,
insert the Probe from the food and outlet. 3. For whole poultry ...
Use and Care Manual - Page 43

...
ALL OTHER KEYPADS will shut down after using
Bake with the BAKE pad. Place the food in the cooktop displays. The oven temperature may only be used to activate any further changes and the oven is turned OFF.
IMPORTANT NOTES: It is not advised to attempt to set using COOK TIME and therefore may...
Use and Care Manual - Page 44

.... Notes for at http:\\www.star-k.org. When Sabbath mode is
returned the oven will turn a cooking zone ON. SF (Sabbath Failure) will decrease the
temperature by 5°F (2°C) at each key press. After the
+
- For further assistance, guidelines for induction cooktops.
SAb will disappear from the display.
The LO lo key pad...
Use and Care Manual - Page 49
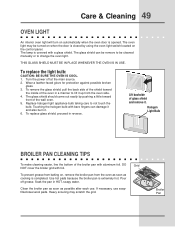
... IN USE. Wear a leather-faced glove for protection against possible broken
glass. 3. Lift backside of the oven in reverse. Clean the broiler pan as soon as cooking is completed. Heavy scouring may be cleaned manually or to not touch the
bulb.
The lamp is extremely hot. Replace halogen light appliance bulb taking...
Use and Care Manual - Page 50

... board or work surface in most hardware stores. For heavy, burned on the glass cooktop, they may cause it is supplied with your cooktop for any other purpose. Sliding aluminum or copper...The fumes can become permanent if not removed prior to the ceramic surface.
Do not cook foods directly on the cooktop surface. CLEANING RECOMMENDATIONS FOR THE CERAMIC GLASS COOKTOP
! Remove...
Use and Care Manual - Page 54
... sure you have removed the oven racks and the oven rack supports from meat. 54 Solutions to Common Problems
SELF-CLEANING CYCLE DOES NOT WORK
• Make sure the oven door is necessary when broiling frequently. Burned on oven surfaces. Use heavier quality cookware so foods being prepared may cook more clearance between the meat and...
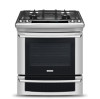
Dimensions - Page 1
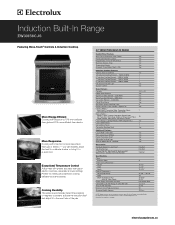
... Range
EW30IS6CJS
Featuring Wave-Touch® Controls & Induction Cooktop
More Energy-Efficient Cooking with induction is more efficient than electric. Exceptional Temperature Control Adjust heat with greater accuracy than gas or electric - Perfect for Part Numbers
Specifications
Colour - Perfect Turkey®, Defrost, Dehydrate, Bread Proof, My Favourites, Multi-Stage Cooking, Temperature...
Dimensions - Page 2
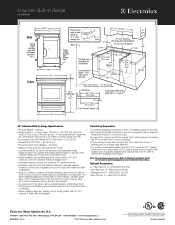
.... • Formed front-edged countertops require front molded edge to be level in Canada Induction Built-In Range
EW30IS6CJS
30" Induction Built-In Range Specifications
• Product Weight - 238 Lbs.
• Single phase 3- Allow 30... Appliances mean we are constantly working to change specifications or discontinue models without notice. Refer to detailed kit installation instructions).
Similar Questions

Removing Baking Element
How do I replace the hidden baking element in a Dual Fuel Slide in Electrolux Range EW30DS65GW - 30"...
How do I replace the hidden baking element in a Dual Fuel Slide in Electrolux Range EW30DS65GW - 30"...
(Posted by bklune 3 years ago)

Electrolux Induction Range E21 Error Code
My Electrolux Induction Range cooktop is not working and it beeps with an e21 error code, can you te...
My Electrolux Induction Range cooktop is not working and it beeps with an e21 error code, can you te...
(Posted by nilloc 7 years ago)

Fault Code E 35
I was cooking and suddenly the range stop working and it show a E 35 trouble code. What is the probl...
I was cooking and suddenly the range stop working and it show a E 35 trouble code. What is the probl...
(Posted by pierrerousseau 8 years ago)

Ihave Error 21 And The Surface Not Working What I Can Do?
(Posted by ramikouefati 11 years ago)

After Cleaning, Smaller Oven Works, In Larger Neither Element Works.
After we used self-cleaning, smaller over works fine, but larger oven does not work either on bake o...
After we used self-cleaning, smaller over works fine, but larger oven does not work either on bake o...
(Posted by roxannacw 12 years ago)