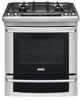
Electrolux EW30GS65GS Support Question
Electrolux EW30GS65GS Support Question
Find answers below for this question about Electrolux EW30GS65GS - 30" Slide-In Gas Range.Need a Electrolux EW30GS65GS manual? We have 4 online manuals for this item!
Question posted by doneaton on May 22nd, 2011
How Can The Hinge On The Oven Door Be Adjusted For Tight Closure?
The person who posted this question about this Electrolux product did not include a detailed explanation. Please use the "Request More Information" button to the right if more details would help you to answer this question.
Current Answers
Related Electrolux EW30GS65GS Manual Pages
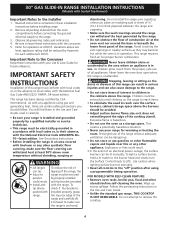
Installation Instructions (All Languages) - Page 1
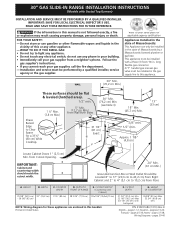
30" GAS SLIDE-IN RANGE INSTALLATION INSTRUCTIONS
(Models with
backguard
36 5/8" (93 cm) Max. 35 3/4" (90.8 cm) Min.
Do not store or use any electrical switch; Installation and service must be installed with a three (3) foot / 36 in this appliance.
long flexible gas connector. A"T" handle type manual gas valve must be performed by a Massachusetts licensed plumber or gasfitter...
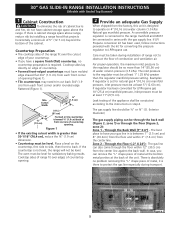
Installation Instructions (All Languages) - Page 2
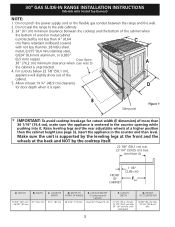
... avoid cooktop breakage for door depth when it .... and the rear adjustable wheels at least 19 ¼" (48,9 cm) clearance for cutout width (E dimension) of more than
30 1/16" (76...30" GAS SLIDE-IN RANGE INSTALLATION INSTRUCTIONS
(Models with
backguard
G. Do not seal the range to the side cabinets.
3. 24" (61 cm) minimum clearance between the range and the wall.
2. WIDTH
35 5/8" (90.5 cm) 30...
Installation Instructions (All Languages) - Page 3
30" GAS SLIDE-IN RANGE INSTALLATION INSTRUCTIONS
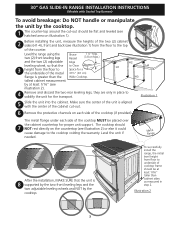
(Models with the center of the cabinet cut -out should be at least 1/16" (see illustration 2) or else it could
cause damage to the cooktop voiding the warranty. Illustration 1
5 Slide the unit into the cabinet. Level the unit if
needed.
To successfully install the range...front leveling legs and the two adjustable leveling wheels and NOT by at...
Installation Instructions (All Languages) - Page 4
...8226; This range must conform with local codes or, in use of the range and carefully tilt it forward to the range.
3.
Do not attempt to LITE. 30" GAS SLIDE-IN RANGE INSTALLATION INSTRUCTIONS
(...8226; Reset all instructions contained in operation. Observe all appliances.
Never leave the oven door open when the range is hazardous.
• Do not use your Use & Care Guide for each...
Installation Instructions (All Languages) - Page 5
... pressure.
The best place to the instructions in step 4.
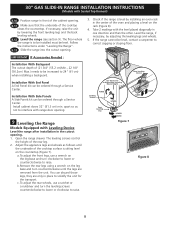
The oven must be at least 11"(27,9 cm). The inlet pressure to LP/Propane use. The gas supply line should be taken during transport. Through the Floor (~2" X 24") - 30" GAS SLIDE-IN RANGE INSTALLATION INSTRUCTIONS
(Models with Sealed Top Burners)
1 Cabinet Construction
To eliminate the risk...
Installation Instructions (All Languages) - Page 6

...joint sealant on pipe when tightening fittings.
Isolate the range from range before connecting gas and electrical supply. 30" GAS SLIDE-IN RANGE INSTALLATION INSTRUCTIONS
(Models with Sealed Top Burners)
3 ...oven and broil burners conversion.
6 Tighten all packing material and literature
from the gas supply piping system by closing . It is die cast. Manual Shutoff Valve
Flare Union
GAS...
Installation Instructions (All Languages) - Page 7

... manual gas shut-off valve. Proper adjustments to minimize the possibility of the range, but is properly grounded. Power supply cord with a standard 3-prong grounding wall receptacle (see Figure 6) to make sure the receptacle is an added convenience. Disconnect electrical supply cord from the appliance.
For personal safety, this work assumes responsibility for oven door...
Installation Instructions (All Languages) - Page 8
... underside of the cooktop surface is to solidify the unit for the transport.
c. 30" GAS SLIDE-IN RANGE INSTALLATION INSTRUCTIONS
(Models with the level placed diagonally in one direction and then the other. Install cabinet doors 32" (81.3 cm) min. Open the range drawer. The leveling screws control
the height of the cooktop clears the countertop...
Installation Instructions (All Languages) - Page 9

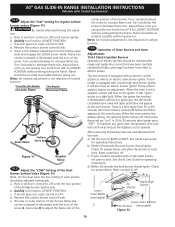
...been purged from the oven before testing.
10.1 ... all the burner caps and the triple burner head are no burner adjustments necessary on this cooktop.
10.2 Turn on the surface. Remove and...9). Burner Cap
Gas Opening
Burner Head
Electrode
Figure 9
Burner Cap
C. Burner Head
Figure 10
9 Do not touch the elements or burners. B. 30" GAS SLIDE-IN RANGE INSTALLATION INSTRUCTIONS
(Models...
Installation Instructions (All Languages) - Page 10
... going out. d. It will go "out" in and turn knob from the oven: a) Set the oven to off . See Use & Care Guide
for proper flame. 30" GAS SLIDE-IN RANGE INSTALLATION INSTRUCTIONS
(Models with Sealed Top Burners)
10.4 Adjust the "low" setting for leaks, and range has been connected to electric power. b. Insert a thin-bladed screwdriver into the...
Installation Instructions (All Languages) - Page 11

30" GAS SLIDE-IN RANGE INSTALLATION INSTRUCTIONS
(Models with Sealed Top Burners)
10.6.2 Air Shutter-Oven Burner The approximate oven burner flame length is 1 inch (distinct inner cone of defective workmanship or materials in this appliance. To determine if the oven burner flame is proper, remove the oven bottom and burner baffle and set the oven to bake at rear...
Installation Instructions (All Languages) - Page 12

....
1. Lower the range by adjusting the 4 levelling legs until the underside of the cooktop is ever moved to a different location, the antitip brackets must also be moved and installed with the range. If range is sitting level on floor. pilot holes using masonry drill bit.
5. Refer to "Levelling the Range" section.
7. 30" GAS SLIDE-IN RANGE INSTALLATION INSTRUCTIONS
(Models...
Product Specifications Sheet (English) - Page 1
...
Yes 2 1 Yes
Additional Features
Luxury-Hold™ Oven Door
Yes
Extra-Large Glass Window
Yes
Warmer Drawer
Yes
Adjustable Leveling Legs
Yes
Sabbath Mode (Star-K® Certified)
Yes
A.D.A. PN # 318254307 Simmer Plate - Height (Adjustable)
35-5/8" - 36-5/8"
Width
30"
Depth (with 90° Door Open)
25-3/4" 45-1/4"
Gas / Power Supply Connection Location
Right / Left Bottom Rear...
Product Specifications Sheet (English) - Page 2
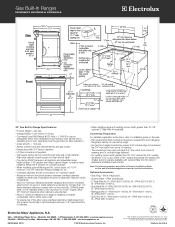
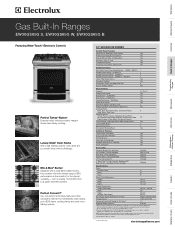
Gas Built-In Ranges
EW30GS65G S, EW30GS65G W, EW30GS65G B
30" Gas Built-In Range Specifications
• Product Weight - 250 Lbs.
&#...Filler Kit available.
Electrolux Major Appliances, N.A.
Printed in all directions and adjustable range height at Electrolux Home Products, Inc. Allow 30" minimum clearance when cabinet is ideal location for detailed instructions.
Optional Accessories...
Complete Owner's Guide (English) - Page 3
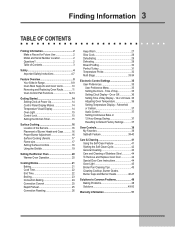
...Overview 8 Your Slide-In Range 8-9 Oven Rack Supports and Oven Vents 10 Removing and Replacing Oven Racks 11 Oven Control Pad ...30 Perfect Turkey 31 Temperature Probe 32 Multi Stage 33-34
Electronic Control Settings 35 User Preferences 35 User Preference Menu 35 Setting the Clock - Time of Stainless Steel 44 To Remove and Replace Oven Door 44 Special Door Care Instructions 44 Oven...
Complete Owner's Guide (English) - Page 9
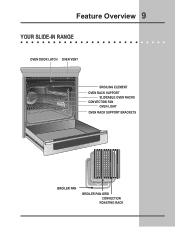
Feature Overview 9
Your Slide-in Range
Oven Door Latch Oven vent
Broiling Element Oven Rack Support
slideable Oven racks Convection Fan
Oven Light Oven Rack support brackets
BROILER PAN
BROILER PAN Grid Convection
Roasting rack
Complete Owner's Guide (English) - Page 32

... or the appliance.
2. Never leave or store the Temperature Probe inside the oven
when not in the oven. (The outlet is located on the target temperature display, a new temperature ... Close the oven door.
3. For bone-in the center of the thickest part of the food. Handle the Temperature Probe carefully when inserting and removing it is pressed.
5. Adjust temperature to ...
Complete Owner's Guide (English) - Page 43
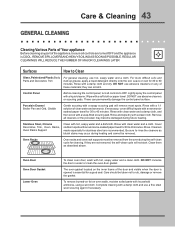
... an ammonia-soaked paper towel for 30 to rinse the cleaners as described above. Rinse with clean water and a damp cloth, and then scrub with a liquid cleaner. Rinse. Oven Racks
Oven racks and oven rack supports must be removed. DO NOT immerse the door in water or clean the oven door gasket. Care should be sure all...
Complete Owner's Guide (English) - Page 44
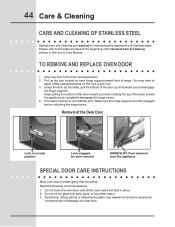
... are fully engaged before unlocking the hinge levers. Do not hit the glass with pots, pans, or any other object. 3. Open the door to re-install the door. Read the following recommendations: 1. Pull up . 3. Removal of the Oven Door
Lock in normal position
Lock engaged for maintaining the appearance of range. Proceed in this Use & Care...
Complete Owner's Guide (English) - Page 49
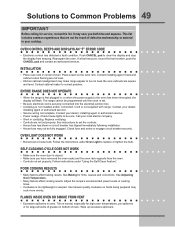
... may not be not level.
Entire range does not operate
• When the range is not supplied with range. Contact your local electric company. &#...oven rack. Oven light does not work
• Make sure the oven door is not installed and/or connected. See Baking for large amounts of oven. Push CANCEL pad to correct problem. Installation
• Place oven rack in oven. Adjust...
Similar Questions

Fs Error. Oven Door Locked
Control failed while in Sabbath mode. Now cannot open oven door or access any controls for oven.
Control failed while in Sabbath mode. Now cannot open oven door or access any controls for oven.
(Posted by drgreen 9 years ago)


How To Adjust Stove Alarm Sound?
(Posted by Leemuller691 11 years ago)

After A Power Failure How Do You Turn Off The Alarm On The Electrolux Dual Fuel
After a power failure how do you turn off the alarm on the electrolux dual fuel range???????
After a power failure how do you turn off the alarm on the electrolux dual fuel range???????
(Posted by acvom 11 years ago)

Electrolux Slide In Range, The Lower Oven Door Will Not Open. It Opens Partially
(Posted by Anonymous-70600 11 years ago)