
Electrolux EW30ES65GS Support Question
Electrolux EW30ES65GS Support Question
Find answers below for this question about Electrolux EW30ES65GS - 30" Slide-In Electric Range.Need a Electrolux EW30ES65GS manual? We have 4 online manuals for this item!
Question posted by eleclx on July 20th, 2012
Control Panel Alarm Went Off - Now Cooktop Won't Respond
My husband was cooking on the stovetop and dripped some water on the control panel and didn't wipe it off immediately. The alarm went off and I ran in there and wiped off the water/turned off the alarm. Now the cooktop will not turn back on again. Is there some combination of buttons to push to override the safety feature or do we just wait for the "HE" to turn off? Will it restart at that point?
Current Answers
Answer #1: Posted by OnlineOutreachSpecialist on July 24th, 2012 8:59 AM
OnlineOutreachSpecialist

Member since:
March 30th, 2011 Points: 2,848,320

Member since:
March 30th, 2011 Points: 2,848,320
Related Electrolux EW30ES65GS Manual Pages
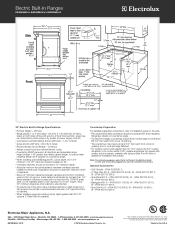
Installation Instructions (All Languages) - Page 1

... call the Service Center for
31 1/2"
(80 cm)
Wide
Cooktop Rim. E
½"min. WIDTH
(Under Cooktop)
C. COOKTOP WIDTH
35 3/4" (90,8 cm) 30" (76,2 cm) 36 5/8" (93 cm)
31 1/2" ...,7 cm) Min.
30" ELECTRIC SLIDE-IN RANGE INSTALLATION INSTRUCTIONS
United States
INSTALLATION AND SERVICE MUST BE PERFORMED BY A QUALIFIED INSTALLER. IMPORTANT: SAVE FOR LOCAL ELECTRICAL INSPECTOR'S USE. FOR...
Installation Instructions (All Languages) - Page 2

... bottom of wood or metal cabinet Door Open
is protected by the cooktop itself. C A D
Side Panel
*** IMPORTANT: To avoid cooktop breakage for
door depth when it . E
E
22 7/8"(58,1 cm... width (E dimension) of the
B
cabinet.
5. 30" ELECTRIC SLIDE-IN RANGE INSTALLATION INSTRUCTIONS
NOTE:
1. Do not seal the range to the side cabinets.
3. 24" (61 cm) minimum clearance between the...
Installation Instructions (All Languages) - Page 3

... installation, MAKE SURE that the height from the floor to the underside
Space for a 31½" (81 cm) Wide Cooktop. 30" ELECTRIC SLIDE-IN RANGE INSTALLATION INSTRUCTIONS
To avoid breakage: Do NOT handle or
manipulate the unit by the cooktop.
1
The counter-top around the cut -out.
6
Remove the protective channels on each side of the...
Installation Instructions (All Languages) - Page 4

30" ELECTRIC SLIDE-IN RANGE INSTALLATION INSTRUCTIONS
Important Notes to the Consumer
Keep these instructions with your Owner's Guide for the local electrical... future reference.
4 Wipe up excess spillage....turning on the power to the appliance.
• Be sure your range...range. Observe all controls to the range.
3. Never leave the oven door open when the range is in use your range...
Installation Instructions (All Languages) - Page 5

...panel access cover. If used , the Installation Instructions are not followed, or the strain relief bracket is equipped with 1 1/8" (2.9 cm) dia. Factory Connected Power Supply Cord (Canada only)
This range... range outlet with upturned ends. Terminal on figure 4. remove the grounding strap from factory with a factory-connected power cord (see Figure 1). 30" ELECTRIC SLIDE-IN RANGE INSTALLATION...
Installation Instructions (All Languages) - Page 8

... cm) dimension.
• Countertop must be level. 30" ELECTRIC SLIDE-IN RANGE INSTALLATION INSTRUCTIONS
4. Cabinet Construction
4.1
To eliminate the risk of burns or
fire by installing a range hood that projects horizontally a minimum of 5" (12.7 cm) beyond the bottom of the cabinet.
4.2 Countertop Preparation
• The cooktop sides of the range fit over heated surface units, do not...
Installation Instructions (All Languages) - Page 9

... and the back leveling wheels.
Installation With End Panel A End Panel kit can be ordered through a Service Center. 30" ELECTRIC SLIDE-IN RANGE INSTALLATION INSTRUCTIONS
5.
apart so as in "Countertop Preparation" section (see section 6). Remove and discard the two rear leveling legs, they are prepared for installation of the cooktop clears 11 the countertop. To provide an...
Installation Instructions (All Languages) - Page 10

...
Refer to CONV. It may be level, contact a carpenter to cause burns. 30" ELECTRIC SLIDE-IN RANGE INSTALLATION INSTRUCTIONS
6.
Remove all controls are only in place to the warranty and service information in your range.
a.
Convection (some models) and Clean functions. If the range cannot be hot enough to correct sagging or sloping floor. Follow the instructions...
Installation Instructions (All Languages) - Page 11

...cooktop is properly anchored. pilot holes using masonry drill bit.
5. Mark on the floor the location of the range and carefully attempt to tilt it flat on the floor with the range...in bracket with the range. Refer to concrete floor, first drill 3/16"(0,48 cm) dia. 30" ELECTRIC SLIDE-IN RANGE INSTALLATION INSTRUCTIONS
8.
Also draw a line on the intersection of the range is no wall....
Product Specifications Sheet (English) - Page 1
... Board on the web at two different temperatures.
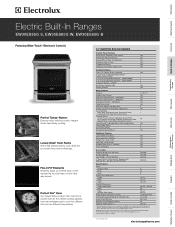
30" ELECTRIC BUILT-IN RANGES
Control Panel Features
Wave-Touch™ Electronic Oven Control
Yes
Perfect Set® Element Controls
Yes
Keypad Entry of Time & Temperature
Yes
Electronic Clock & Timer
Yes
Temperature Display
Yes
Automatic Oven (Delay, Cook & Off)
Yes
Cooktop Features
Flex-2-Fit® Ceramic Glass Smoothtop
Yes...
Product Specifications Sheet (English) - Page 2
... Built-In Ranges
EW30ES65G S, EW30ES65G W, EW30ES65G B
30" Electric Built-In Range Specifications
• Product Weight - 238 Lbs.
• Single phase 3-
Optional Accessories
• Grill / Griddle - (PN # 318251611). • 2" Rear Filler Kit: S - (PN # 903113-901S), W - (PN # 903113-9011),
B - (PN # 903113-9010). • Side Panel Kit: S - (PN # 903102-901S), W - (PN # 903102-9011...
Complete Owner's Guide (English) - Page 3
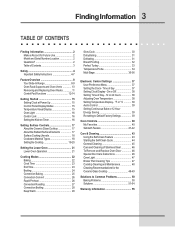
...-14
Getting Started 15 Setting Clock at Power Up 15 Control Panel Display Modes 15 Temperature Visual Display 15 Oven Light 16 Control Lock 16 Setting the Kitchen Timer 16
Setting Surface Controls 17 About the Ceramic Glass Cooktop 17 About the Radiant Surface Elements 17 Surface Cooking Utensils 18 Cookware Material Types 18 Setting the...
Complete Owner's Guide (English) - Page 6
... grid allow dripping fat to drain and be done to reposition.
Always place oven racks in a risk of electric shock or fire or a short circuit.
• Glazed Cooking Utensils-Only certain types of the broiler.
• Do not cover your broiler or warmer drawer (if equipped) grid with both hands to the cooktop. If...
Complete Owner's Guide (English) - Page 15

... set , the actual temperature will be active with a time of 12:00. CONTROL PANEL DISPLAY MODES
Sleep Mode:
Your control will beep and go back into sleep mode.
Only the clock will sound to remind you to 1:30.
To start with some cooking modes; TEMPERATURE VISUAL DISPLAY
Your oven is equipped with "12:00". bake...
Complete Owner's Guide (English) - Page 16

...control panel and the cooktop. SETTING THE KITCHEN TIMER
This unit is opened. To set the timer to 5 minutes. To toggle the Oven Lights ON and OFF:
1. The Control Lock is flashing.
The oven light key will be turned... and start or stop cooking. To cancel the Timer before the set time has run out:
Press TIMER .
"00:00" will flash in the cooktop displays. Do not attempt...
Complete Owner's Guide (English) - Page 18

... pan.
• Pan is shown in the oven or on the cooktop. 18 Setting Surface Controls
SURFACE COOKING UTENSILS
GOOD
POOR
Cookware should have flat bottoms that conducts heat well. ...cooktop surfaces because it to follow the recommendations for its intended purpose. If aluminum pans slide across the bottom of food will vary depending on METAL - Remove these marks immediately...
Complete Owner's Guide (English) - Page 19

...number of circles displayed at the element zone LCD represents the number of the BURNER SIZE key. Setting Surface Controls 19
SETTING THE COOKTOP
The cooktop control provides 5 digital display windows to help set power levels for that position.
• 1 circle = single .... Display Settings Changes
Setting / Power Lo to 3.0 (1-30%) 3.0 to HI (30-100%)
Incremental change much faster.
Complete Owner's Guide (English) - Page 20

... or plastic wrappings on top of the range when it is touched before the indicator light has turned OFF.
Continue a rapid boil; steaming vegetables. frying, deep fat frying.
poaching and stewing. keys to have cooled after turning the control off, the cooktop will continue to glow until the glass cooktop has cooled down to a moderate level...
Complete Owner's Guide (English) - Page 45
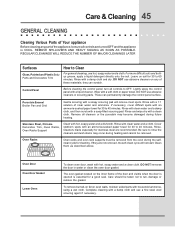
... 30 to 40 minutes. Care should be removed. REGULAR CLEANINGS WILL REDUCE THE NUMBER OF MAJOR CLEANINGS LATER
Surfaces
Glass, Painted and Plastic Body Parts and Decorative Trim
How to rub, damage or remove the gasket. Rinse with a soft cloth or paper towel. Wipe with a damp cloth and dry.
Control Panel
Before cleaning the control panel, turn...
Complete Owner's Guide (English) - Page 47
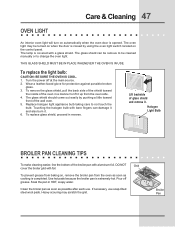
... glass shield, proceed in HOT, soapy water. DO NOT
Grid
cover the broiler grid with a glass shield...source. 2. Clean the broiler pan as soon as cooking is opened.
If necessary, use . The glass...turned on when the door is closed by pushing a little toward
the inside of glass shield and remove it. Soak the pan in reverse.
To prevent grease from baking on the control panel...
Similar Questions

Keeps Beeping Without Any Codes.
I shut off the breaker for 5 minutes, no change. The lights that indicate the cooktop elements come ...
I shut off the breaker for 5 minutes, no change. The lights that indicate the cooktop elements come ...
(Posted by MontyBurns 9 years ago)

My Power Went Out And My Control Panel Will Not Start
(Posted by gadomsch 9 years ago)

My Ew30es65gsb Electrolux Oven Only Shows Up To 288 On Led. Control Lock On
Temperature is reaching up to 500 degrees. you can only program up to 288 degrees. how do i get cont...
Temperature is reaching up to 500 degrees. you can only program up to 288 degrees. how do i get cont...
(Posted by bo 11 years ago)

Top Oven Will Not Work After Self Cleaning Cycle.
Bottom oven works. Top does not. Fan runs but elements do not heat. Self cleaning cycle was the firs...
Bottom oven works. Top does not. Fan runs but elements do not heat. Self cleaning cycle was the firs...
(Posted by maggiemoon455 12 years ago)

Electrolux Oven Euee63as Will Not Heat. Control Panel Works But No Heat
(Posted by Anonymous-38902 12 years ago)