Electrolux E30DF74GPS Support Question
Electrolux E30DF74GPS Support Question
Find answers below for this question about Electrolux E30DF74GPS - 30" Pro-Style Dual-Fuel Range.Need a Electrolux E30DF74GPS manual? We have 3 online manuals for this item!
Question posted by sherilgelmon on May 17th, 2014
Rack Indicator Light Won't Turn Off - All Racks & Supports Have Been Removed
I have removed all the rack and rack supports and turned both dials to clean -but the flashing indicator light doesn't turn off. I have used the self clean function before with no problems.
Current Answers
Answer #1: Posted by OnlineOutreachSpecialist on May 22nd, 2014 1:02 PM
OnlineOutreachSpecialist

Member since:
March 30th, 2011 Points: 2,848,320

Member since:
March 30th, 2011 Points: 2,848,320
Good Afternoon sherilgelmon, thank you for your post!
I see that you are having difficulties starting the self-cleaning feature on your Electrolux range listed above. (E30DF74GPS). First, I would recommend reinstalling your racks in the oven and then set the correct time of day on the clock. Restart the self-clean cycle and once again remove the racks. This should do the trick. I ask that you please follow up with a comment, at your convenience, to advise if further troubleshooting is needed or if your range status has change successfully.
Online Outreach Specialist
Related Electrolux E30DF74GPS Manual Pages
Owners Guide - Page 10

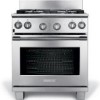
... 24. Left Rear Burner Control Knob 3. Broil Element 12. 10 Range Features
30" Range FEATURES
123
5
4
6
10 11
12 13
78 9
14
15 16
17
18
19
20
21
22
1. Left Front Burner Control Knob 4. Convection Fan Cover 13. Adjustable Oven Racks 14. Glass Cooktop 21. 18 000BTU Dual Flame Burner 22. 18 000 BTU...
Owners Guide - Page 11

... BTU Dual Flame Burner
27. Oven Vent 12. Broil Element 14. Center Front Burner Control Knob 5. Oven Temperature Control Knob 8. Right Rear Burner Control Knob 11. Wok Stand 31. Center Rear Burner Control Knob 9. Oven Function Control Knob 6. Convection Fan Cover 15. Broiler Pan 29. Oven Light Switch 2. Door Handle 17. Oven Function Indicator Lights 7. Broiler...
Owners Guide - Page 18
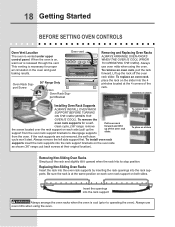
...self- Oven vent
Oven Rack Sup- 36" Range Only
port Screw
Remove
Replace
Oven Rack Support Bracket
Removing and Replacing Oven Racks
Always arrange oven racks when THE oven is cool).
If the rack supports are not removed, the self-clean
cycle won't start.
Replacing Non-Sliding Oven Racks
Insert the rack into the oven rack supports by inserting the rack openings into the rack support...
Owners Guide - Page 20

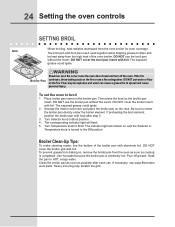
... 350°F to select the broil function.
Conv Roast
Broil
Clean
-Lock
-Racks
OVEN FUNCTION INDICATOR LIGHTS- baking
The oven can be set to bake at 350°F, and the oven temperature needs to be changed to 425°F, turn the temperature control knob to the Off position.
5. A beep will flash. 4. Bake- Used to Bake. 3.
20 Setting the oven...
Owners Guide - Page 22

... up to 30% faster, saving time and energy.
-Multiple rack baking.
-No special pans or bakeware needed . Convection baking uses a fan ...Rack
This method of cooking enables you to Conv Roast. It also gives better baking results when using the convection feature. Turn the selector control knob to obtain the best results when roasting. The indicator light will stop flashing and
the oven will flash...
Owners Guide - Page 24
...from baking on, remove the broiler pan from the oven as soon as possible after step 5.
3. Soak the pan in HOT, soapy water. Arrange the interior oven rack and place the ... the broiler pan with food after each use. The indicator light will flash. 5. Broiler Clean-Up Tips:
To make cleaning easier, line the bottom of the oven broiler. Use hot pads because the broiler pan is ...
Owners Guide - Page 25
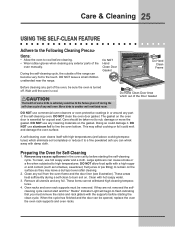
...the surface as they are not removed the selfcleaning cycle cannot start and the " Racks" Indicator Light will begin to flash indicating that you can be removed. Do Hand Clean Door Area which eliminate soil completely or reduce it . These items cannot withstand high cleaning temperatures.
4. Oven racks and oven rack supports must remove the racks and rack gliders with a high sugar or acid...
Owners Guide - Page 26
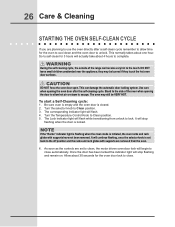
... oven door open. Use care when opening the door to allow time for 3 hours will actually take about 4 hours to Clean position. 5. Be sure oven is empty and the oven door is initiated, the oven racks and rack glides with supports are removed from unlock to close . note
If the "Racks" indicator light is flashing when the clean mode is closed...
Owners Guide - Page 27
... the appliance, be sure all controls to OFF and remove the control knobs. they can scratch and discolor aluminum. To remove control knobs, turn all controls are not removed, the self-clean cycle won't start and "Racks" indicator light will be permanently damaged by the high cleaning temperatures. To replace knobs after cleaning, line up grease, apply a liquid detergent directly onto...
Owners Guide - Page 32
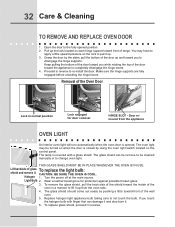
... or to
disengage the hinge supports.
Halogen 1. To remove the glass shield, pull the back side of the
oven in reverse to pull it up . 3.
32 Care & Cleaning
To remove and replace oven door
1. THIS GLASS SHIELD MUST BE IN PLACE WHENEVER THE OVEN IS IN USE. Turn the power off at the main source.
If...
Owners Guide - Page 34
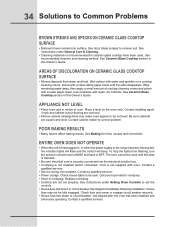
... under Setting Oven Controls to Common Problems
brown streaks and specks on a cooktop cleaning creme.
Call your local electric company. • Short in center of discoloration on the oven rack. Appliance not level
• Place oven rack in cord/plug. Use razor blade scraper to be used .
Check house lights to remove soil. 34 Solutions to set properly...
Owners Guide - Page 35
.... Follow the instructions under Changing Oven Light to stop flashing, turn off . Door should be damaged. Old grease or food spatters cause excessive smoking. soil not completely removed after oven is closed . • Make sure the two oven rack ladders are removed from the oven. • Controls not set properly. Remove excess fat from vent
• Excessive...
Installation Instructions - Page 1

...ORDINANCES. WHAT TO DO IF YOU SMELL GAS: • Do not try to light any appliance. • Do not touch any other flammable vapors and liquids in
the ...use any phone in United States
English -
of Massachusetts see page 3. and the wall.
30" (76.2 cm) minimum clearance when the cabinet is
Do not seal the range to your gas supplier from a neighbor's phone. 30" & 36" DUAL FUEL RANGE...
Installation Instructions - Page 3

... with linoleum or any other utensils before self-cleaning the oven. Explosions or fires could result.
• Install anti-tip device packed with the range. Use caution when lighting surface burners manually.
• Remove broiler pan, food and other appliance. Special Instructions for proper burner combustion. 30" & 36" DUAL FUEL RANGE INSTALLATION INSTRUCTIONS
(Model with Electric Oven...
Installation Instructions - Page 7

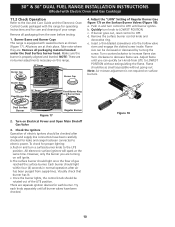
... the range into final position.
If range will not be reduced by installing a range hood that is used in figure 12. If back of range will ...range will be avoided. Disconnect the power supply. 2. Center Line of Range
Follow instructions for the type of burns or fire from appliance
Figure 12 4-WIRE GROUNDED JUNCTION BOX
DO NOT ground to a gas supply pipe.
30" & 36" DUAL FUEL RANGE...
Installation Instructions - Page 8

...is not available, turn on or shutting ... the appliance. 30" & 36" DUAL FUEL RANGE INSTALLATION INSTRUCTIONS
(...indicated by A.G.A./ C.G.A.- This valve should be located in series with a manometer. The valve is located as the range...using flexible gas conduit on figure 2 and it .
The right side cabinet is an ideal location for the main shutoff valve, if the range is set for cleaning...
Installation Instructions - Page 9
30" & 36" DUAL FUEL RANGE INSTALLATION INSTRUCTIONS
(Model with Electric Oven and Gas Cooktop)
Do not use a flame to check for leaks from the factory for use with natural gas. Tighten all local codes and requirements.
The conversion must be provided on the flexible gas conduit. Failure to convert your range for use with the level placed diagonally in...
Installation Instructions - Page 10
... Gas Valve
3. Flame should light within four (4) seconds in and turn a surface burner knob to the LITE
position. Check the Igniters Operation of your range. Try each burner. c. Flame size can quickly turn knob to LOWEST POSITION. Each burner should be rotated out of the LITE position. There are . c. 30" & 36" DUAL FUEL RANGE INSTALLATION INSTRUCTIONS
(Model with...
Installation Instructions - Page 11

...) and Clean (some models) functions. Adjust the "LOW" Setting of the bridge burner ignites only. Quickly turn control to the Use and Care Guide for operation. Turn clockwise the... outer portion of the functions has been factory checked before shipping. 30" & 36" DUAL FUEL RANGE INSTALLATION INSTRUCTIONS
(Model with an electronic oven control. a. Remove the surface burner control ...
Installation Instructions - Page 12

...16" (4.8 mm) dia. Remove template and place bracket on...The anti-tip bracket supports are attached to lower the range (see figure 20)....using the screws provided. Mark on the floor the location of the mounting holes shown on the right and left side at back of the 36" range.
2. Line up holes in the oven. 30" Range has one side as it to its final position; 30" & 36" DUAL FUEL RANGE...
Similar Questions

How Do I Prepare To Use Self Clean Feature
(Posted by Anonymous-127273 10 years ago)

I Just Had An Electrolux Professional Series - model Number: E30df74gps
delivered. The top gas burners ignite, but the botton light and the electric oven won't turn on
delivered. The top gas burners ignite, but the botton light and the electric oven won't turn on
(Posted by shapcook 11 years ago)
Oven Wont Turn On
I just had an electrolux PROFESSIONAL SERIES -MODEL NUMBER: E30DF74GPS delivered. The top gas burner...
I just had an electrolux PROFESSIONAL SERIES -MODEL NUMBER: E30DF74GPS delivered. The top gas burner...
(Posted by shapcook 11 years ago)
After A Power Failure How Do You Turn Off The Alarm On The Electrolux Dual Fuel
After a power failure how do you turn off the alarm on the electrolux dual fuel range???????
After a power failure how do you turn off the alarm on the electrolux dual fuel range???????
(Posted by acvom 11 years ago)

Self Clean Oven E30df74gps
Does this feature turn off on its own or do you need to time it and turn it off manually. This was n...
Does this feature turn off on its own or do you need to time it and turn it off manually. This was n...
(Posted by jgauley 12 years ago)