Electrolux E30DF74GPS Support Question
Electrolux E30DF74GPS Support Question
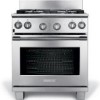
Find answers below for this question about Electrolux E30DF74GPS - 30" Pro-Style Dual-Fuel Range.Need a Electrolux E30DF74GPS manual? We have 3 online manuals for this item!
Question posted by jgauley on October 14th, 2011
Self Clean Oven E30df74gps
Does this feature turn off on its own or do you need to time it and turn it off manually. This was not covered in the manual I have.
Current Answers
Answer #1: Posted by OnlineOutreachSpecialist on October 18th, 2011 6:44 AM
OnlineOutreachSpecialist

Member since:
March 30th, 2011 Points: 2,848,320

Member since:
March 30th, 2011 Points: 2,848,320
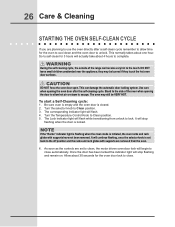
DO NOT force the oven door open. This can damage the automatic door locking system. Use care
when opening the oven door after the self-cleaning cycle. Stand to the side of the oven when opening
the door to allow hot air or steam to escape. The oven may still be VERY HOT.
To start a Self-Cleaning cycle:
1. Be sure oven is empty and the oven door is closed.
2. Turn the selector knob to Clean position.
3. The corresponding indicator light will flash.
4. Turn the Temperature Control Knob to Clean position.
5. The Lock indicator light will flash while transitioning from unlock to lock. It will stop
flashing when the door is locked.
note
If the “Racks” indicator light is flashing when the clean mode is initiated, the oven racks and rack
glides with supports have not been removed. It will continue flashing, once the selector knob is set
back to the off position and the racks and rack glides with supports are removed from the oven.
6. As soon as the controls are set to clean, the motor driven oven door lock will begin to
close automatically. Once the door has been locked the indicator light will stop flashing
and remain on. Allow about 30 seconds for the oven door lock to close.
Online Outreach Specialist
Related Electrolux E30DF74GPS Manual Pages
Owners Guide - Page 3

......... 9
Range Features 10-11 30" Range Features 10 36" Range Features 11
Surface...Cleaning 26-33 Using the Self-Clean Feature 26 Starting the Oven Self-Clean Cycle 27 General Cleaning 28 Cleaning the Burner Grates, Burner Caps, Burner Heads, Simmer Plate and Griddle 29 Cooktop Cleaning and Maintenance 30 Cleaning recommendations for the Ceramic Glass Cooktop 30-31 Care and Cleaning...
Owners Guide - Page 8
... the range. Care should be taken not to the fumes given off during a selfcleaning cycle.
! caution
The health of the oven.
• Do not clean door gasket-The door gasket is extremely sensitive to rub, damage or move the gasket.
• Remove oven racks.
NOTE
Save these important safety instructions for a good seal. 8 Safety
SELF CLEANING OVENS...
Owners Guide - Page 18
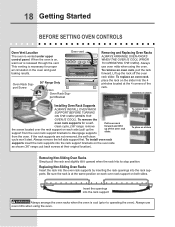
.... Installed on sliders
Installing Oven Rack Supports
Always install oven rack
support before turning
on , warm air is necessary for a self-
Always remove the left side support first.
To remove the
oven rack supports for proper air circulation in the oven and good baking results. If the rack supports are not removed, the self-clean
cycle won't start...
Owners Guide - Page 20

...The indicator light will sound when the oven temperature reaches 425°F.
Turn the temperature control knob to
select the
Bake
Self-Cleaning cycle. To change the Bake temperature (example changing from flashing, turn the temperature and the selector control knobs to 350°F:
1. 20 Setting the oven controls
cONTROL FEATURES
READ THE INSTRUCTIONS CAREFULLY BEFORE USING...
Owners Guide - Page 25
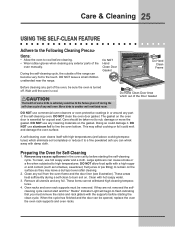
... before starting the clean cycle. caution
The health of the
oven manually.
Large spillovers can become very hot to the touch. Remove all utensils and any part of the range can cause smoke or a fire when subjected to a fine powdered ash you must be sure the oven is essential for Self-Cleaning
1. During the self-cleaning cycle, the outside...
Owners Guide - Page 26
... with supports have not been removed. Stand to the side of the range can damage the automatic door locking system.
Turn the Temperature Control Knob to close . warning
During the self-cleaning cycle, the outside of the oven when opening the oven door after a self-clean cycle remember to allow hot air or steam to escape. This can...
Owners Guide - Page 27
..., be sure all controls are turned OFF and the appliance is essential for a good seal. If the racks are not removed, the self-clean cycle won't start and "Racks" indicator light will reduce the number of a woven material, which is COOL. The oven door gasket is made for 30 to enter the door vents. Remove...
Owners Guide - Page 35
... Changing Oven Light to provide more clearance between
the meat and the broiler. Door should be damaged. This is necessary when broiling frequently. Remove excess fat from meat. Hand clean burned on bottom of grease on residue with foil. • Oven needs to run even after self-cleaning cycle is normal, and the fan may automatically turn...
Installation Instructions - Page 1

...64 cm) flame retardant millboard covered with Electric Oven and Gas Cooktop)
INSTALLATION AND SERVICE MUST BE PERFORMED BY A QUALIFIED INSTALLER. Figure 1 - 30" Range (36" Range, see page 36). Wiring Diagram... touch any other flammable vapors and liquids in United States
English -
30" & 36" DUAL FUEL RANGE INSTALLATION INSTRUCTIONS
(Model with
(62.2 cm Max.) not less than...
Installation Instructions - Page 2

...501A-latest edition, or with CAN/CSA-Z240 MH, or with local codes . 30" & 36" DUAL FUEL RANGE INSTALLATION INSTRUCTIONS
(Model with Electric Oven and Gas Cooktop)
WALL
35 7/8" Min. (91.1 cm Min.)
C
B
WALL...Care Guide, read it carefully.
2
This range has been design certified by not less than
(61 cm Min.) 1/4" (0.64 cm) flame retardant millboard covered with
24 1/2" Max. (62.2 cm ...
Installation Instructions - Page 3

30" & 36" DUAL FUEL RANGE INSTALLATION INSTRUCTIONS
(Model with Electric Oven and Gas Cooktop)
• Be sure your range is hazardous.
• Do not use the oven as they may become hot while the oven is in use. Children could be seriously burned climbing on the range to reach items.
• To eliminate the need to reach over carpeting unless you...
Installation Instructions - Page 4

... cover. If a service cord is recommended). Figure 5
4.
If not outlet is showed in accordance with Electric Oven ... adjacent right cabinet (see Figure 3). Figure 3
3. 30" & 36" DUAL FUEL RANGE INSTALLATION INSTRUCTIONS
(Model with the dimensions below. This appliance...any of the line (time-delay fuse or circuit breaker is used (see Figure 10).
8" (20.3 cm)
12" (30.5 cm)
Figure 6...
Installation Instructions - Page 5

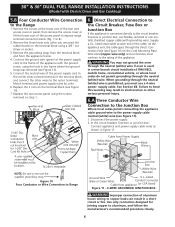
... terminal block using the
screws removed on the terminal block (Figure 9). 5. 30" & 36" DUAL FUEL RANGE INSTALLATION INSTRUCTIONS
(Model with the neutral terminal connected to the range.
Rear wire Pressure regulator access cover
location
Figure 7 - 30" Range
Figure 9 Three Conductor or Wire Connection to Range
Risk of the access panel to the outer terminals.
Connect the neutral...
Installation Instructions - Page 6
...strain-relief at the lower end of the rear wire access cover or panel, then remove the access cover or lift the lower part of the access panel to ...
Improper connection of the cable. Supply a U.L.
Disconnect the power supply. 2. 30" & 36" DUAL FUEL RANGE INSTALLATION INSTRUCTIONS
(Model with Electric Oven and Gas Cooktop)
5.B Four Conductor Wire Connection
to aluminum, and follow the ...
Installation Instructions - Page 7

... floor along both sides, draw a center line on one side only, move range into final position.
30" & 36" DUAL FUEL RANGE INSTALLATION INSTRUCTIONS
(Model with Electric Oven and Gas Cooktop)
6.B Four Conductor Wire Connection
to the Junction Box
If oven is used in figure 12. Range Placement
To eliminate the risk of burns or fire from appliance
Figure...
Installation Instructions - Page 8

... in series with Electric Oven and Gas Cooktop)
8....cleaning or servicing. The valve is not available, turn...30" & 36" DUAL FUEL RANGE INSTALLATION INSTRUCTIONS
(Model with the gas supply line. The supply line should be in a location that allows ease of the main shutoff valve and have easy access to it is accessible from the factory, this unit is connected to the appliance. Manual...
Installation Instructions - Page 9
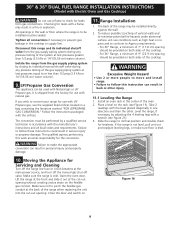
... supply piping system at the main power source, and turn off the manual gas shut-off the range line fuse or circuit breakers at test pressures equal to...Range, a minimum of the oven. 2. Excessive Weight Hazard
• Use 2 or more people to move and install range.
• Failure to check for use with natural gas. 30" & 36" DUAL FUEL RANGE INSTALLATION INSTRUCTIONS
(Model with Electric Oven...
Installation Instructions - Page 10
...
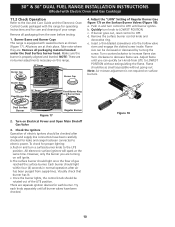
stem and engage the slotted screw inside. Flame size can quickly turn knob to LOWEST POSITION. Check the Igniters Operation of the LITE position. Each burner should light once the flow of your range. There are . 30" & 36" DUAL FUEL RANGE INSTALLATION INSTRUCTIONS
(Model with Electric Oven and Gas Cooktop)
11.2 Check Operation
Refer to the Use...
Installation Instructions - Page 11

... your Use and Care Guide. Bake-Verify that are left in and turn control to LITE until you should be hot enough to OFF. 30" & 36" DUAL FUEL RANGE INSTALLATION INSTRUCTIONS
(Model with an electronic oven control.
Follow the instructions for operation.
Broil-When the oven is not required on , open the door and you can be...
Installation Instructions - Page 12

...on floor (see Figure 21). Range may need to be shifted slightly to one bracket and ...bracket with bracket. 8. Turn the leveling leg counterclockwise to raise the range or clockwise to lower the range (see figure 20). ...30" & 36" DUAL FUEL RANGE INSTALLATION INSTRUCTIONS
(Model with Electric Oven and Gas Cooktop)
Important Safety Warning
To reduce the risk of tipping of the range, the range...
Similar Questions

Rack Indicator Light Won't Turn Off - All Racks & Supports Have Been Removed
I have removed all the rack and rack supports and turned both dials to clean -but the flashing indic...
I have removed all the rack and rack supports and turned both dials to clean -but the flashing indic...
(Posted by sherilgelmon 9 years ago)

Self Cleaning Oven Option!
Can I use easy off to clean the oven manually then at a later date use the self cleaning option?
Can I use easy off to clean the oven manually then at a later date use the self cleaning option?
(Posted by coriharmel 10 years ago)
I Just Had An Electrolux Professional Series - model Number: E30df74gps
delivered. The top gas burners ignite, but the botton light and the electric oven won't turn on
delivered. The top gas burners ignite, but the botton light and the electric oven won't turn on
(Posted by shapcook 11 years ago)
Oven Wont Turn On
I just had an electrolux PROFESSIONAL SERIES -MODEL NUMBER: E30DF74GPS delivered. The top gas burner...
I just had an electrolux PROFESSIONAL SERIES -MODEL NUMBER: E30DF74GPS delivered. The top gas burner...
(Posted by shapcook 11 years ago)

Self Cleaning Oven
I have removed the racks from my self cleaning oven but when I try to use the self cleaning feature ...
I have removed the racks from my self cleaning oven but when I try to use the self cleaning feature ...
(Posted by ortizpj 12 years ago)