Dell Vostro 3360 Support Question
Dell Vostro 3360 Support Question
Find answers below for this question about Dell Vostro 3360.Need a Dell Vostro 3360 manual? We have 2 online manuals for this item!
Question posted by rajulr on May 1st, 2014
How Install Vostro 3360
The person who posted this question about this Dell product did not include a detailed explanation. Please use the "Request More Information" button to the right if more details would help you to answer this question.
Current Answers
Related Dell Vostro 3360 Manual Pages
User Manual - Page 1
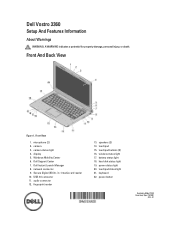
Front View
1. Dell Instant Launch Manager 8. network connector 9. battery status light 18. touchpad status light 21. Dell Vostro 3360
Setup And Features Information
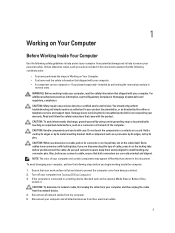
About Warnings
WARNING: A WARNING indicates a potential for property damage, personal injury, or death. camera 3. Secure Digital (SD) 8- USB 3.0 connector 11. fingerprint ...
User Manual - Page 3
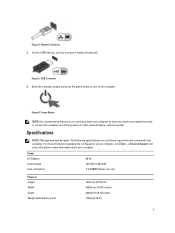
... Depth Weight (with your computer at least once before you turn on and shut down your computer.
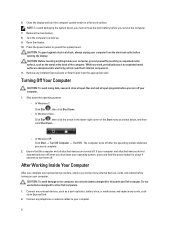
Power Button
NOTE: It is recommended that you install any cards or connect the computer to a docking device or other external device, such as a mouse or keyboard (optional). Figure 4.
User Manual - Page 4
... Inc. Information in this text: Dell™, the DELL logo, Dell Precision™, Precision ON™,ExpressCharge™, Latitude™, Latitude ON™, OptiPlex™, Vostro™, and Wi-Fi Catcher™ are either the entities claiming the marks and names or their products, Dell Inc. Microsoft®, Windows®, MS...
Owner's Manual - Page 2

... Precision™ , OptiPlex™, Latitude™, PowerEdge™, PowerVault™, PowerConnect™, OpenManage™, EqualLogic™, Compellent™, KACE™, FlexAddress™, Force10™ and Vostro™ are trademarks of Advanced Micro Devices, Inc. in the United States or other countries. A00 Intel®, Pentium®, Xeon®, Core® and...
Owner's Manual - Page 3
... Removing the Coin-Cell Battery...11 Installing the Coin-Cell Battery...12 Removing the Memory...12 Installing the Memory...12 Removing the Keyboard...12 Installing the Keyboard...14 Removing the Palmrest...14 Installing the Palmrest...17 Removing the Battery...18 Installing the Battery...19 Removing the Hard Drive...19 Installing the Hard Drive...20 Removing the...
Owner's Manual - Page 4
Removing the Camera Module...27 Installing the Camera Module...28 Removing the Fan...28 Installing the Fan...29 Removing the System Board...29 Installing the System Board...31 Removing the Heat Sink...31 Installing the Heat Sink...32 Removing the Speakers...32 Installing the Speakers...33 Removing the Power Connector...34 Installing the Power Connector...34 Removing...
Owner's Manual - Page 5
... or on its pins. NOTE: The color of the computer.
WARNING: Before working inside your computer. • A component can be replaced or--if purchased separately--installed by a certified service technician.
Also, before you disconnect the cable. To avoid damaging your product documentation, or as directed by periodically touching an unpainted metal...
Owner's Manual - Page 6
... computers.
1. Remove the main battery. 8. Shut down on your computer.
1. After Working Inside Your Computer
After you complete any replacement procedure, ensure you connect any installed ExpressCards or Smart Cards from the electrical outlet before you work surface.
Connect any external devices, such as a port replicator, battery slice, or media base...
Owner's Manual - Page 9

...-blade screwdriver • Phillips screwdriver • Small plastic scribe
Removing the Subscriber Identity Module (SIM) Card
1. 2
Removing and Installing Components
This section provides detailed information on the SIM-card holder to remove or install the components from the computer.
9 Insert a paper clip into the small hole on how to release it from...
Owner's Manual - Page 10

... Your Computer. 2. 4.
Follow the procedures in After Working Inside Your Computer.
Removing the Security Digital (SD) Card
1. Installing the Secure Digital Card
1. Removing the Access Panel
1. Remove the SIM card from the computer. Installing the SIM Card
1. Slide the SD card out of the computer. Follow the procedures in Before Working Inside...
Owner's Manual - Page 11
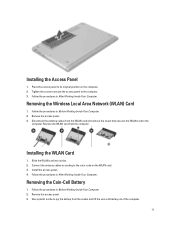
... the screw that secures the WLAN card to its slot. 2.
Remove the access panel. 3. Installing the WLAN Card
1. Tighten the screw to secure the access panel to the color code on ...Working Inside Your Computer. Slide the WLAN card into its original position on the WLAN card. 3. Installing the Access Panel
1. Place the access panel to the
computer. Remove the WLAN card from the...
Owner's Manual - Page 12
... in After Working Inside Your Computer. Follow the procedures in Before Working Inside Your Computer. 2. Install the access panel. 3.
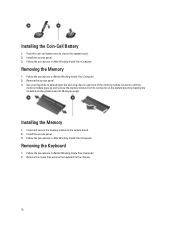
Removing the Memory
1. Use your fingertips to spread apart the securing clips...board by drawing the module from the system board at 45-degree angle. Installing the Memory
1. Push the coin-call battery into its connector on the system board. 2. ...
Owner's Manual - Page 14
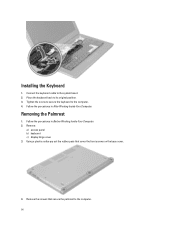
Using a plastic scribe pry out the rubber pads that secure the palmrest to the system board. 2. Installing the Keyboard
1. Follow the procedures in After Working Inside Your Computer. Follow the procedures in Before Working Inside Your Computer. 2. Removing the Palmrest
1. Place the ...
Owner's Manual - Page 46
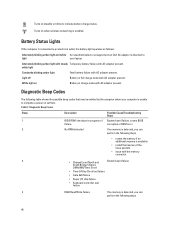
... memory is detected, you can
perform the following steps
• reseat the memory if an additional memory is available
• install that may be emitted by the computer when your laptop.
Possible Cause/Troubleshooting Steps
System board failure, covers BIOS corruption or ROM error
2
No RAM detected
If no memory is unable...
Owner's Manual - Page 49
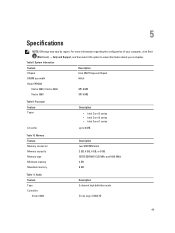
...
Chipset
Intel HM77 Express Chipset
DRAM bus width
64-bit
Flash EPROM:
Vostro 3360 / Vostro 3460
SPI 8 MB
Vostro 3560
SPI 6 MB
Table 9. Processor Feature Types
L3 cache
Description
... MHz and 1600 MHz) 2 GB 8 GB
Table 11. Audio Feature Type Controller:
Vostro 3360
Description 2 channel high definition audio
Cirrus Logic CS4213D
49 For more information regarding the configuration...
Owner's Manual - Page 50
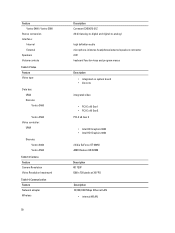
...
Description 10/100/1000 Mbps Ethernet LAN
• internal WLAN Video Feature Video type
Data bus: UMA Discrete: Vostro 3460
Vostro 3560 Video controller:
UMA
Discrete: Vostro 3460 Vostro 3560
Table 13. Camera Feature Camera Resolution Video Resolution (maximum) Table 14. Feature Vostro 3460 / Vostro 3560
Stereo conversion Interface:
Internal External Speakers Volume controls Table 12.
Owner's Manual - Page 51

.... Feature
Description
• Bluetooth • WWAN (optional)
Table 15. Display Feature Type Size:
Vostro 3360 Vostro 3460 Vostro 3530 Dimensions: Height Width Diagonal Active area (X/Y) Maximum resolution: Vostro 3360/3460 Vostro 3560
Description HD WLED AG
13.0 inches
14.0 inches
15.0 inches
Vostro 3360
Vostro 3460
Vostro 3560
240 mm (9.44 inches) 245 mm (9.64 inches) 259 mm (10.19...
Owner's Manual - Page 52

...Canada: 86 keys, Europe and Brazil: 87 keys, Japan: 90 keys
Description Vostro 3360 82.00 mm (3.22 inches) 45.00 mm (1.77 inches)
Vostro 3460/3560 90.00 mm (3.54 inches) 49.00 mm (1.93 inches)...
4-cell lithium ion (3.4 Ahr/cell or 49 Whr)
6-cell lithium ion (2.2 Ahr/cell or 48 Whr)
Vostro 3360
Vostro 3460
Vostro 3560
20.20 mm (0.80 inch)
20 mm (0.79 inch) 20 mm (0.79 inch)
208.36 mm ...
Owner's Manual - Page 53

...
Temperature range: Operating Non-Operating
Coin-cell battery
Table 20. AC Adapter Feature Type:
Vostro 3360 / Vostro 3460 / Vostro 3560 with integrated video card Vostro 3460 with discrete video card Vostro 3560 with quad core Input voltage Input current (maximum) Input frequency Output power Output current: 65 W 90 W Rated output voltage Dimensions: Height Width Depth Temperature...
Owner's Manual - Page 54

... Altitude (maximum): Operating Non-Operating Airborne contaminant level
Description Vostro 3360 19.20 mm (0.75 inch)
332.00 mm (13.07 inches) 232.50 mm (9.15 inches) 1.66 kg (3.65 lb)
Vostro 3460
30.10 mm (1.18 inches)
345.50 mm ...(13.60 inches)
244.00 mm (9.60 inches)
2.23 kg (4.91 lb)
Vostro 3560 32.50 mm (1.27 inches)
375.00 mm (14.76 inches) 259.00 mm (10.19 inches) 2....
Similar Questions


How To Install Dell Inspiron Laptop N7010 Sd/mmc Driver Update
(Posted by bhgijaku 10 years ago)

How Wireless Network Adapter Installed Dell N5010 Laptop
(Posted by blmult 10 years ago)
