Dell Vostro 2520 Support Question
Dell Vostro 2520 Support Question
Find answers below for this question about Dell Vostro 2520.Need a Dell Vostro 2520 manual? We have 2 online manuals for this item!
Question posted by mariyarajesh on June 14th, 2014
I Use Dell 2520 Laptop.drivers Installed Still Unable To Detect Webcam. Why?
Webcam drivers installed. Web cam not visible in Images list still. Unable to detect webcam. Pl. help.
Current Answers
Answer #1: Posted by TechSupport101 on June 14th, 2014 5:19 AM
TechSupport101

Member since:
May 24th, 2013 Points: 12,171,305

Member since:
May 24th, 2013 Points: 12,171,305
Hi. Troubleshooting the Dell Webcam and Dell Webcam Central Software
You can try this file, also known as Dell Webcam Central.
Create a new unrestricted user account and try the webcam. Did the webcam work?
If yes, log out and log back in to your account and try the webcam. Did the webcam work?
If no, then the webcam became detached from the motherboard, usually near the webcam
If your computer is under warranty, contact Dell Tech Support
Related Dell Vostro 2520 Manual Pages
User Manual - Page 1

... Regulatory Type: P22G004, P18F004
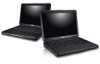
2012 - 02 optical drive eject button 8. Front View
1. memory card reader 12. touchpad buttons (2) 13. display 4. device status lights 14. Vostro 2420 - Dell Vostro 2420/2520
Setup And Features Information
About Warnings
WARNING: A WARNING indicates a potential for property damage, personal injury, or death. audio connectors
9. keyboard 15.
User Manual - Page 2

... and does not indicate a problem with the fan or the computer.
2 Restricting the airflow can damage the computer or cause a fire. Do not store your Dell computer in the air vents. HDMI connector 8. battery 3. network connector
6.
User Manual - Page 3

Front View
1. display 4. optical drive 6. microphone 11. memory card reader 12. device status lights 13. camera status light 2. camera 3. USB 2.0 connectors (2) 8. Vostro 2520 - Front And Back View
Figure 3. touchpad
9. power button
3 speakers (2) 5. optical drive eject button 7. touchpad buttons (2) 10. keyboard 14.
User Manual - Page 4
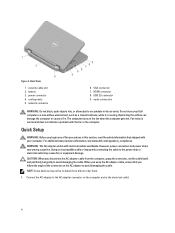
... procedures in this section, read the safety information that shipped with your Dell computer in the air vents. For additional best practices information, see www.dell.com/regulatory_compliance
WARNING: The AC adapter works with the fan or the computer. Using an incompatible cable or improperly connecting the cable to the power strip or...
User Manual - Page 5

...NOTE: Offerings may vary by law to view information about your computer, click Start → Help and Support and select the option to ship with integrated video card
65 W
5 The ...that you turn on and shut down your computer. Power AC adapter
Vostro 2420 / Vostro 2520 with your computer at least once before you install any cards or connect the computer to a docking device or other ...
User Manual - Page 6

...36 inches) 342.00 mm (13.46 inches) 244 mm (9.60 inches) 2.20 kg (4.85 lb)
Vostro 2520 31.50 mm to 34.50 mm (1.24 inches to 1.35 inches) 376.00 mm (14.80 ...and the regulatory compliance website at www.dell.com/regulatory_compliance for more information on:
• Safety best practices • Regulatory certification • Ergonomics
See www.dell.com for additional information on the device...
User Manual - Page 7

... Windows Vista start button, and Office Outlook® are trademarks of Dell Inc. Other trademarks and trade names may be used in this text: Dell™, the DELL logo, Dell Precision™, Precision ON™,ExpressCharge™, Latitude™, Latitude ON™, OptiPlex™, Vostro™, and Wi-Fi Catcher™ are either the entities claiming...
Owner's Manual - Page 2

...: Dell™, the DELL logo, Dell Precision™, Precision ON™,ExpressCharge™, Latitude™, Latitude ON™, OptiPlex™, Vostro™, and Wi-Fi Catcher™ are trademarks of Dell Inc..., or death.
© 2012 Dell Inc. and any use on discs and players. Notes, Cautions, and Warnings
NOTE: A NOTE indicates important information that helps you how to avoid the problem....
Owner's Manual - Page 3
... (SD) Card...10 Removing the Hinge Cover...10 Installing the Hinge Cover...11 Removing the Keyboard...11 Installing the Keyboard...13 Removing the Optical Drive...13 Installing the Optical Drive...14 Removing the Memory Module...14 Installing the Memory Module...15 Removing the Palmrest...15 Installing the Palmrest...16 Removing the Power-Button Board...17...
Owner's Manual - Page 4

...-Connector Port and Bracket 31 Installing the Power-Connector Port and Bracket 33 Removing the Display Bezel...33 Installing the Display Bezel...34 Removing the Camera...34 Installing the Camera...35 Removing the Display Panel...35 Installing the Display Panel...37 Removing the... Lights...47 Device Status Lights...48 Diagnostic Beep Codes...48
5 Technical Specifications...49
6 Contacting Dell...55
Owner's Manual - Page 5

...computer (see the Regulatory Compliance Homepage at www.dell.com/ regulatory_compliance
CAUTION: Many repairs may appear differently...connected to help protect your computer from being scratched. 2.
CAUTION: To avoid electrostatic discharge, ground yourself by using a ...components may only be replaced or--if purchased separately--installed by a certified service technician. Some cables have...
Owner's Manual - Page 6

...close all open programs before you turn off your computer.
1.
Do not use only the battery designed for this particular Dell computer. Remove the main battery. 8. Turn the computer top-side up. ...are turned off . CAUTION: To avoid damage to ground the system board. Connect any installed ExpressCards or Smart Cards from the electrical outlet before turning on a flat work , periodically ...
Owner's Manual - Page 9

... the following tools: • Small flat-blade screwdriver • Phillips screwdriver • Small plastic scribe
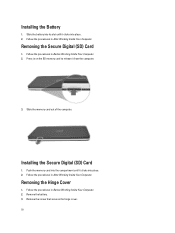
Removing the Battery
1. Slide the release latches to remove or install the components from the computer.
9 Recommended Tools
The procedures in Before Working Inside Your Computer. 2. Slide the battery and remove it from your computer. 2
Removing...
Owner's Manual - Page 10
...Computer.
Follow the procedures in Before Working Inside Your Computer. 2. Remove the battery. 3. Removing the Secure Digital (SD) Card
1. Installing the Secure Digital (SD) Card
1. Follow the procedures in Before Working Inside Your Computer. 2. Push the memory card into the ... the hinge cover. 10 Slide the battery into its slot until it clicks into place. 2. Installing the Battery
1.
Owner's Manual - Page 11

... Cover
1. Follow the procedures in Before Working Inside Your Computer. 2. Install the battery. 4. Remove the battery. 3. Pry up to release the tabs securing the keyboard ... Your Computer. 4. Flip the computer and remove the hinge cover. Flip the computer and install the screw that secures the hinge cover. 3. Install the hinge cover and press on it to secure it to the computer.
11
Owner's Manual - Page 13

.... 5. Slide the optical drive out of 30 degrees to the system board. 2. Installing the Keyboard
1.
Remove the battery. 3. Press down on the keyboard until it clicks into place. 4. Follow the procedures in Before Working Inside Your Computer. 2. Follow ...
Owner's Manual - Page 14
... memory module until it pops up.
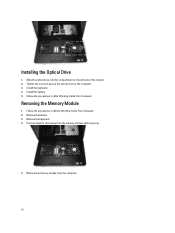
5. Follow the procedures in Before Working Inside Your Computer. 2. Remove the battery. 3. Installing the Optical Drive
1. Install the battery. 5. Pry the retention clips away from the computer.
14 Install the keyboard. 4. Follow the procedures in After Working Inside Your Computer. Slide the optical drive into the compartment...
Owner's Manual - Page 15
... battery. 3. Remove the screws that secure the bottom base.
5. Flip the computer and disconnect the power board cable (1) and the touchpad cable (2).
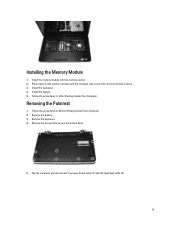
15 Installing the Memory Module
1. Install the keyboard. 4. Insert the memory module into the memory socket. 2.
Remove the keyboard. 4. Press down on the memory module until the retention clips secure...
Owner's Manual - Page 44

... the service tag label is available on the front of all Dell products 5. On the application and drivers screen, under the Operating System drop-down list, select BIOS. 6. Identify the latest BIOS file and click ...Tag or Express Service Code and click Submit. Updating the BIOS
It is recommended to install the updated BIOS settings on the bottom of different devices in the Please select your...
Owner's Manual - Page 47

...unable to fix the problem yourself, service and support personnel can use the diagnostics results to help you wish to run the ePSA diagnostics before contacting Dell...- The purpose of your laptop.
• Alternately blinking amber light with your ...operates as the Dell logo appears. 3. The diagnostics starts running diagnostics is displayed, listing all the detected devices. 4. Power...
Similar Questions

Can The Recovery Cd For Dell Inspiron N5030 Install Web Cam Driver
(Posted by kouv 9 years ago)


I M Using Dell 2520 I3 Laptop...i Wnt 2 Wic Webcam Software Is Gud For My Lapee
(Posted by Anonymous-108058 11 years ago)

Webcam Not Working
i am not able to use webcam in dell vostrom 2520. so which driver in particular should i install?? p...
i am not able to use webcam in dell vostrom 2520. so which driver in particular should i install?? p...
(Posted by jagrutigunjal92 11 years ago)
I Am Using Dell 2520 Laptop.i Am Unabel To Start Webcam? What Is The Proceedure.
i am using dell 2520 laptop.i am unabel to start webcam? what is the proceedure.
i am using dell 2520 laptop.i am unabel to start webcam? what is the proceedure.
(Posted by roshanghormode 11 years ago)