Dell PowerEdge R210 Support Question
Dell PowerEdge R210 Support Question
Find answers below for this question about Dell PowerEdge R210.Need a Dell PowerEdge R210 manual? We have 6 online manuals for this item!
Question posted by nobjml0 on June 3rd, 2014
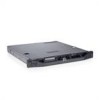
How To Open Power Edge R210
The person who posted this question about this Dell product did not include a detailed explanation. Please use the "Request More Information" button to the right if more details would help you to answer this question.
Current Answers
Answer #1: Posted by JCatDell on June 3rd, 2014 2:24 PM
JCatDell

Member since:
March 11th, 2014 Points: 136,220

Member since:
March 11th, 2014 Points: 136,220
Hi nobjml0,
To open an R210, follow the instruction on page 18 ftp://ftp.dell.com/Manuals/all-products/esuprt_ser_stor_net/esuprt_poweredge/poweredge-r210_owner%27s%20manual_en-us.pdf
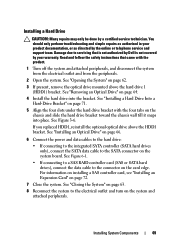
1. Turn off the system and attached peripherals, and disconnect the system from the electrical outlet and peripherals.
2. Rotate the latch release lock counter clockwise to the unlocked position.
3. Grasp the cover on both sides while pressing your thumbs on the latch release lock and the indent, carefully slide the cover toward the back of the
system, and lift it away from the system
Josh Craig
Dell | Social Outreach Services - Enterprise
Get Support on Twitter @DellCaresPro
Related Dell PowerEdge R210 Manual Pages
Getting Started Guide - Page 3

Dell™ PowerEdge™ R210 Systems
Getting Started With Your System
Regulatory Model E10S Regulatory Type E10S001
www.dell.com | support.dell.com
Getting Started Guide - Page 4

...trademarks and trade names may be used in the U.S. Microsoft, Hyper-V, Windows, and Windows Server are either the entities claiming the marks and names or their products.
A01 Trademarks used in... registered trademarks of Dell Inc.; in this text: Dell, the DELL logo, and PowerEdge are registered trademarks of Intel Corporation in this document is subject to either trademarks or...
Hardware Owner's Manual - Page 2

...strictly forbidden.
Trademarks used in this text: Dell, the DELL logo, and PowerEdge are trademarks of Microsoft Corporation in the United States and/or other than ...instructions are either the entities claiming the marks and names or their products. Microsoft, Windows, Windows Server, and MS-DOS are not followed.
A00 All rights reserved.
is subject to either trademarks or...
Hardware Owner's Manual - Page 61

...back of the system, so that the two hooks on the back edge of the cover fit over the corresponding slots on the back edge of the chassis till it snaps in position.
3 Rotate the ...latch release lock in a clockwise direction to secure the cover. Figure 3-3. Opening and Closing the System Cover 1
2...
Hardware Owner's Manual - Page 62

... any attached peripherals, and disconnect the system from its electrical outlet.
3 Open the system. Note the routing of the power and data cables underneath the tabs on the system board. Optical Drive (Optional...them to release it from the back of
the drive and the system board.
5 Disconnect the power cable from the system board and drive. See "Closing the System" on the metal standoffs.
...
Hardware Owner's Manual - Page 64

...notches and seat it firmly.
7 Push the release latch back to position.
8 Connect the power cable.
9 Connect the data cable to the back of the drive and to their electrical ...drive. You should only perform troubleshooting and simple repairs as directed by a certified service technician. See "Opening the System" on page 63.
12 If applicable, replace the front bezel. See Figure 6-1.
11...
Hardware Owner's Manual - Page 65

...system board. See Figure 3-5. 6 Lift the hard-drive bracket away from the peripherals.
2 Open the system. You should only perform troubleshooting and simple repairs as directed by the online or ...) bracket. See "Removing an Optical Drive" on page 62. 3 Disconnect the data and power cable from the chassis wall. Read and follow the safety instructions that is not authorized by Dell is...
Hardware Owner's Manual - Page 67
... See "Installing an Optical Drive" on page 66.
6 Connect the power and data cables to the hard drive:
• If connecting to... page 64.
4 Install the hard drive into place. See "Opening the System" on the system and attached peripherals. See Figure 3-6. Installing System Components...
69 See "Removing an Optical Drive" on the card edge. See Figure 6-1.
• If connecting to a SAS RAID...
Hardware Owner's Manual - Page 70
... system, including any attached peripherals, and disconnect the system from the electrical outlet.
3 Open the system. edge connector aligns with the expansion-card connector on the hard-drive bracket.
3 Attach the ... drive with the back set of holes on the expansion-card riser. 6 Insert the card-edge connector firmly into the expansion-card connector until the card is fully seated. 7 Close the ...
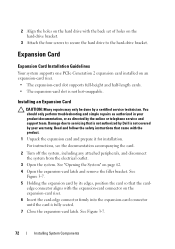
Hardware Owner's Manual - Page 72

...turn the system on page 63. 8 Reconnect the system to its edges and carefully remove it from the chassis. See "Opening the System" on the expansion-card riser. 6 If you are ...connector on page 62. 3 If installed, remove the expansion card from the electrical outlet.
2 Open the system. Damage due to maintain Federal Communications Commission (FCC) certification of the system and aid ...
Hardware Owner's Manual - Page 77

The system contains four memory sockets.
See "Opening and Closing the System" on the system board.
System Memory
Your system ...fail to observe these guidelines can prevent your system memory. See Figure 3-10.
2 Push the cooling shroud down until all edges are secured to 1333 Mhz. • If memory modules with different speeds are unused, all populated channels must have identical ...
Hardware Owner's Manual - Page 79

... socket down . Handle the memory modules by the card edges and avoid touching the components on page 62.
3 Remove the cooling shroud.
See "Opening the System" on the memory module. See "Removing the... authorized by a certified service technician. Allow time for some time after the system has been powered down and out, as authorized in those sockets.
1 Turn off the system, including any...
Hardware Owner's Manual - Page 81

...Modules
WARNING: The memory modules are firmly seated in their power sources, and turn them . Handle the memory modules by the card edges and avoid touching the components on page 62.
3 Remove...test in any attached peripherals, and disconnect the system from the electrical outlet.
2 Open the system. Installing System Components
83 The system should only perform troubleshooting and simple ...
Hardware Owner's Manual - Page 82
... by Dell is not supported.
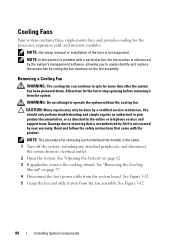
Allow time for some time after the system has been powered down. Cooling Fans
Your system contains three single-motor fans and provides cooling for removing...can continue to operate the system without the cooling fan. See "Opening the System" on page 77. 4 Disconnect the fan's power cable from the fan assembly. You should only perform troubleshooting and ...
Hardware Owner's Manual - Page 84

...done by the online or telephone service and support team. See "Opening the System" on the system board. 5 Align the front edge of the holder.
86
Installing System Components You should only perform...into the clip on page 62. 3 If installed, remove the expansion card from the electrical outlet.
2 Open the system. See Figure 6-1 for the location of the connector. 6 Press the card down until it ...
Hardware Owner's Manual - Page 86

...certified service technician. See "Installing an Expansion Card" on the retention standoff tab at the front edge of the card and gently lift the card off the system, including any attached peripherals.
88
... on page 62.
3 If installed, remove the expansion card from the electrical outlet.
2 Open the system. Damage due to its electrical outlet and turn the system on, including any attached...
Hardware Owner's Manual - Page 97

... product. 1 Turn off the system, including any attached peripherals. See your product documentation, or as authorized in your safety information for additional info.
Installing the Power Supply
1 Open the system. System Battery
Replacing the System Battery
WARNING: There is a danger of a new battery exploding if it is not covered by a certified service...
Hardware Owner's Manual - Page 101

...
103 See "Installing a Hard Drive" on the control panel assembly. Damage due to the power source and turn on your product documentation, or as authorized in your hard drives.
1 Turn... off the system and attached peripherals, and disconnect the system from the electrical outlet.
2 Open the system. Be sure to the control panel board. 4 Connect the USB connector cable. 5 Replace...
Hardware Owner's Manual - Page 109

...See "Closing the System" on page 72.
8 Run the appropriate online diagnostic test.
See "Opening the System" on page 133.
7 If the system starts properly, shut down the system and ...and follow the safety instructions that you removed in your warranty. • iDRAC6 Express card • Power supply • Fans • Processor and heat sink • Memory modules 4 Let the system dry...
Hardware Owner's Manual - Page 112

... in your product documentation, or as directed by the online or telephone service and support team. See "Opening the System" on page 84.
7 Restart the system. See "Cooling Fans" on page 62. 4 Reseat the fan's power cable. 5 Restart the system.
Damage due to servicing that is not authorized by Dell is not...
Similar Questions


