Dell OptiPlex 9010 AIO Support Question
Dell OptiPlex 9010 AIO Support Question
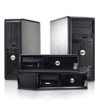
Find answers below for this question about Dell OptiPlex 9010 AIO.Need a Dell OptiPlex 9010 AIO manual? We have 4 online manuals for this item!
Question posted by leesgutt on July 21st, 2014
Optiplex 9010 How To Install Wifi
The person who posted this question about this Dell product did not include a detailed explanation. Please use the "Request More Information" button to the right if more details would help you to answer this question.
Current Answers
Related Dell OptiPlex 9010 AIO Manual Pages
User Manual - Page 1
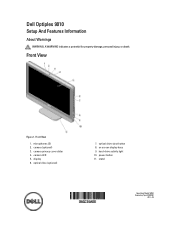
camera privacy cover slider 4.
Front View
Figure 1. microphones (2) 2. camera LED 5. hard-drive activity light 10. Dell Optiplex 9010
Setup And Features Information
About Warnings
WARNING: A WARNING indicates a potential for property damage, personal injury, or death. camera (optional) 3. optical drive (optional)
7. display 6. power button ...
User Manual - Page 5

... Dell Inc. Trademarks used in this text: Dell™, the DELL logo, Dell Precision™, Precision ON™,ExpressCharge™, Latitude™, Latitude ON™, OptiPlex™, Vostro™, and Wi-Fi Catcher™ are either trademarks or registered trademarks of Microsoft Corporation in the U.S. Blu-ray Disc™ is a trademark...
Owner's Manual - Page 1

Dell OptiPlex 9010 All-In-One Owner's Manual
Regulatory Model: W04C Regulatory Type: W04C001
Owner's Manual - Page 2
... SMP®, vMotion®, vCenter® and vSphere® are trademarks of VMware, Inc. in this text: Dell™, the Dell logo, Dell Precision™ , OptiPlex™, Latitude™, PowerEdge™, PowerVault™, PowerConnect™, OpenManage™, EqualLogic™, Compellent™, KACE™, FlexAddress™, Force10™ and Vostro™ are...
Owner's Manual - Page 3

... Off Your Computer...6 After Working Inside Your Computer...6
2 Removing and Installing Components 7
Recommended Tools...7 Removing the VESA Stand...7 Installing the VESA Stand...8 Removing the Back Cover...8 Installing the Back Cover...9 Removing the Memory...9 Installing the Memory...10 Removing the VESA Mount Bracket...10 Installing the VESA Mount Bracket...11 Removing the Converter Board...11...
Owner's Manual - Page 4

... Power-Button Board...26 Removing the Processor Fan...26 Installing the Processor Fan...27 Removing the Processor...27 Installing the Processor...27 Removing the Speakers...28 Installing the Speakers...29 Removing the System Board...29 Installing the System Board...30 Removing the Display Panel...31 Installing the Display Panel...33 Removing the Antenna Modules...34...
Owner's Manual - Page 5
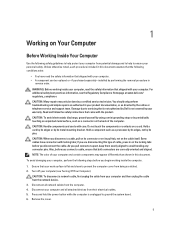
..., not on the cable itself. Unless otherwise noted, each procedure included in your computer and certain components may only be replaced or--if purchased separately--installed by Dell is unplugged to servicing that both connectors are disconnecting this document. NOTE: The color of the computer.
As you are correctly oriented and...
Owner's Manual - Page 7
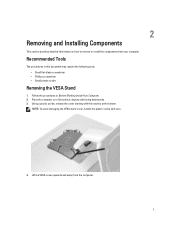
Place the computer on how to remove or install the components from the computer.
7 Recommended Tools
The procedures in Before Working Inside Your Computer. 2. Follow ...the notches at the bottom. Lift the VESA cover upwards and away from your computer.
2
Removing and Installing Components
This section provides detailed information on a flat surface, display side facing downwards. 3.
Owner's Manual - Page 8

... stand to the computer and lift the VESA stand away from the base of the computer. 2. Follow the procedures in After Working Inside Your Computer. 5. Installing the VESA Stand
1.
Place and press the VESA cover on the back of the computer. 8 Remove the screws from the computer.
Removing the Back Cover...
Owner's Manual - Page 9
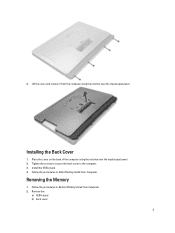
... back cover to the computer. 3. Removing the Memory
1.
Place the cover on the back of the computer using the notches near the input/output panel. 2.
Install the VESA stand. 4. Follow the procedures in After Working Inside Your Computer. Lift the cover and remove it from the computer using the notches near...
Owner's Manual - Page 10
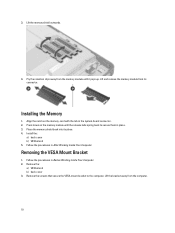
.... Lift and remove the memory module from the memory module until the release tabs spring back to the computer. Install the:
a) back cover b) VESA stand 5. Follow the procedures in the system-board connector. 2. Installing the Memory
1. Follow the procedures in place. 3.
Lift the bracket away from the computer.
10 Press down on...
Owner's Manual - Page 11

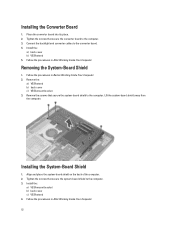
... Your Computer. 2. Disconnect the backlight and converter cables from the computer.
11 Remove the screws that secure the converter board to the computer. 3. Installing the VESA Mount Bracket
1. Install the:
a) back cover b) VESA stand 4.
Remove the:
a) VESA stand b) back cover 3. Tighten the screws to secure the VESA mount bracket to the computer...
Owner's Manual - Page 12
...-Board Shield
1. Install the:
a) VESA mount bracket b) back cover c) VESA stand 4. Removing the System-Board Shield
1....Follow the procedures in Before Working Inside Your Computer. 2.
Install the:
a) back cover b) VESA stand 5. Remove the screws that secure the converter board to the converter board. 4. Installing the Converter Board
1. Connect the backlight and converter cables to...
Owner's Manual - Page 13
...Before Working Inside Your Computer. 2. Remove the screws that secure the optical-drive bracket to the computer.
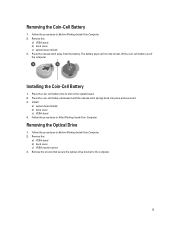
13 Installing the Coin-Cell Battery
1. Follow the procedures in After Working Inside Your Computer. Press the release latch away from... Inside Your Computer. 2. Place the coin-cell battery into place and secures it. 3. Install:
a) system-board shield b) base cover c) VESA stand 4.
Owner's Manual - Page 15
... cover c) VESA mount bracket 3. Removing the Hard Drive
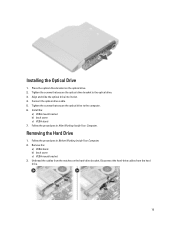
1. Align and slide the optical drive into its slot. 4. Unthread the cables from the hard drive.
15 Install the:
a) VESA mount bracket b) back cover c) VESA stand 7. Place the optical-drive bracket on the hard-drive bracket. Disconnect the hard-drive cables from the...
Owner's Manual - Page 16

...-drive bracket.
2. Tighten the screws that secure the hard drive to the hard-drive bracket. Installing the Hard Drive
1. Tighten the screws that secure the hard drive to the hard-drive bracket.... the hard drive from the hard-drive bracket. Slide the hard drive into the hard-drive bracket. Install: 16 Remove the screw that secure the hard drive to the hard-drive bracket.
3. For a ...
Owner's Manual - Page 18

... and tighten the screw to secure it to the chassis. 2. Remove the WLAN card from the connector.
18
Install:
a) system-board shield b) VESA mount bracket c) back cover d) VESA stand 4. Disconnect the WLAN cables. Installing the Intrusion Switch
1. Remove the:
a) VESA stand b) back cover c) VESA mount bracket d) system-board shield 3. Place the intrusion...
VESA Tech Sheet - Page 1
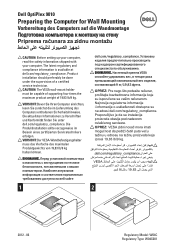
Product installation should preferably be done under the supervision of a certified service technician. ...kg.
.dell.com/regulatory_compliance
VESA
9 19.83
1
2
2012 - 06
Regulatory Model: W04C Regulatory Type: W04C001
Dell OptiPlex 9010
Preparing the Computer for Wall Mounting
Vorbereitung des Computers auf die Wandmontage
Priprema računara za zidnu montažu
...
Statement of Volatility - Page 1
Dell OptiPlex 9010 AIO
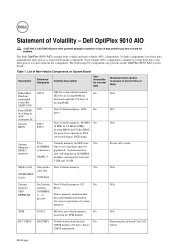
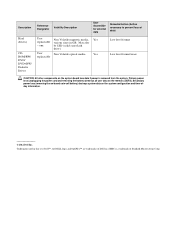
CAUTION: A CAUTION indicates either potential damage to hardware or loss of Volatility - Volatile components...Bytes.
RTC CMOS
BATTERY
Volatile battery back-backed
No
CMOS memory 256 bytes. Stores
CMOS information. The Dell OptiPlex 9010 AIO contains both volatile and non-volatile (NV) components.
Statement of data and tells you how to avoid the problem. Removing...
Statement of Volatility - Page 2
... data if power is a trademark of data)
User
Non Volatile magnetic media, Yes
replaceable various sizes in this text: Dell™, the DELL logo, and OptiPlex™ are trademarks of Dell Inc. SMSC is removed from the system. one.
May also
- Yes
replaceable
Low level format Low level format/erase
CAUTION...
Similar Questions

How To Remove Hdd From Dell Optiplex 9010 All In One
(Posted by Parkyk 9 years ago)


Where Are The Usb 2.0 Ports On My Dell Optiplex 9010
(Posted by cbjgmca 9 years ago)

Optiplex 9010 Why Blink The Yellow Light On On Off Switch
(Posted by C3daa 10 years ago)

Can I Install Wifi Onto A Dell Optiplex-gx 520 Pc ?
(Posted by mrazekwilliam 11 years ago)