
Dell OptiPlex 760 Support Question
Dell OptiPlex 760 Support Question
Find answers below for this question about Dell OptiPlex 760.Need a Dell OptiPlex 760 manual? We have 3 online manuals for this item!
Question posted by sksvrli on February 9th, 2014
Where Is The Front Panel Connector In A Optiplex 760
The person who posted this question about this Dell product did not include a detailed explanation. Please use the "Request More Information" button to the right if more details would help you to answer this question.
Current Answers
Related Dell OptiPlex 760 Manual Pages
Setup and Quick Reference Guide - Page 3
... - Back View 14 Small Form Factor - Back View 15 Ultra Small Form Factor - Back Panel Connectors 16
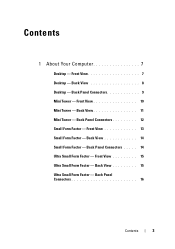
Contents
3 Front View 13 Small Form Factor - Front View 15 Ultra Small Form Factor - Front View 7 Desktop - Front View 10 Mini Tower - Back Panel Connectors 12 Small Form Factor - Back View 11 Mini Tower - Contents
1 About Your Computer...
Setup and Quick Reference Guide - Page 39
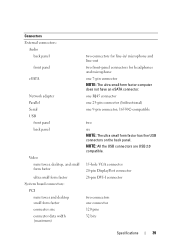
...compatible.
15-hole VGA connector 20-pin DisplayPort connector 28-pin DVI-I connector
two connectors one 9-pin connector; 16550C-compatible
two six NOTE: The ultra small form factor has five USB connectors on the back panel. Connectors External connectors:
Audio back panel
front panel
eSATA
Network adapter Parallel Serial USB
front panel back panel
Video mini tower, desktop, and small form factor...
Service Manual - Page 2
... to enable the remote management of desktop and mobile computing resources in a ...connectors, a parallel connector, a floppy drive, PCI slots, and a PS/2 mouse. For more management functionality through system setup, Dell OpenManage™ IT Assistant, or Dell custom-factory integration. With iAMT, computers can be unable to Contents Page
Advanced Features
Dell™ OptiPlex™ 760...
Service Manual - Page 12
... your computer. Back to Contents Page
Working on Your Computer
Dell™ OptiPlex™ 760 Service Manual Recommended Tools Before Working on Your Computer After Working on Your Computer...inside the computer.
1. Also, before you connect a cable, ensure that : l You have connectors with your computer. if you have read the safety information that shipped with your computer.
l ...
Service Manual - Page 14
...Page Dell™ OptiPlex™ 760 Service Manual
Desktop Computer
About Your ...Computer Inside Your Computer System Setup Advanced Features Troubleshooting Getting Help Glossary
Removing and Replacing Parts Working on Your Computer Removing the Computer Cover Chassis Intrusion Switch Cards Drives Heat Sink Assembly Processor System Fan I/O Panel...
Service Manual - Page 15
... low-profile PCI cards l One connector for information.
1. The brackets keep dust and dirt out of the computer. ISA cards are replacing a PCI card, remove the current driver for the card from your computer's electronic components. Back to Contents Page Dell™ OptiPlex™ 760 Service Manual
Cards
Cards
WARNING: Before working inside...
Service Manual - Page 30

...computer. Reconnect the cable to Contents Page Dell™ OptiPlex™ 760 Service Manual
Chassis Intrusion Switch
Chassis Intrusion Switch
WARNING: ...connector to remove the switch
and its slot until it down through the square hole in the bracket to disconnect the chassis intrusion switch cable from underneath the metal bracket into the square hole in Working on mini tower, desktop...
Service Manual - Page 32
...) must be able to connect all supported devices at once. Data Interface Connectors
SATA Connector
NOTE: If you will not be installed in place of the drive....2 floppy drive 3 hard drive
General Drive Installation Guidelines
SATA connectors on the system board). Back to Contents Page Dell™ OptiPlex™ 760 Service Manual
Drives
Drives
Your computer supports: l One serial ATA...
Service Manual - Page 47
... the I /O panel to the desktop computer. Back to Contents Page Dell™ OptiPlex™ 760 Service Manual
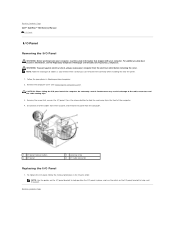
I/O Panel
I/O Panel
Removing the I/O Panel
WARNING: Before working inside your computer, read the safety information that you can re route them , so that shipped with your computer from the computer.
1 securing screw
2 I/O panel
3 I/O cable connector 4 I /O panel out of all...
Service Manual - Page 52
Back to Contents Page Dell™ OptiPlex™ 760 Service Manual
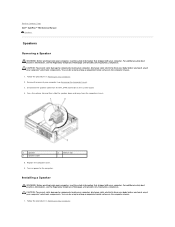
Speakers
Speakers
Removing a Speaker
WARNING: Before working inside...1. Follow the procedures in Working on power to components inside your computer, discharge static electricity from the INT_SPKR connector on Your Computer. Disconnect the speaker cable from your body before you touch any of your computer. Replace...
Service Manual - Page 54
... Computer
WARNING: Before working inside your computer, read the safety information that a graphics card heat sink has had sufficient time to Contents Page
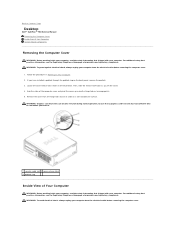
Desktop
Dell™ OptiPlex™ 760 Service Manual Removing the Computer Cover Inside View of the computer cover and pivot the cover up using the hinge tabs as you have...
Service Manual - Page 66
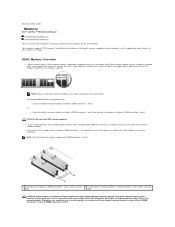
... any new modules that you may not start properly. Otherwise, your original memory modules in pairs either in DIMM connectors 1 and 2 or DIMM connectors 3 and 4. Back to Contents Page
Memory
Dell™ OptiPlex™ 760 Service Manual Installing Memory Module (s) Removing Memory Module (s)
You can increase your computer memory by your computer, see the...
Service Manual - Page 69
... forbidden.
Dell™ OptiPlex™ 760 Service Manual
Mini Tower Computer...
About Your Computer Inside Your Computer System Setup Advanced Features Troubleshooting Getting Help Glossary
Removing and Replacing Parts Working on Your Computer Removing the Computer Cover Chassis Intrusion Switch Cards Drives Heat Sink and Processor System Fan I/O Panel...
Service Manual - Page 94
... so that you can re-route them correctly when installing the new I/O panel.
1. Follow the procedures in the reverse order. Back to the cable connectors and the cable routing clips.
3. Back to Contents Page Dell™ OptiPlex™ 760 Service Manual
I/O Panel
I/O Panel
Removing the I/O Panel
WARNING: Before working inside your computer, read the safety information that...
Service Manual - Page 161

... lamp. ¡ Ensure that the main power cable and front panel cable are : ¡ Power, keyboard, and mouse extension cables ...Components ¡ Desktop - Cards l Eliminate interference. Back to Contents Page
Troubleshooting
Dell™ OptiPlex™ 760 Service Manual Tools...¡ Reseat the power cable into both the power connector on the back of interference are securely connected to the ...
Service Manual - Page 183
Back to Contents Page Back to Contents Page Dell™ OptiPlex™ 760 Service Manual
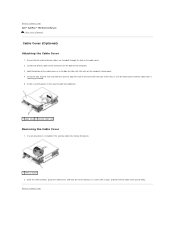
Cable Cover (Optional)
Cable Cover (Optional) Attaching the Cable Cover
1....the back of the computer. 3. Insert the tabs into the slots and slide the cover to the connectors on the computer's back panel. 4.
Hold the bottom of the chassis (see the illustration) until it stops, and then lift the...
Technical Guide - Page 4
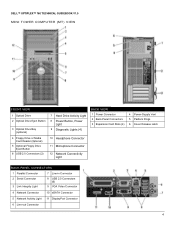
... OPTIPLEX™ 760 TECHNICAL GUIDEBOOK V1.0
MINI TOWER COMPUTER (MT) VIEW
FRONT VIEW
1 Optical Drive 2 Optical Drive Eject Button
3 Optical Drive Bay (optional)
4 Floppy Drive or Media Card Reader (0ptional)
5 Optional Floppy Drive Eject Button
6 USB 2.0 Connectors (2)
7 Hard Drive Activity Light 8 Power Button, Power
Light 9 Diagnostic Lights (4)
10 Headphone Connector
11 Microphone Connector...
Technical Guide - Page 5
DELL™ OPTIPLEX™ 760 TECHNICAL GUIDEBOOK V1.0
DESKTOP COMPUTER (DT) VIEW
FRONT VIEW
1 Optical Drive 2 Optical Drive Eject Button
7 Network Connectivity Light
8 Microphone Connector
3 USB 2.0 Connectors (2)
9 Headphone Connector
4 Hard Drive Activity Light 10 Optional Floppy Drive Eject Button
5 Power Button, Power Light
11 Floppy Drive or Media Card Reader (optional)
6 ...
Technical Guide - Page 6
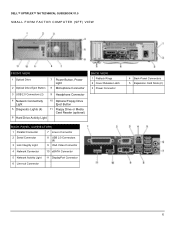
DELL™ OPTIPLEX™ 760 TECHNICAL GUIDEBOOK V1.0
SMALL FORM FACTOR COMPUTER (SFF) VIEW
FRONT VIEW
1 Optical Drive 2 Optical Drive Eject Button
7 Power Button, Power Light
8 Microphone Connector
3 USB 2.0 Connectors (2)
9 Headphone Connector
4 Network Connectivity Light
10 Optional Floppy Drive Eject Button
5 Diagnostic Lights (4)
11 Floppy Drive or Media Card Reader (optional)
6 ...
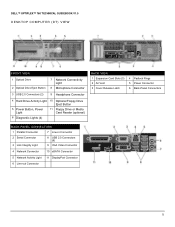
Technical Guide - Page 7

...; OPTIPLEX™ 760 TECHNICAL GUIDEBOOK V1.0
ULTRA SMALL FORM FACTOR COMPUTER (USFF) VIEW
FRONT VIEW
1 USB 2.0 Connectors (2)
6 Optical Drive Eject Button
2 Hard Drive Activity Light 7 Optical Drive
3 USB 2.0 Connectors (2)
8 Headphone Connector
4 Power Button, Power Light
5 Air Vents
9 Air Vents
BACK VIEW 1 Diagnostic Lights (4) 2 Cover Release Knob 3 Security Cable Slot
4 Back-Panel...
Similar Questions


Where Is The Front Panel Connector On An Optiplex 780 Sff
(Posted by kirxckt 10 years ago)

How To Remove Front Panel Of A Dell Optiplex 760 Mini Desktop
(Posted by hooliwle 10 years ago)
Can I Get A Better, More Powerful Graphics Ccard For My Dell Optiplex 760,
Desktop Form
Desktop Form
(Posted by fire127 11 years ago)

My Cords Came Unhooked From The Front Panel Connector
i have a dell dimension 4600 and i cant find a wiring diagram i understand to hook up my power and l...
i have a dell dimension 4600 and i cant find a wiring diagram i understand to hook up my power and l...
(Posted by hernekdemetera 12 years ago)