
Dell OptiPlex 330 Support Question
Dell OptiPlex 330 Support Question
Find answers below for this question about Dell OptiPlex 330.Need a Dell OptiPlex 330 manual? We have 2 online manuals for this item!
Question posted by stelelu on January 26th, 2014
When Was Optiplex 330 Released
The person who posted this question about this Dell product did not include a detailed explanation. Please use the "Request More Information" button to the right if more details would help you to answer this question.
Current Answers
Related Dell OptiPlex 330 Manual Pages
Quick Reference - Page 2
... permission of your computer. Model DCSM and DCNE
September 2007
P/N JY235
Rev. A00 Information in this text: Dell, the DELL logo, Inspiron, Dell Precision, Dimension, OptiPlex, Latitude, PowerEdge, PowerVault, PowerApp, and Dell OpenManage are registered trademarks of data and tells you make better use of Dell Inc.
Dell Inc. is subject...
Quick Reference - Page 6
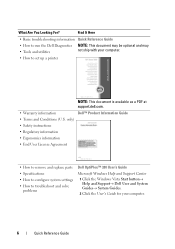
... Agreement
• How to remove and replace parts • Specifications • How to configure system settings • How to troubleshoot and solve
problems
Dell OptiPlex™ 330 User's Guide
Microsoft Windows Help and Support Center 1 Click the Windows Vista Start button→ Help and Support→ Dell User and System Guides→...
User's Guide - Page 2
Reproduction in this text: Dell, the DELL logo, OptiPlex, Inspiron, TravelLite, Dell OpenManage, and Strike Zone are trademarks of Dell Inc. Intel, Pentium, SpeedStep, and Celeron are registered trademarks of Intel Corporation; Computrace and ...
User's Guide - Page 15
... Agreement
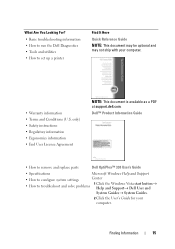
NOTE: This document is available as a PDF at support.dell.com. Dell™ Product Information Guide
• How to remove and replace parts
Dell OptiPlex™ 330 User's Guide
• Specifications
Microsoft Windows Help and Support
• How to configure system settings
Center
• How to set up a printer
Find It...
User's Guide - Page 35

... use the padlock rings, insert a commercially available padlock through the rings, and then lock the padlock.
6 cover release latch Use this latch to the inside of the system air vents are for more information).
3 power connector Insert ...
Padlock rings are blocked. Blocking them would cause serious thermal problems.
Desktop Computer Views
35 CAUTION: Ensure that none of the computer.
User's Guide - Page 209
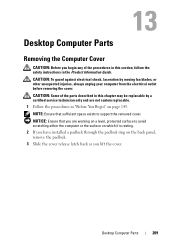
... in "Before You Begin" on the back panel, remove the padlock. 3 Slide the cover release latch back as you lift the cover. NOTICE: Ensure that sufficient space exists to avoid scratching either...always unplug your computer from the electrical outlet before removing the cover. Desktop Computer Parts
209 Desktop Computer Parts
Removing the Computer Cover
CAUTION: Before you begin any of the parts...
User's Guide - Page 210

1
2 3
1 security cable slot 3 padlock ring
2 cover release latch
4 Pivot the cover up using the hinge tabs as leverage points.
5 Remove the cover from the hinge tabs and set it aside on a soft ... View of Your Computer
CAUTION: Before you begin any of the procedures in this section, follow the safety instructions in the Product Information Guide.
210
Desktop Computer Parts
User's Guide - Page 220
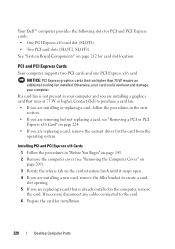
... but not replacing a card, see "Removing the Computer Cover" on page 209). 3 Rotate the release tab on the card retention latch until it snaps open. 4 If you are installing a new card... card slots (SLOT2, SLOT3) See "System Board Components" on page 212 for installation.
220
Desktop Computer Parts Otherwise, your card could overheat and damage your computer and you are replacing a card...
User's Guide - Page 221

Desktop Computer Parts
221
1
2
3 4
1 release tab 3 card-edge pins
2 card 4 card connector
NOTE: See the documentation that the card is fully seated in the connector and press down firmly.
Ensure ...
User's Guide - Page 224
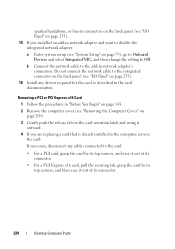
... a PCI card, grasp the card by its top corners, and ease it out of its connector.
224
Desktop Computer Parts Do not connect the network cable to the integrated connector on the back panel (see "I /O ...Enter system setup (see "Removing the Computer Cover" on page 209).
3 Gently push the release tab on page 253).
15 If you installed an add-in network adapter and want to the add-in the...
User's Guide - Page 225

... over empty card-slot openings is necessary to electrical outlets, and then turn
Desktop Computer Parts
225 NOTICE: To connect a network cable, first plug the cable...card retention latch into place.
The brackets also keep dust and dirt out of the computer. 1
2
3
4 5
1 release tab 3 card 5 card connector
2 card retention latch 4 card-edge pins
5 If you are removing the card permanently, ...
User's Guide - Page 231

... does not have the plastic hard-drive bracket
attached, remove the bracket from the existing drive by unsnapping it from the drive, using the two release tabs.
1
2 3
1 hard drive 3 plastic hard-drive bracket
2 release tabs (2)
5 Attach the bracket to the new drive by snapping it onto the drive...
User's Guide - Page 232
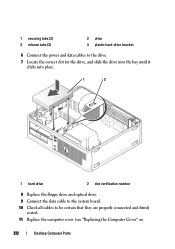
1 securing tabs (2) 3 release tabs (2)
2 drive 4 plastic hard-drive bracket
6 Connect the power and data cables to the drive.
7 Locate the correct slot for the drive, and slide the ... all cables to be certain that they are properly connected and firmly
seated. 11 Replace the computer cover (see "Replacing the Computer Cover" on
232
Desktop Computer Parts
User's Guide - Page 234
... towards the back of the computer.
NOTICE: Do not pull the drive out of the computer by the drive cables. 1
2
1 drive release latch (blue)
2 floppy drive
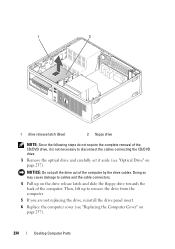
NOTE: Since the following steps do not require the complete removal of the CD/DVD drive, it is not... drive.
3 Remove the optical drive and carefully set it aside (see "Replacing the Computer Cover" on page 257).
234
Desktop Computer Parts
User's Guide - Page 237
... system setup (see "Dell Diagnostics" on page 111).
Then, lift up on the drive release latch and slide the drive towards the back of the procedures in this section, follow the ... first plug the cable into the network port or device and then plug it into the computer.
Desktop Computer Parts
237 CAUTION: To guard against electrical shock, laceration by running the Dell Diagnostics (see ...
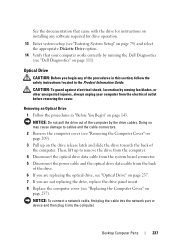
User's Guide - Page 238

...your computer.
2 Follow the procedures in system setup (see "Entering System Setup" on page 79).
2 1
1 drive release latch
2 optical drive
9 Connect your computer and devices to electrical outlets, and then turn them on.
10 Configure the ... accompanied the drive to the replacement drive.
238
Desktop Computer Parts Check the documentation that the drive is configured for installation.
User's Guide - Page 241

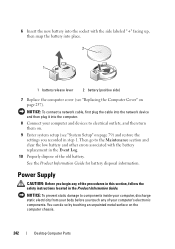
...the procedures in system setup (see "Dell Diagnostics" on page 212). 5 Carefully press the battery release lever away from the battery and the battery will pop out. To replace the battery: 1 Record... page 209). 4 Locate the battery socket (see "System Board Components" on page 111). Desktop Computer Parts
241
Replace the battery only with FCC regulations, it is locked in the Product ...
User's Guide - Page 242
....
9 Enter system setup (see "Replacing the Computer Cover" on the computer chassis.
242
Desktop Computer Parts You can do so by touching an unpainted metal surface on page 257). NOTICE...network cable, first plug the cable into the network device and then plug it into place.
2
1
1 battery release lever 2 battery (positive side)
7 Replace the computer cover (see "System Setup" on page 79) and ...
User's Guide - Page 244
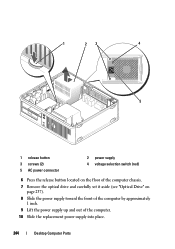
... 3 screws (2) 5 AC power connector
2 power supply 4 voltage selection switch (red)
6 Press the release button located on the floor of the computer chassis.
7 Remove the optical drive and carefully set it aside (see "Optical Drive" on page 237... by approximately 1 inch.
9 Lift the power supply up and out of the computer.
10 Slide the replacement power supply into place.
244
Desktop Computer Parts
User's Guide - Page 270

....
270
Appendix The following information is provided on the device or devices covered in this document in compliance with the FCC regulations:
• Product name: OptiPlex 330
• Model number: DCSM and DCNE
• Company name: Dell Inc.
Similar Questions

How To Reformat Hard Drive Dell Optiplex 330 To Factory Settings
(Posted by ccraAKe 10 years ago)


How Do You Access The Bios On The Dell Optiplex 330
(Posted by cjaxlme 10 years ago)

How To Reinstall Drivers On Dell Optiplex 330 To Factory Settings
(Posted by djjessie 10 years ago)
Dell Optiplex 330 Os
Is Windows 8 compatible with the Dell Optiplex 330 desktop, or will a new computer be needed?
Is Windows 8 compatible with the Dell Optiplex 330 desktop, or will a new computer be needed?
(Posted by coolburner 11 years ago)