Dell Latitude E5430 Support Question
Dell Latitude E5430 Support Question
Find answers below for this question about Dell Latitude E5430.Need a Dell Latitude E5430 manual? We have 3 online manuals for this item!
Question posted by engmkhalifa on April 8th, 2013
How Can I Fix Hard Drive Pipee Voice And Giving Me Msg Hard Not Installed
The person who posted this question about this Dell product did not include a detailed explanation. Please use the "Request More Information" button to the right if more details would help you to answer this question.
Current Answers
Answer #1: Posted by TommyKervz on April 8th, 2013 1:12 PM
TommyKervz

Member since:
January 10th, 2013 Points: 17,776,803

Member since:
January 10th, 2013 Points: 17,776,803
Greetings - Generally, sadly, when a hard drive begins to make this notable sounds, it is signs of its death that may lie right ahead. You may want to start making back-ups as it could colapse at any time without a warning. You can even have a hard drive diagnostic downloaded to have its health analysed. Mine has gotten there and would even frizze the computer at times and I would have to manually restart it in order to continue using in..
Answer #2: Posted by RathishC on April 9th, 2013 11:03 AM
RathishC

Member since:
June 19th, 2012 Points: 2,516,090
Member since:
June 19th, 2012 Points: 2,516,090
Hi Engmkhalifa,
Rathish C
#iworkfordell
It seems to be an issue with the hard drive. However, I would request you to run a test to check the hardware functionality. Restart the computer and keep tapping F12, which will take you to “One Time Boot Menu” Choose diagnostics and let me know the error which you are getting.
You can also refer the Dell Article 266787 on www.support.dell.com
Also, check if the hard drive is correctly installed or not.
Please reply for further assistance.
Rathish C
#iworkfordell
Related Dell Latitude E5430 Manual Pages
User Manual - Page 2
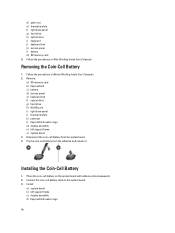
... the Display Panel...12 Removing the Keyboard Trim...12 Installing the Keyboard Trim...14 Removing the Keyboard...14 Installing the Keyboard...16 Removing the Access Panel...16 Installing the Access Panel...17 Removing the Optical Drive...17 Installing the Optical Drive...19 Removing the Hard Drive...19 Installing the Hard Drive...21 Removing the Wireless Local Area Network (WLAN) Card 22...
User Manual - Page 19
... the optical drive bezel tabs to the optical drive. 2. Remove the optical drive bezel.
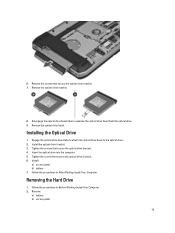
Follow the procedures in After Working Inside Your Computer. Removing the Hard Drive
1. Remove the optical drive bracket.
8. Remove:
a) battery b) access panel
19 Tighten the screws that secure the optical drive bracket. 7.
6. Install the optical drive bracket. 3. Install:
a) access panel...
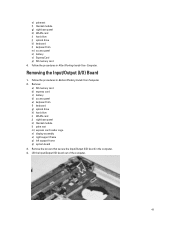
User Manual - Page 20

Use the tab to pull the hard drive bracket to release the hard drive from the computer. 20 Remove the screws that secure the hard drive bracket in place. 4. Remove the hard drive from its connector. 5. 3.
User Manual - Page 21

... access panel b) battery 6. Installing the Hard Drive
1. 6. Tighten the screw that secure the hard drive bracket.
7. Follow the procedures in place. 5. Engage the hard drive bracket to the hard drive. 2. Remove the hard drive bracket from the hard drive. Install the hard drive into the computer. 4.
Remove the screws that secures the hard drive bracket in After Working Inside Your...
User Manual - Page 31
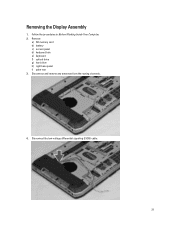
Disconnect the low-voltage differential signaling (LVDS) cable.
31 Follow the procedures in Before Working Inside Your Computer. 2. Remove:
a) SD memory card b) battery c) access panel d) keyboard trim e) keyboard f) optical drive g) hard drive h) right base panel i) palm rest 3. Removing the Display Assembly
1. Disconnect and remove any antennae from the routing channels.
4.
User Manual - Page 32

Install:
a) palm rest b) right base panel c) hard drive 32 5. Remove the display assembly from the computer. Connect the antenna cables to the system board. 4. Insert...compartment and connect the connector to their connectors. 5. Pull the antennas through the holes on the
chassis. 3. Installing the Display Assembly
1. Install the screws that secure the display assembly in place. 2.
User Manual - Page 33
...keyboard f) keyboard trim g) access panel h) battery i) SD memory card 6. Remove:
a) SD memory card b) express card c) battery d) access panel e) keyboard trim f) keyboard g) optical drive h) hard drive i) WLAN card j) right base panel k) thermal module l) palm rest m) display assembly 3.
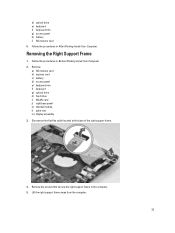
Remove the screws that secure the right support frame to the computer. 5. Disconnect the ...
User Manual - Page 34
... The Modem Card
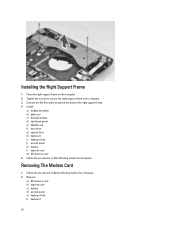
1. Connect the flat flex cable located at the base of the right support frame. 4. Installing the Right Support Frame
1. Install:
a) display assembly b) palm rest c) thermal module d) right base panel e) WLAN card f) hard drive g) optical drive h) keyboard i) keyboard trim j) access panel k) battery l) express card m) SD memory card 5.
Tighten the screws to secure the...
User Manual - Page 35

.... 2.
Removing the Left Support Frame
1. Remove:
35 Follow the procedures in After Working Inside Your Computer. Install:
a) right support frame b) display assembly c) express card reader cage d) palm rest e) thermal module f) right base panel g) hard drive h) optical drive i) keyboard j) keyboard trim k) access panel l) battery m) express card n) SD memory card 6. Lift the modem card to...
User Manual - Page 36
... b) palm rest c) thermal module d) right base panel e) WLAN card f) hard drive g) optical drive h) keyboard i) keyboard trim j) access panel k) battery
36 Installing the Left Support Frame
1.
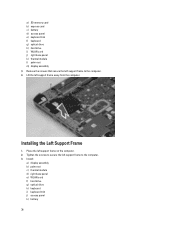
Remove the screws that secure the left support frame to the computer. 4. Place the left support frame away from the computer. ...
User Manual - Page 37
.... Disconnect the audio board flat flex cable. 7. Follow the procedures in Before Working Inside Your Computer. 2. Remove:
a) battery b) access panel c) keyboard trim d) keyboard e) optical drive f) hard drive g) WLAN card h) right base panel i) thermal module j) palm rest k) express card reader cage l) display assembly m) left support frame 3. l) express card m) SD memory card 4. Disconnect...
User Manual - Page 40
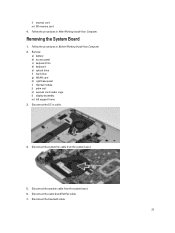
... Computer. 2. Disconnect the coin-cell battery from the adhesive and remove it. Place the coin-cell battery on the system board with adhesive side downwards. 2. Install:
a) system board b) left support frame o) system board 3. d) palm rest e) thermal module f) right base panel g) hard drive h) optical drive i) keyboard j) keyboard trim k) access panel l) battery m) SD memory card 5.
User Manual - Page 41
... express card c) battery d) access panel e) keyboard trim f) keyboard g) optical drive h) hard drive i) WLAN card j) right base panel k) thermal module l) palm rest m) express... (I /O) Board
1.
e) palmrest f) thermal module g) right base panel h) WLAN card i) hard drive j) optical drive k) keyboard l) keyboard trim m) access panel n) battery o) ExpressCard p) SD memory card 4. Removing the Input/...
User Manual - Page 42
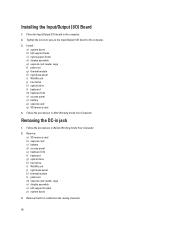
... support frame d) display assembly e) express card reader cage f) palm rest g) thermal module h) right base panel i) WLAN card j) hard drive k) optical drive l) keyboard m) keyboard trim n) access panel o) battery p) express card q) SD memory card
4. Install: a) system board b) left support bracket p) system board
3. Follow the procedures in Before Working Inside Your Computer.
2. Place the...
User Manual - Page 43

4. Install the DC-in jack in the routing channel. 3. Thread the DC-in cable in the computer. 2. Remove the DC-in Jack
1. Install:
a) system board b) left support bracket c) display assembly d) express card reader cage e) palm rest f) thermal module g) right base panel h) WLAN card i) hard drive
43
Installing the DC-in -jack.
User Manual - Page 44
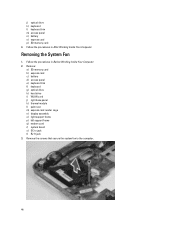
... the procedures in Before Working Inside Your Computer. 2. Removing the System Fan
1. Remove:
a) SD memory card b) express card c) battery d) access panel e) keyboard trim f) keyboard g) optical drive h) hard drive i) WLAN card j) right base panel k) thermal module l) palm rest m) express card reader cage n) display assembly o) right support frame p) left support frame q) modem card r) system...
User Manual - Page 45

... system fan out of the computer. Install:
a) RJ11 jack b) DC-in the computer. 2. Place the system fan in -jack c) system board d) modem card e) left support frame f) right support frame g) display assembly h) express card reader cage i) palm rest j) thermal module k) right base panel l) WLAN card m) hard drive n) optical drive o) keyboard p) keyboard trim q) access panel r) battery...
User Manual - Page 46
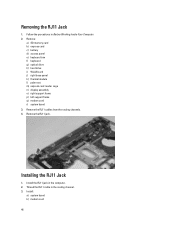
... the RJ11 jack in Before Working Inside Your Computer. 2. Removing the RJ11 Jack
1. Installing the RJ11 Jack
1. Remove the RJ11 jack. Install:
a) system board b) modem card
46 Remove:
a) SD memory card b) express card c) battery d) access panel e) keyboard trim f) keyboard g) optical drive h) hard drive i) WLAN card j) right base panel k) thermal module l) palm rest m) express card reader...
User Manual - Page 59

... Memory Installed, Memory Available, Memory Speed, Memory Channels Mode, Memory Technology, DIMM ASize, DIMM B Size,
• Processor Information: Displays Processor Type, Core Count, Processor ID, Current Clock Speed, Minimum Clock Speed, Maximum Clock Speed, Processor L2 Cache, Processor L3 Cache, HT Capable, and 64-Bit Technology.
• Device Information: Displays Primary Hard Drive, Fixed...
User Manual - Page 61
... or disable the following devices:
• Enable Internal Modem • Enable Microphone • Enable eSATA Ports • Enable Hard Drive Free Fall Protection • Enable Fixed Bay • Enable Express card • Enable Camera
61 All drives are reported during system startup. The options are:
• SATA-0 • SATA-1 • SATA-4 • SATA-5
This...
Similar Questions


How Do I Fix No Hard Drive Detected In A Dell Inspiron N5050 Laptop
(Posted by honkejag 10 years ago)

How To Get To Recovery Drive In Dell Inspiron N5110 After Installing Windows 8
(Posted by Jay24cu 10 years ago)

Hard Disk Fail
i has hard disk fail PSA V4220 Error 2000:0155 please if some body can advise
i has hard disk fail PSA V4220 Error 2000:0155 please if some body can advise
(Posted by amseng85 11 years ago)