Dell Latitude CPX Support Question
Dell Latitude CPX Support Question
Find answers below for this question about Dell Latitude CPX - Notebook.Need a Dell Latitude CPX manual? We have 1 online manual for this item!
Question posted by shwetabhs432 on April 11th, 2013
Power Pro
when insert power coard in to my dell laptop the laptop auto turn on
Current Answers
Answer #1: Posted by RoyanAtDell on April 16th, 2013 8:01 AM
RoyanAtDell

Member since:
April 3rd, 2013 Points: 232,700

Member since:
April 3rd, 2013 Points: 232,700
Hi,
I work for Dell's Social Media Team. I recommend you update the Bios for the system. Log on to support.dell.com, enter your service tag or select by system model, click on view drivers and downloads to find drivers for your system. Under Bios download and install the Bios. Have the AC adapter and the battery connected to the system when flashing the Bios. Do not turn off the system when flashing Bios.
Thank you.
Dell-Royan
RoyanAtDell.
Dell Social Media and Communities.
Related Dell Latitude CPX Manual Pages
Service Manual - Page 8
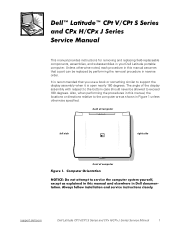
...the bottom case should never be replaced by performing the removal procedure in your Dell Latitude portable computer. back of computer
left side
right side
front of the display assembly... when it is open nearly 180 degrees. The angle of computer
support.dell.com
Dell Latitude CPt V/CPt S Series and CPx H/CPx J Series Service Manual
1
Also, when performing the procedures in this ...
Service Manual - Page 9
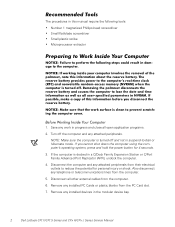
...is turned off...power button for personal injury or shock. Save any installed devices in a C/Dock Family Expansion Station or C/Port Family Advanced Port Replicator (APR), undock the computer.
4. Disconnect all open application programs.
2. NOTE: Make sure the computer is docked in the modular device bay.
2
Dell Latitude CPt V/CPt S Series and CPx H/CPx J Series Service Manual Turn...
Service Manual - Page 10
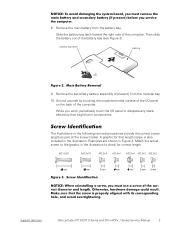
... part of the computer. A graphic for correct length. M2.5x20
M2.5x10
M3.0x5 M2.5x4 M2.5x4 M3.0x3 M2.0x3
support.dell.com
Dell Latitude CPt V/CPt S Series and CPx H/CPx J Series Service Manual
3 Ground yourself by touching the unpainted metal surface of the I /O panel to check for that might harm components. Slide...
Service Manual - Page 11
....
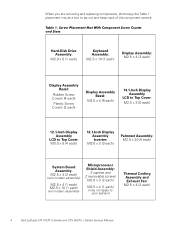
When you are removing and replacing components, photocopy the Table 1 placement mat as a tool to
your system)
Thermal Cooling Assembly and Exhaust Fan: M2.5 x 4 (2 each)
4
Dell Latitude CPt V/CPt S Series and CPx H/CPx J Series Service Manual
Service Manual - Page 12

...dell.com
Dell Latitude CPt V/CPt S Series and CPx H/CPx J Series Service Manual
5 To ensure a firm connection, make sure the ZIF connector is completely closed. movable part of the connector.
2. Grasp the interface cable and pull it releases the interface cable.
3. Insert...place, close the ZIF connector. These connectors are zero insertion force (ZIF) connectors. Some of the computer's ...
Service Manual - Page 13
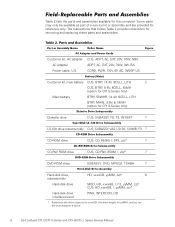
...may only be available as part of a service kit or assembly and are provided for the manufacturer's name.
6
Dell Latitude CPt V/CPt S Series and CPx H/CPx J Series Service Manual CUS, ADPT, AC, EXT, 20V, 70W, NBK ADPT, AC, EXT, 20V, 70W... parts and assemblies. Customer kit, AC adapter AC adapter Power cable, U.S.
The subsections that follow Table 2 provide instructions for the computer.
Service Manual - Page 14
...
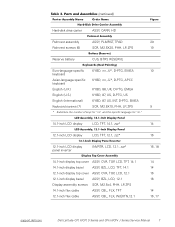
14.1-inch flex cable
ASSY, CBL, FLX, TFT
12.1-inch flex cable
ASSY, CBL, FLX, W/EXTN,12.1
14 14 16 16
14 16, 17
support.dell.com
Dell Latitude CPt V/CPt S Series and CPx H/CPx J Series Service Manual
7
Service Manual - Page 15

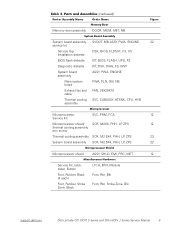
...-MB
CUS, 128MB, DIMM, SDRAM
Customer kit, memory module, 192-MB
CUS, 192MB, DIMM, SDRAM
Customer kit, memory module, 256-MB
CUS, 256MB, DIMM, SDRAM
8
Dell Latitude CPt V/CPt S Series and CPx H/CPx J Series Service Manual
Service Manual - Page 16
... Kit, latch, slider, Button
Foot, Rubber, Black (4 each)
Foot, Rubber, Strike Zone, Black
LTCH, BTN, Module Foot, Rbr, Blk Foot, Rbr, Strike Zone, Blk
support.dell.com
Dell Latitude CPt V/CPt S Series and CPx H/CPx J Series Service Manual
9
Service Manual - Page 17
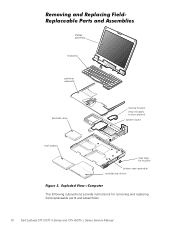
display assembly
keyboard
palmrest assembly
hard-disk drive
internal modem (may not apply to your system)
system board
main battery
case plug for modem
bottom case assembly modular bay device
The following subsections provide instructions for removing and replacing field-replaceable parts and assemblies.
10 Dell Latitude CPt V/CPt S Series and CPx H/CPx J Series Service Manual
Service Manual - Page 18
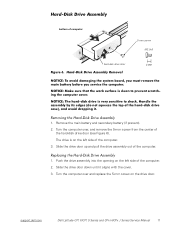
... and secondary battery (if present). 2. support.dell.com
Dell Latitude CPt V/CPt S Series and CPx H/CPx J Series Service Manual 11 The drive is on the left side of the computer.
1. Turn the computer over , and remove the 5-mm... cover. 3. Push the drive assembly into the opening on the drive door. Turn the computer over and replace the 5-mm screw on the left side of computer
5-mm screw ...
Service Manual - Page 19
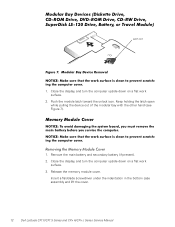
... hand (see Figure 7).
1. Close the display, and turn the computer upside down on a flat work surface.
2. Insert a flat-blade screwdriver under the indentation in the bottom case assembly and lift the cover.
12 Dell Latitude CPt V/CPt S Series and CPx H/CPx J Series Service Manual Close the display, and turn the computer upside down on a flat work
surface...
Service Manual - Page 20

... memory module to fit into their sockets, in only one direction. support.dell.com
Dell Latitude CPt V/CPt S Series and CPx H/CPx J Series Service Manual 13 NOTES: 192-MB memory modules are keyed,... (if present). 2. To release a memory module from the socket. A 192-MB memory module inserted with the double-stacked memory chips facing you only have one way. Remove the memory module cover....
Service Manual - Page 21

... secondary battery (if present). 2. 2. Pivot the memory module down on a flat
work surface.
10-mm screws (7)
M2.5x10
14 Dell Latitude CPt V/CPt S Series and CPx H/CPx J Series Service Manual Close the display assembly, and turn the computer upside down until it .
4. Align the memory module's edge connector with the slot in the center of...
Service Manual - Page 22
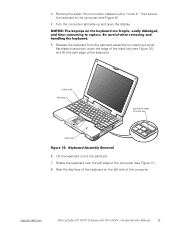
... assembly by inserting a small flat-blade screwdriver under the edge of the computer. 3. Turn the computer right-side up and open the display.
5. track stick keyboard
scalloped edge of the palmrest. 7. Rotate the keyboard over the left side of the blank key (see Figure 11). 8. support.dell.com
Dell Latitude CPt V/CPt S Series and CPx H/CPx J Series...
Service Manual - Page 23

... the track stick cable to the connector on the system board. The keyboard cable is face down when you insert the cable into the keyboard ZIF interface connector.
16 Dell Latitude CPt V/CPt S Series and CPx H/CPx J Series Service Manual track stick cable keyboard cable
9. Place the keyboard on the palmrest's flexible printed circuit board...
Service Manual - Page 24
...then work inward to the center. Carefully turn the computer over and fit the keyboard ...turn the keyboard over and reinstall the seven 10-mm screws. 4. Start by installing the outermost screws on the blank key located below the right key.
6. The keys should be flush with the left and right sides of the palmrest.
7.
support.dell.com
Dell Latitude CPt V/CPt S Series and CPx H/CPx...
Service Manual - Page 42
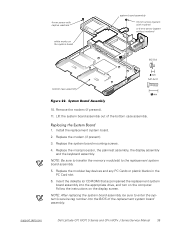
...Insert the diskette (or CD-ROM) that accompanied the replacement system board assembly into the BIOS of the bottom case assembly.
1. NOTE: Be sure to transfer the memory module(s) to enter the system's service tag number into the appropriate drive, and turn... instructions on the display screen. support.dell.com
Dell Latitude CPt V/CPt S Series and CPx H/CPx J Series Service Manual 35 Remove the...
Service Manual - Page 43
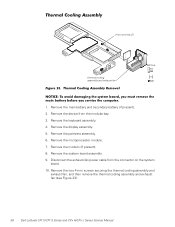
... palmrest assembly. 6. Remove the modem (if present). 8. Disconnect the exhaust-fan power cable from the modular bay. 3. Remove the two 4-mm screws securing the thermal cooling assembly and
exhaust fan, and then remove the thermal cooling assembly and exhaust fan (see Figure 23).
36 Dell Latitude CPt V/CPt S Series and CPx H/CPx J Series Service Manual
Service Manual - Page 45

Ensure that the slider is inserted in its snap tabs are fully engaged in the new latch button from the case: a. bumps (2)
wear ribs (2)
38 Dell Latitude CPt V/CPt S Series and CPx H/CPx J Series Service Manual Apply pressure to the module latch and spring while unsnapping the snap tabs to prevent the module latch assembly from...
Similar Questions

Dell Latitude Cpx J 750 Gt Laptop
Where can I find a hard drive adaptor for a CPx J750 Gt laptop.
Where can I find a hard drive adaptor for a CPx J750 Gt laptop.
(Posted by Wevil1 1 year ago)

My Dell Inspiron N5130 Can Not Turn On What Is The Problom
I installed the drivers and restart 32 bytes restart computer I saw that GrailI took out the battery...
I installed the drivers and restart 32 bytes restart computer I saw that GrailI took out the battery...
(Posted by Ralizada 11 years ago)

How Could I Fix The Alert Of Low C Drive Space?
Don't what program to delete to get more free space
Don't what program to delete to get more free space
(Posted by fbozasr 11 years ago)


My Notebook Laptop Dell Latitude H500gt Can' Type Word.
Hi , webmaster ,i can't type some character on keyboard Dell Latitude CPx H500GT, what do for resolv...
Hi , webmaster ,i can't type some character on keyboard Dell Latitude CPx H500GT, what do for resolv...
(Posted by vucaomai 12 years ago)