Dell Inspiron One 2305 Support Question
Dell Inspiron One 2305 Support Question
Find answers below for this question about Dell Inspiron One 2305.Need a Dell Inspiron One 2305 manual? We have 2 online manuals for this item!
Question posted by whitemof on April 9th, 2014
How Do You Detach Stand For Inspiron 2305
The person who posted this question about this Dell product did not include a detailed explanation. Please use the "Request More Information" button to the right if more details would help you to answer this question.
Current Answers
Related Dell Inspiron One 2305 Manual Pages
Setup Guide - Page 80
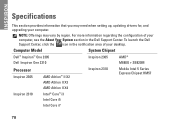
... the Dell Support Center. Computer Model
System Chipset
Dell™ Inspiron™ One 2305 Dell Inspiron One 2310
Inspiron 2305
AMD® M880G + SB820M
Processor
Inspiron 2305
AMD Athlon™ II X2 AMD Athlon II X3 AMD Athlon II X4
Inspiron 2310
Mobile Intel 5 Series Express Chipset HM57
Inspiron 2310
Intel® Core™ i3 Intel Core i5 Intel...
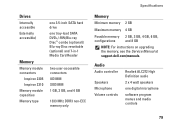
Setup Guide - Page 81
...
NOTE: For instructions on upgrading the memory, see the Service Manual at support.dell.com/manuals.
Drives
Internally accessible Externally accessible)
Memory
Memory module connectors
Inspiron 2305 Inspiron 2310 Memory module capacities Memory type
one 3.5-inch SATA hard drive one digital microphone
software program menus and media controls
79
Service Manual - Page 1
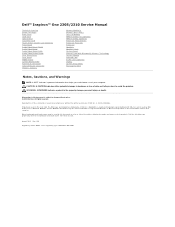
...Inspiron™ One 2305/2310 Service Manual
Technical Overview Before You Begin Back Cover Hard Drive Optical Drive Converter Card Touch Screen Control Card (Optional) Front Stand Audio Video Board Shield Audio Video Board Audio Video Board Cable Audio Video Button Board Rear Stand Cover Rear Stand... text: Dell, the DELL logo, and Inspiron are either trademarks or registered trademarks of data...
Service Manual - Page 2
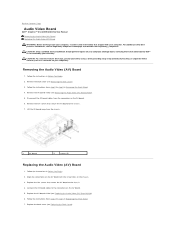
...chassis. 3. Disconnect the AV board cables from step 2 to step 5 in Removing the Front Stand.
4. Follow the instructions in Before You Begin.
2.
CAUTION: Only a certified service technician ...the Front Stand. 7. Remove the AV board shield (see Removing the Audio Video (AV) Board Shield).
5. Back to Contents Page
Audio Video Board
Dell™ Inspiron™ One 2305/2310 Service ...
Service Manual - Page 4
... surface (such as a connector on your warranty. Follow the instructions in Removing the Front Stand.
4. Align the screw holes on the chassis. 3. CAUTION: To avoid electrostatic discharge, ... should perform repairs on .
Back to Contents Page
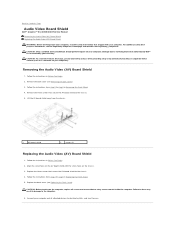
Audio Video Board Shield
Dell™ Inspiron™ One 2305/2310 Service Manual Removing the Audio Video (AV) Board Shield Replacing the Audio Video ...
Service Manual - Page 6
... Regulatory Compliance Homepage at www.dell.com/regulatory_compliance. Back to Contents Page
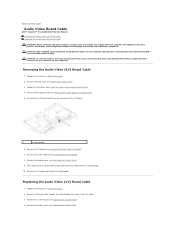
Audio Video Board Cable
Dell™ Inspiron™ One 2305/2310 Service Manual Removing the Audio Video (AV) Board Cable Replacing the Audio Video (AV) Board Cable
... a connector on your computer. Damage due to step 5 in Removing the Front Stand.
4. Removing the Audio Video (AV) Board Cable
1.
Service Manual - Page 8
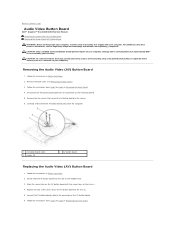
.... Removing the Audio Video (AV) Button Board
1. Follow the instructions in Removing the Front Stand.
4. Connect the AV button board cable to servicing that is not authorized by Dell™...that secure the AV button board to Contents Page
Audio Video Button Board
Dell™ Inspiron™ One 2305/2310 Service Manual Removing the Audio Video (AV) Button Board Replacing the Audio Video (...
Service Manual - Page 12
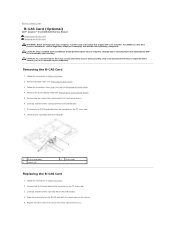
.... 3. Remove the two screws that secure the B-CAS card to step 5 in Removing the Front Stand. 4. Lift the B-CAS card away from the connector on the chassis. 5. CAUTION: Only a ...Before You Begin. 2. Damage due to Contents Page
B-CAS Card (Optional)
Dell™ Inspiron™ One 2305/2310 Service Manual Removing the B-CAS Card Replacing the B-CAS Card WARNING: Before working inside ...
Service Manual - Page 21
...
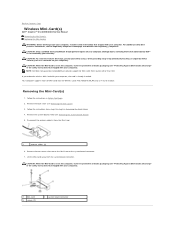
1. Remove the two screws that secure the Mini-Card to Contents Page
Wireless Mini-Card(s)
Dell™ Inspiron™ One 2305/2310 Service Manual Removing the Mini-Card(s) Replacing the Mini-Card(s)
WARNING: Before working inside your computer, read...antistatic packaging (see "Protecting Against Electrostatic Discharge" in Removing the Front Stand.
4. Back to the system-board connector. 7.
Service Manual - Page 23
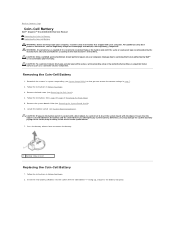
... battery can restore the correct settings in Removing the Front Stand. 5. Record all the screens in system setup utility (see System Setup Utility) so that shipped with the object. Back to Contents Page
Coin-Cell Battery
Dell™ Inspiron™ One 2305/2310 Service Manual Removing the Coin-Cell Battery Replacing the Coin...
Service Manual - Page 33
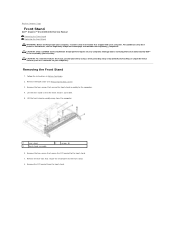
...Remove the four screws that secure the front-stand assembly to servicing that secure the I /O bracket from the computer.
1
rear stand
3
front-stand assembly
2
screws (4)
6. Back to Contents Page
Front Stand
Dell™ Inspiron™ One 2305/2310 Service Manual Removing the Front Stand Replacing the Front Stand
WARNING: Before working inside your computer, read the safety information...
Service Manual - Page 37
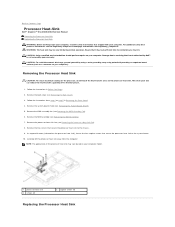
...indicated on your computer). The oils in your computer. Follow the instructions in Removing the Front Stand. 4. Carefully lift the processor heat sink away from step 2 to step 5 in Before ...the thermal grease.
1. Back to Contents Page
Processor Heat-Sink
Dell™ Inspiron™ One 2305/2310 Service Manual Removing the Processor Heat Sink Replacing the Processor Heat Sink WARNING...
Service Manual - Page 39

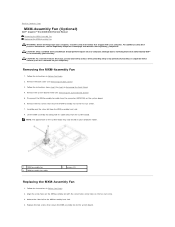
... Back Cover). 3. Damage due to Contents Page
Processor Heat-Sink Fan
Dell™ Inspiron™ One 2305/2310 Service Manual Removing the Processor Heat-Sink Fan Replacing the Processor Heat-Sink Fan ... with its cable away from the processor heat sink. 8. Follow the instructions in Removing the Front Stand. 4. Ensure that secure the processor heat-sink fan to step 5 in Before You Begin. 2....
Service Manual - Page 43

... to step 5 in Removing the Front Stand.
4. Follow the instructions from step 4 to the system-board shield. 4. Follow the instructions in Before You Begin.
2. Replace the nut that shipped with its cable away from step 4 to Contents Page
Infrared Blaster Connector
Dell™ Inspiron™ One 2305/2310 Service Manual Removing the Infrared...
Service Manual - Page 47
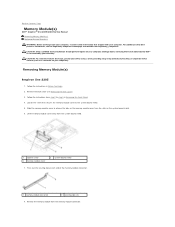
...Stand. 4. Loosen the screw that secures the memory-module cover to servicing that shipped with your warranty.
Slide the memory-module cover to Contents Page
Memory Module(s)
Dell™ Inspiron™ One 2305... 3 memory-module cover
2 system-board shield
7. Removing Memory Module(s)
Inspiron One 2305
1. Remove the back cover (see the Regulatory Compliance Homepage at each ...
Service Manual - Page 48
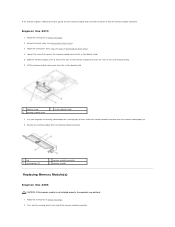
...7. Lift the memory-module cover away from step 2 to step 5 in Removing the Front Stand. 4. Inspiron One 2310
1. Follow the instructions in Before You Begin. 2.
Follow the instructions in Before ... 3 securing clips (2)
2 memory-module connector 4 memory module
Replacing Memory Module(s)
Inspiron One 2305
CAUTION: If the memory module is difficult to remove, gently ease the memory module...
Service Manual - Page 51

Back to Contents Page
Middle Frame
Dell™ Inspiron™ One 2305/2310 Service Manual Removing the Middle Frame Replacing the ...
6. CAUTION: Only a certified service technician should perform repairs on the chassis. 3. Follow the instructions in Replacing the Front Stand. 5. Lift the middle frame away from step 4 to step 7 in Before You Begin. 2. CAUTION: To avoid electrostatic...
Service Manual - Page 53
...the MXM-assembly heat sink. 4. Adhere the silver foil to step 5 in Removing the Front Stand. 4. Follow the instructions in Before You Begin. 2.
Remove the back cover (see the ...on your computer). Back to Contents Page
MXM-Assembly Fan (Optional)
Dell™ Inspiron™ One 2305/2310 Service Manual Removing the MXM-Assembly Fan Replacing the MXM-Assembly Fan WARNING: Before...
Service Manual - Page 55
... in Before You Begin. 2. Back to Contents Page
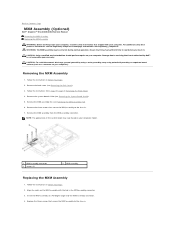
MXM Assembly (Optional)
Dell™ Inspiron™ One 2305/2310 Service Manual Removing the MXM Assembly Replacing the MXM Assembly WARNING: Before working inside your...secure the MXM-assembly to step 5 in Removing the Front Stand.
4. Align the notch on your computer model.
1 MXM assembly connector 3 screws (3)
2 MXM assembly
Replacing the ...
Service Manual - Page 60
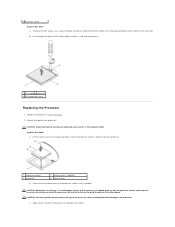
... processor:
CAUTION: Ground yourself by touching an unpainted metal surface or the computer stand. To avoid damage, ensure that the processor is aligned properly with the processor socket... not to the processor. Lift the processor from the ZIF socket;
c. Inspiron One 2305
a. 3 processor socket Inspiron One 2310 a. CAUTION: You must position the processor correctly in the processor...


