
Dell Inspiron N5050 Support Question
Dell Inspiron N5050 Support Question
Find answers below for this question about Dell Inspiron N5050.Need a Dell Inspiron N5050 manual? We have 2 online manuals for this item!
Question posted by angegbu on July 23rd, 2014
Can We Connect 2 Displays In Inspiron N5050
The person who posted this question about this Dell product did not include a detailed explanation. Please use the "Request More Information" button to the right if more details would help you to answer this question.
Current Answers
Answer #1: Posted by DELLJustinC on July 23rd, 2014 5:22 PM
DELLJustinC

Member since:
April 25th, 2014 Points: 55,210

Member since:
April 25th, 2014 Points: 55,210
Greetings Angegbu!
Yes, you can use a combination of any of the 2 connections on the PC:
One VGA and the built in LCD
or
One HDMI and the built in LCD
or
One HDMI and one VGA with the built in LCD closed.
Justin C
Get Support on Twitter @DellCaresPro
http://www.dell.com/learn/us/en/uscorp1/corp-comm/dell-social-media
Related Dell Inspiron N5050 Manual Pages
Owners Manual - Page 1
P18F003 P18F002; Dell Inspiron M5040/15-N5040/ 15-N5050 Owner's Manual
Regulatory model: P18F
Regulatory type: P18F001;
Owners Manual - Page 2
...®, and the Windows start button logo are either trademarks or registered trademarks of Microsoft Corporation in this text: Dell™, the DELL logo, and Inspiron™ are not followed. CAUTION: A CAUTION indicates potential damage to change without the written permission of your computer. WARNING: A WARNING indicates a potential for property damage...
Owners Manual - Page 5
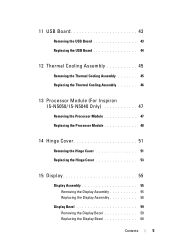
... Module (For Inspiron 15-N5050/15-N5040 Only... 47
Removing the Processor Module 47 Replacing the Processor Module 48
14 Hinge Cover 51
Removing the Hinge Cover 51 Replacing the Hinge Cover 53
15 Display 55
Display Assembly 55 Removing the Display Assembly 55 Replacing the Display Assembly 58
Display Bezel 59 Removing the Display Bezel 59 Replacing the Display...
Owners Manual - Page 6
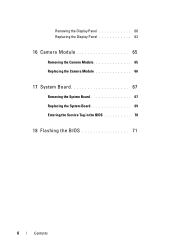
Removing the Display Panel 60 Replacing the Display Panel 63
16 Camera Module 65
Removing the Camera Module 65 Replacing the Camera Module 66
17 System Board 67
Removing the System Board 67 Replacing the System Board 69 Entering the Service Tag in the BIOS 70
18 Flashing the BIOS 71
6
Contents
Owners Manual - Page 10
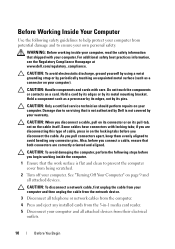
... its pins. Hold a component such as a connector on the locking tabs before you disconnect the cable. Some cables have connectors with care. Also, before you connect a cable, ensure that both connectors are disconnecting this type of cable, press in -1 media card reader.
5 Disconnect your computer and all attached devices. For additional...
Owners Manual - Page 11
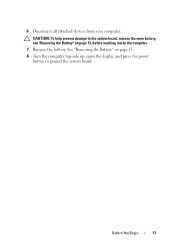
CAUTION: To help prevent damage to ground the system board.
See "Removing the Battery" on page 13. 8 Turn the computer top-side up, open the display, and press the power
button to the system board, remove the main battery, see "Removing the Battery" on page 13, before working inside the computer.
7 ...
Owners Manual - Page 15
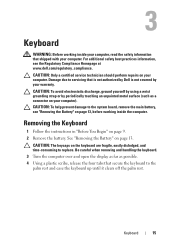
... best practices information, see "Removing the Battery" on your computer). Be careful when removing and handling the keyboard. 3 Turn the computer over and open the display as far as a connector on page 13.
See "Removing the Battery" on your computer.
Owners Manual - Page 17
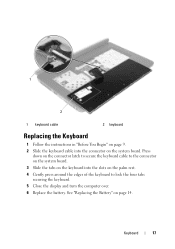
... into the slots on the palm rest. 4 Gently press around the edges of the keyboard to lock the four tabs securing the keyboard. 5 Close the display and turn the computer over. 6 Replace the battery.
Press
down on the connector latch to secure the keyboard cable to the connector on the system...
Owners Manual - Page 21
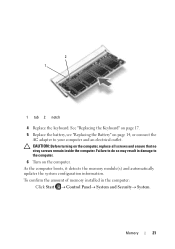
2 1
1 tab 2 notch
4 Replace the keyboard. CAUTION: Before turning on page 14, or connect the
AC adapter to the computer. 6 Turn on the computer.
See "Replacing the Keyboard" on page 17. 5 Replace the battery, see "Replacing the Battery" on ...
Owners Manual - Page 28
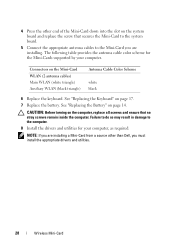
... the Keyboard" on page 14. CAUTION: Before turning on the computer, replace all screws and ensure that secures the Mini-Card to the system board.
5 Connect the appropriate antenna cables to the computer. 8 Install the drivers and utilities for the Mini-Cards supported by your computer, as required. See "Replacing the...
Owners Manual - Page 39
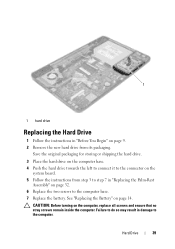
... original packaging for storing or shipping the hard drive.
3 Place the hard drive on the computer base. 4 Push the hard drive towards the left to connect it to the connector on the
system board. 5 Follow the instructions from step 3 to step 7 in "Replacing the Palm-Rest
Assembly" on page 9. 2 Remove the...
Owners Manual - Page 45
... (indicated on page 9. 2 Remove the battery.
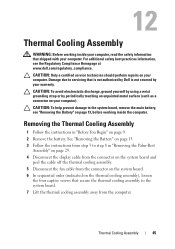
Removing the Thermal Cooling Assembly
1 Follow the instructions in "Removing the Palm-Rest
Assembly" on page 29. 4 Disconnect the display cable from the connector on the system board and
peel the cable off the thermal cooling assembly. 5 Disconnect the fan cable from the computer. Damage...
Owners Manual - Page 46

...
1
1 captive screws (4) 3 fan cable
2 thermal cooling assembly 4 display cable
Replacing the Thermal Cooling Assembly
1 Follow the instructions in "Before You... (indicated on the thermal cooling assembly). 3 Connect the fan cable to the connector on the system board. 4 Attach the display cable to the thermal cooling assembly and connect the display cable to the connector on the system board....
Owners Manual - Page 47
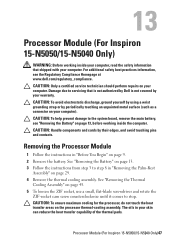
13
Processor Module (For Inspiron 15-N5050/15-N5040 Only)
WARNING: Before working inside your computer). CAUTION: Handle components and ...rotate the
ZIF-socket cam screw counterclockwise until it comes to servicing that shipped with your warranty. Processor Module (For Inspiron 15-N5050/15-N5040 Only)47 Damage due to stop. CAUTION: To help prevent damage to step 8 in your computer. ...
Owners Manual - Page 48
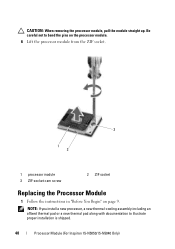
... page 9. CAUTION: When removing the processor module, pull the module straight up. Be careful not to illustrate proper installation is shipped.
48
Processor Module (For Inspiron 15-N5050/15-N5040 Only)
Owners Manual - Page 49
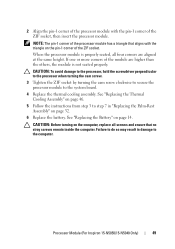
... the instructions from step 3 to step 7 in damage to the computer. Failure to the system board. 4 Replace the thermal cooling assembly. Processor Module (For Inspiron 15-N5050/15-N5040 Only)
49
NOTE: The pin-1 corner of the processor module has a triangle that no stray screws remain inside the computer. CAUTION: Before turning...
Owners Manual - Page 50

50
Processor Module (For Inspiron 15-N5050/15-N5040 Only)
Owners Manual - Page 58
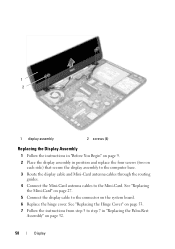
... 3 to step 7 in position and replace the four screws (two on
each side) that secure the display assembly to the computer base. 3 Route the display cable and Mini-Card antenna cables through the routing
guides. 4 Connect the Mini-Card antenna cables to the connector on the system board. 6 Replace the hinge cover. See...
Owners Manual - Page 63
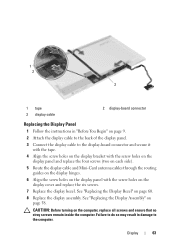
... the computer. CAUTION: Before turning on
page 58. Display
63
See "Replacing the Display Bezel" on the
display cover and replace the six screws. 7 Replace the display bezel. Failure to do so may result in "Before You Begin" on page 9. 2 Attach the display cable to the back of the display panel. 3 Connect the display cable to the computer.
Owners Manual - Page 66
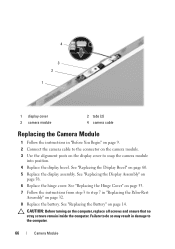
... module
2 tabs (2) 4 camera cable
Replacing the Camera Module
1 Follow the instructions in "Before You Begin" on page 9. 2 Connect the camera cable to the connector on the camera module. 3 Use the alignment posts on the display cover to step 7 in damage to the computer.
66
Camera Module See "Replacing the Hinge Cover" on...
Similar Questions

How To Connect Dell Model Inspiron N5050 Laptop To Wireless Internet
(Posted by mragadb 10 years ago)


Can I Connect A Dell Inspiron N5050 To A Tv With The Hdmi Port
(Posted by bughineen 10 years ago)


Connecting A Dell Inspiron To A Non-hd Tv
I want to connect my Dell Inspiron N7010 laptop to a non-HD TV. The TV only has red, white and yello...
I want to connect my Dell Inspiron N7010 laptop to a non-HD TV. The TV only has red, white and yello...
(Posted by jackiegross144 12 years ago)