
Dell Inspiron N4110 Support Question
Dell Inspiron N4110 Support Question
Find answers below for this question about Dell Inspiron N4110.Need a Dell Inspiron N4110 manual? We have 4 online manuals for this item!
Question posted by kurupna on May 7th, 2014
Dell Inspiron N4110 Battery Says Fully Charged But When Unplugged It Turns Off
The person who posted this question about this Dell product did not include a detailed explanation. Please use the "Request More Information" button to the right if more details would help you to answer this question.
Current Answers
Related Dell Inspiron N4110 Manual Pages
Setup Guide - Page 5
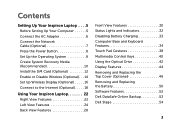
... Up Wireless Display (Optional 16 Connect to the Internet (Optional 18
Using Your Inspiron Laptop 22 Right View Features 22 Left View Features 24 Back View Features 28
Front View Features 30 Status Lights and Indicators 32 Disabling Battery Charging 33 Computer Base and Keyboard Features 34 Touch Pad Gestures 38 Multimedia Control...
Setup Guide - Page 7

...turns on all other sides.
To prevent overheating ensure that you leave at least 10.2 cm (4 inches) at the back of the computer and a minimum of 5.1 cm (2 inches) on the fan when the computer gets hot. You should never place your laptop... a level surface to overheat. INSPIRON
Setting Up Your Inspiron Laptop
This section provides information about setting up your Dell Inspiron laptop.
Setup Guide - Page 14
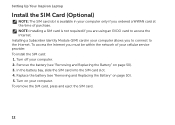
... Replacing the Battery" on page 50). 5. Remove the battery (see "Removing and Replacing the Battery" on page 50). 3. Turn on your computer. 2. Turn off your computer. In the battery bay, slide the SIM card into the SIM card slot. 4. To remove the SIM card, press and eject the SIM card.
12 Setting Up Your Inspiron Laptop
Install the...
Setup Guide - Page 27
... powered off or in sleep state. To continue charging, disconnect the USB device and connect it again.
In such cases, turn off when only 10% of the total battery life remains.
4
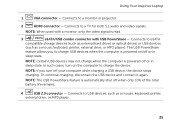
USB 2.0 connector - NOTE: If you to charge the device.
The USB PowerShare
feature allows you turn on /off or in
sleep state.
Connects to...
Setup Guide - Page 31
... using a wired network.
2
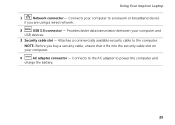
USB 3.0 connector -
Connects to the AC adapter to the computer. Provides faster data transmission between your computer.
4
AC adapter connector - Using Your Inspiron Laptop
1
Network connector - Attaches a commercially available security cable to power the computer and
charge the battery.
29
Setup Guide - Page 34
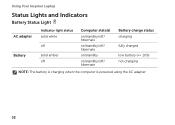
Using Your Inspiron Laptop
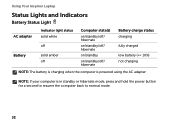
Status Lights and Indicators
Battery Status Light
AC adapter Battery
Indicator light status solid white
off
solid amber off
Computer state(s)
on/standby/off/ hibernate
on/standby/off/ hibernate
on/standby
on/standby/off/ hibernate
Battery charge status charging
fully charged
low battery (
Setup Guide - Page 35
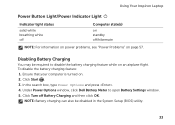
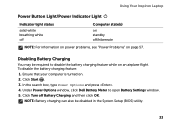
... the search box, type Power Options and press . 4.
NOTE: Battery charging can also be required to open Battery Settings window. 5. Ensure that your computer is turned on. 2. Click Turn off /hibernate
NOTE: For information on power problems, see "Power Problems" on page 57. Using Your Inspiron Laptop
Power Button Light/Power Indicator Light
Indicator light status
solid...
Setup Guide - Page 88
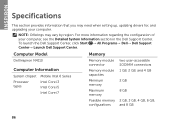
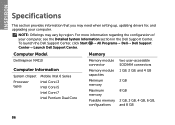
... when setting up, updating drivers for, and upgrading your computer, see the Detailed System Information section in the Dell Support Center. For more information regarding the configuration of your computer. Computer Model
Memory
Dell Inspiron N4110
Computer Information
System chipset Mobile Intel 6 Series
Processor types
Intel Core i3 Intel Core i5 Intel Core i7...
Setup Guide - Page 5
... Up Wireless Display (Optional 16 Connect to the Internet (Optional 18
Using Your Inspiron Laptop 22 Right View Features 22 Left View Features 24 Back View Features 28
Front View Features 30 Status Lights and Indicators 32 Disabling Battery Charging 33 Computer Base and Keyboard Features 34 Touch Pad Gestures 38 Multimedia Control...
Setup Guide - Page 7
.... Do not place your Dell computer in a low-airflow...a power source, adequate ventilation, and a level surface to place your laptop may result in permanent damage to accumulate in the air vents. CAUTION:... dust to the computer.
5 You should never place your Dell Inspiron laptop. INSPIRON
Setting Up Your Inspiron Laptop
This section provides information about setting up your computer in an...
Setup Guide - Page 14

... the time of purchase. To remove the SIM card, press and eject the SIM card.
12 Remove the battery (see "Removing and Replacing the Battery" on your computer. 2. Turn off your computer. Setting Up Your Inspiron Laptop
Install the SIM Card (Optional)
NOTE: The SIM card slot is not required if you are using an...
Setup Guide - Page 34
Using Your Inspiron Laptop
Status Lights and Indicators
Battery Status Light
AC adapter Battery
Indicator light status solid white
off
solid amber off
Computer state(s)
on/standby/off/ hibernate
on/standby/off/ hibernate
on/standby
on/standby/off/ hibernate
Battery charge status charging
fully charged
low battery (
Setup Guide - Page 35
... that your computer is turned on page 57.
NOTE: Battery charging can also be required to open Battery Settings window. 5. Click Turn off /hibernate
NOTE: For information on power problems, see "Power Problems" on . 2. Under Power Options window, click Dell Battery Meter to disable the battery charging feature while on an airplane flight. Using Your Inspiron Laptop
Power Button Light/Power...
Setup Guide - Page 88
Computer Model
Memory
Dell Inspiron N4110
Computer Information
System chipset Mobile Intel 6 Series
Processor types
Intel Core i3 Intel Core i5 Intel Core i7 Intel Pentium Dual Core
Memory module connector
...
Service Manual - Page 11
CAUTION: To help prevent damage to the system board, remove the main battery (see "Removing the Battery" on page 15) before working inside the computer. 7 Remove the battery (see "Removing the Battery" on page 15). 8 Turn the computer top-side up, open the display, and press the power button to ground the system board. Before You Begin
11
Service Manual - Page 81
...5 to step 7 in "Replacing the Hard-Drive
Assembly" on page 97. 5 Replace the coin-cell battery (see "Replacing the Coin-Cell Battery" on
page 88). 6 Turn the system board over. 7 Align the connectors on the system board with the slots on the computer
base ...). 18 Replace the module cover (see "Replacing the Module Cover" on page 18). 19 Replace the battery (see "Replacing the Battery" on page 16).
Service Manual - Page 82

...that the main battery is plugged in the Set Service Tag
field.
82
System Board Entering the Service Tag in the BIOS
1 Ensure that the AC adapter is installed properly.
2 Turn on the computer...the replacement system board.
22 Enter the service tag (see the Dell logo to enter the system setup
program. 4 Navigate to the computer.
21 Turn on the computer. 3 Press as soon as you see "...
Service Manual - Page 11

Before You Begin
11
CAUTION: To help prevent damage to the system board, remove the main battery (see "Removing the Battery" on page 15) before working inside the computer. 7 Remove the battery (see "Removing the Battery" on page 15). 8 Turn the computer top-side up, open the display, and press the power button to ground the system board.
Service Manual - Page 81

...to step 7 in "Replacing the Hard-Drive
Assembly" on page 97. 5 Replace the coin-cell battery (see "Replacing the Coin-Cell Battery" on
page 88). 6 Turn the system board over. 7 Align the connectors on the system board with the slots on the computer... the module cover (see "Replacing the Module Cover" on page 18). 19 Replace the battery (see "Replacing the Battery" on page 16).
System Board
81
Service Manual - Page 82
...
2 Turn on the computer. 3 Press as soon as you have replaced the system board, enter the computer Service Tag in the BIOS of the replacement system board.
22 Enter the service tag (see the Dell logo... the 8-in damage to the computer.
21 Turn on the computer. CAUTION: Before turning on the computer, replace all screws and ensure that the main battery is plugged in and that no stray screws ...
Similar Questions


