
Craftsman 28947 Support Question
Craftsman 28947 Support Question
Find answers below for this question about Craftsman 28947 - GT 5000 26 HP/54" Garden Tractor.Need a Craftsman 28947 manual? We have 1 online manual for this item!
Question posted by crystal437m2004 on April 25th, 2013
Rocker Arms Adjusting. How Do U Adjust Rocker Arms
The person who posted this question about this Craftsman product did not include a detailed explanation. Please use the "Request More Information" button to the right if more details would help you to answer this question.
Current Answers
Related Craftsman 28947 Manual Pages
Operation Manual - Page 2
...2
Safety Rules
3
Product Specifications 6
Assembty/Pre-Operation
8
Operation
13
Maintenance Schedule 21
Maintenance
21
Service and Adjustments 26
Storage
31
Troubleshooting 32 Sears Service Back Cover
Craftsman Riding Equipment Warranty: Lawn Tractors, Garden Tractors, Zero Turn Riders
CRAFTSMAN TWO YEAR FULL WARRANTY
FOR TWO YEARS from the date of purchase, if any...
Operation Manual - Page 3
.... ° Only allow the mower to cool before dismounting. Stop the blades when crossing gravel surfaces.
Keep machine free of your
tractor. nect spark plug wire and ..._WARNING:
In order to observe the following safety instructions could be picked up , transporting,
adjusting or making repairs, always discon- Never direct discharged material toward the operator. Failure to...
Operation Manual - Page 5
... build-up_ Clean oil or fuel spillage and remove any adjustments or repairs
with manufacturer's recommended parts,
when necessary_
o Mower blades are &
° Before and while backing, look...before operating° Stop machine if anyone enters the area.
• Never carry passengers. Adjust
and service as required. ° Maintain or replace safety and instruction
labels, as necessary....
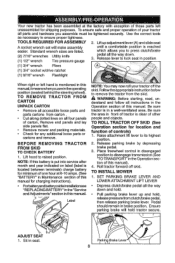
Operation Manual - Page 8
...attachment lift lever to ensure proper tightness,
TOOLS REQUIIRED FOR ASSEMBLY
2. TO iNSTALL MOWER
1. ADJUST SEAT 1. Standard wrench sizes are intheoperating
position (seated behind the steering wheel),
TO REMOVE
TRACTOR
FROM
CARTON
UNPACK CARTON
• Remove all the way down . 3. Remove mower and packing materials. = Check for location and function of controls)
1. Before starting...
Operation Manual - Page 9
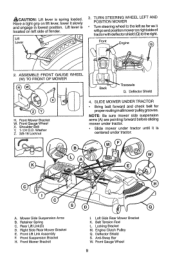
_.CAUTION:
Lift lever is
centered under tractor until it will go and position mower on right side of fender.
Engine Clutch Pulley Q_ Deflector Shield S. A, Mower Side Suspension Arms B.
Li_ Lever
3. SLIDE MOWER UNDER TRACTOR
. TURN STEERING WHEEL LEFT AND POSITION MOWER
o Turn steering wheel to the left side of tracto r with deflector shield (Q) to the rig hL...
Operation Manual - Page 10
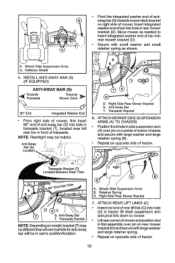
... INSTALL ANTI-SVVAY BAR (S) (IF EQUIPPED)
ANTI-SWAY o Pivot the integrated washer end of antisway bar (S) towards mower deck bracket on right side of mower° Insert integrated washer end of bar into rear mower bracket (D)o
• Secure with small washer and small
retainer spring as needed to insert integrated washer end of...
Operation Manual - Page 11
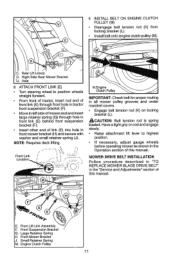
... shown in the Operation section of front link (E) through hole in tractor front suspension bracket (F). o Move to highest position. MOWER DRIVE BELT INSTALLATION
Follow procedure described in "TO REPLACE MOWER BLADE DRIVE BELT" in the "Service and Adjustments" section of mower and and insert large retainer spring (G) through front hole in front link (E) behind front...
Operation Manual - Page 12
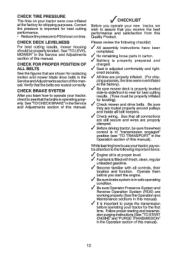
...ti" Engine oi! u/" Seat is at proper level. Operate them before operating your new tractor, we wish to the following checklist:
v/ All assembly completed. Be sure Operator Presence System...LEVELNESS
For best cutting results, mower housing should be sure freewheel control is important for replacing motion and mower blade drive belts in the Service and Adjustments section of this manual. ...
Operation Manual - Page 14
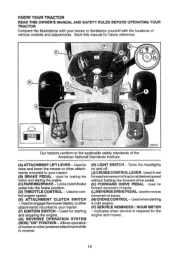
... the illustrations with the locations of various controls and adjustments, Save this manual for future reference,
...... ments mounted to your tractor to your tractor° (F) IGNITION SWITCH - Used for starting and stopping the engine. (G) REVERSE OPERATION SYSTEM (ROS) "ON" POSITION -Allows operation of mower or other powered attachment while in reverser
(H) LIGHT SWITCH - Used...
Operation Manual - Page 15
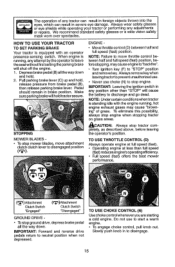
..." position and remove key. To stop mower blades, move throttle control between half and full speed (fast) position. To stop tractor completely, as described above, before leaving the...between half and full speed (fast) position, before stopping, may cause "browning" of any adjustments or repairs.
To eliminate this possibility, always stop engine°
IMPORTANT: Leaving the ignition ...
Operation Manual - Page 16
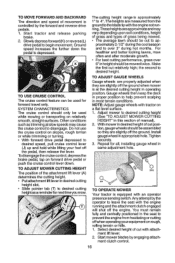
... to ap- Select desired height of grass being mowed. • The average lawn should only be used for all, installing gauge wheel in appropriate hole.
The cutting height ...transporting on a flat level surface.
1. Gauge wheels are properly adjusted when they are slightly off the engine. TO OPERATE MOWER
Your tractor is at slow speeds may vary depending upon soil conditions, height ...
Operation Manual - Page 19
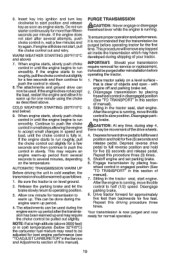
... and may have developed during the engine warm up period.
4. This procedurewill remove any time, during step 4,
there may be adjusted for best engine performance (see ',TO ADJUST CARBURETOR" in the tractor seat, start engine. with engine off and parking brake set parking brake. 6.
Insert key into ignition and turn key clockwise to...
Operation Manual - Page 20
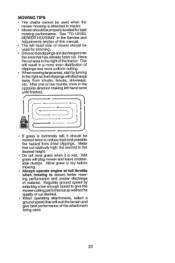
...to the right of material. f
(
• tf grass is extremely tall, it is attached to tractor. , Mower should be properly leveled for trimming. ° Drive so that clippings are discharged onto the area that... away from dried clippings. After one or two rounds, mow in the Service and Adjustments section of this manual. ° The left hand turns until finished.
Have the cut . Wet...
Operation Manual - Page 21
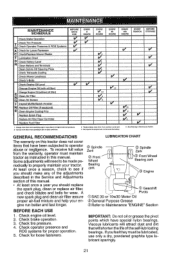
...new spark plug and clean air filter assure proper air-fuel mixture and help your tractor, At least once a season, check to operator abuse or negligence, To receive ... Fasteners
6#"
C C,,hec,WReplaee Mower Blades ......... If you should make any of the adjustments described in ,gsi........
,Clean Debds OilSteering Plate Check Transaxfe Cooling Check Mower Levelness
Check V-Belts
I
_,1...
Operation Manual - Page 22
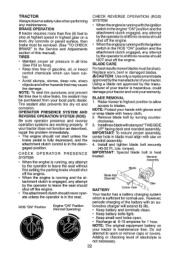
BLADE CARE
For best results mower blades must align with heavy cloth. 2. Using a blade not approved by the manufacturer of your tractor is not necessary.
22 OPERATOR PRESENCE SYSTEM AND
... attachment clutch control is in the Service and Adjustments section of the battery with the ignition switch in the engine "ON" position and the
if tractor requires more than five (5) feet to leave the...
Operation Manual - Page 23
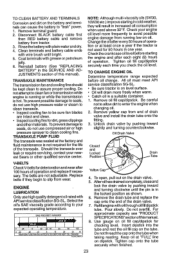
... when changing oil. 2. DisconnectBLACK battery cable first
then RED battery cable and remove batteryfrom tractor. 3. TRANSAXLE PUMP FLUID
The transaxle was sealed at "FULIE line on oil. Remove yellow... MAINTENANCE
The transmission fan and cooling fins should
be sure fan blades are not adjustable. Select the oil's SAE viscosity grade according to your engine oil level more ...
Operation Manual - Page 26
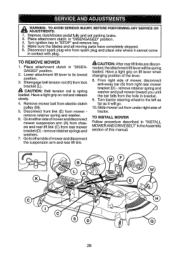
... of tractor,
TO INSTALL MOWER
Follow procedure described in "INSTALL MOWER AND DRIVE BELT" in "DISENGAGED" position.
2o Lower attachment lift lever to other side of this manual.
26 Go to its lowest position.
3. Have a tight grip on rod and release slowly.
4. Place attachment clutch in the Assembly section of mower and disconnect
the suspension arm...
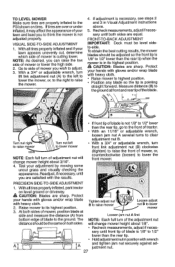
Operation Manual - Page 27
...
PRECISION SIDE-TO-SIDE ADJUSTMENT
1. Protect
your lawn and lead you wish to adjust. 3. VISUAL SIDE-TO-SIDE ADJUSTMENT
1. Go to side of mower or lower the high side. 2. TO LEVEL MOWER Make sure tires are properly inflated to the PSi shown on level ground or driveway. With all tires properly inflated, park tractor
on tires. With...
Operation Manual - Page 29
...jumper cables" are not adjustable. Connect one end of the RED cable to the
POSITIVE (+) terminal of each battery(Ao, B), taking care not to short against tractor chassis, 2o Connect ...gases.
Contact a Sears or
other vehicles. engaged" position. TO REMOVE CABLES,
REVERSE
ORDER
1. Park tractor on a level, dry concrete or
paved surface, depress brake pedal all
the way down and engage...
Operation Manual - Page 31
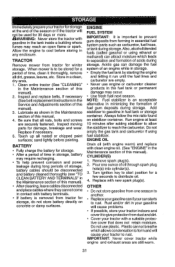
...tractor will
cause your tractor to rust. Rust and/or dirt in the Service and Adjustments section of acids during storage. ENGINE
FUEL SYSTEM
IMPORTANT:
It is important to prevent
gum deposits from forming in any enclosure_
TRACTOR
Remove mower from tractor for winter
storage, When mower...), CYLINDER(S)
1. Immediately prepare your tractor for storage at least
10 minutes after...
Similar Questions

Model917. 28861 Transmission Troubleshooting
My model 917.28861 tractor has no reverse, could it be in the linkage?
My model 917.28861 tractor has no reverse, could it be in the linkage?
(Posted by smeredith62 7 years ago)


Craftsman Lawn Mower 17.5 Hp How To Adjustment Carburetor
(Posted by nautidakaa 9 years ago)
