Craftsman 24838 Support Question
Craftsman 24838 Support Question
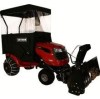
Find answers below for this question about Craftsman 24838 - 42 in. Lawn Tractor Snow Thrower.Need a Craftsman 24838 manual? We have 1 online manual for this item!
Question posted by rrbsjohnson on December 22nd, 2012
Tension Spring For Blower Belt
Where does the tension spring for the idler arm attach?
Current Answers
Related Craftsman 24838 Manual Pages
Operation Manual - Page 1
...., Hoffman Estates, IL 60179 U.S.A.
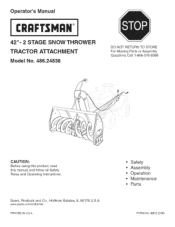
Safety Assembly Operation Maintenance Parts
FORM NO. 49812 (2/06) www sears.corn/craftsman PRINTED iN U.S.A. Operator's Manual
CRQFTSNQ°N
42"= 2 STAGE SNOW THROWER TRACTOR ATTACHMENT Model No. 486.24838
DO NOT RETURN TO STORE For Missing Parts or Assembly Questions Call 1-866-576-8388
CAUTION: Before using this product, read this manual...
Operation Manual - Page 3
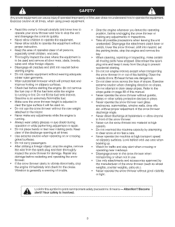
... starting engine. * Do not operate equipment without proper instruction. Disengage the attachment clutch lever or switch, lower the snow thrower, shift into neutral before restarting and operating the snow thrower
* If the snow thrower starts to the tractor. Never operate the snow thrower without good visibility or light
aLloeortk!!foYr othuisr ssyamfebtyoltois pinovinotlvoeudt .important...
Operation Manual - Page 7
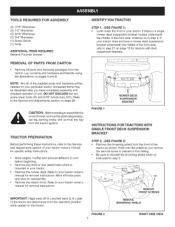
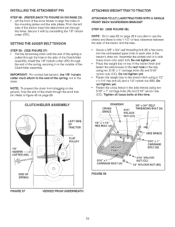
...: Before starting to assemble the snow thrower, remove the spark plug wire(s), set the parking brake and remove the key from the tractor ignition
TRACTOR PREPARATION
Before performing these instructions, ... your tractor owner's manual for specific safety instructions.
• Allow engine, muffler and exhaust deflector to cool before beginning
• Remove any front or rear attachment which is...
Operation Manual - Page 9
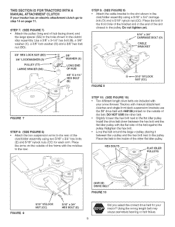
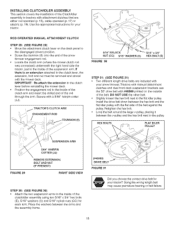
...USE the other fiat idler pulley. THIS SECTION IS FOR TRACTORS WITH A MANUAL ATTACHMENT CLUTCH If your tractor? Retighten the hex bolt • Loop the belt around the large v-...Attach the two suspension arms to the rear of the frame with the notches 1othe rear
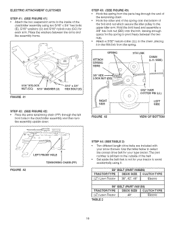
STEP 10: (SEE FIGURE 10) • Two different length drive belts are included with
your snow thrower Tractors with manual attachment...
Operation Manual - Page 10
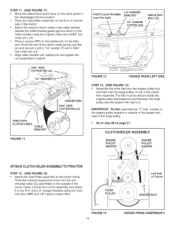
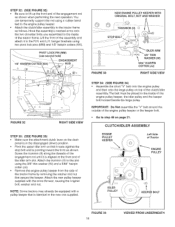
... the engine pulley belt keeper(s) and between the large pulley and the keeper bolt next to it. Secure the cable housing guide (groove down ) position.
* Place the clutch/idler assembly on the floor on the idler arm.
PULLEY
Le# Side of the tractor frame.
and L.H. STEP 11: (SEE FIGURE 11) Move the attachment clutch lever on...
Operation Manual - Page 11
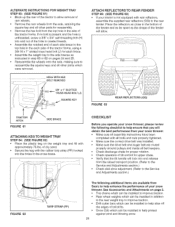
... spring onto the end of the bolt and nut which secure the idler pulley to the upper idler arm.
THIS SECTION IS FOR TRACTORS WITH AN ELECTRIC ATTACHMENT CLUTCH
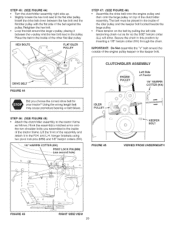
STEP 14: (SEE FIGURE 14) Attach the two suspension arms to the rear of the clutch/idler assembly using it in the parts bag
through the end link of the tensioning...
Operation Manual - Page 12
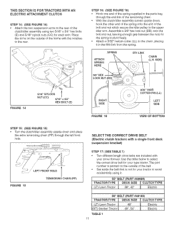
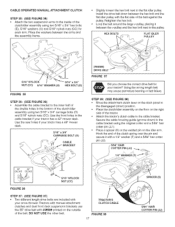
... FIGURE 18) * Attach the clutch/idler assembly to the tractor frame
Hook the notched suspension arms onto the two shoulder bolts (Q) assembled to the outside of the keeper bolt beside the large pulley
• Go to the inside of the idler pulley and the belt keeper bolt located beside the large pulley • Place tension on top...
Operation Manual - Page 15
... insert the ddl{ed end of the rod through the arm Secure with
your snow thrower. Place the washers between the v-pulley and the hex bolt next to the pulley
HEX BOLTS
\ \ \ \
FLAT IDLER PULLEY
(#46989) DRIVE BELT FIGURE 31
Did you choose the correct drive belt for your tractor. Retighten the hex bolt • Loop the...
Operation Manual - Page 16
...
* Attach the clutch/idler assembly to the tractor frame as shown when performing the next operation.
ROD
i
/
FIGURE 32
RIGHT SIDE VIEW
STEP 83: (SEE FIGURE 33) • Make sure the attachment clutch lever on page 21. The belt must be equipped with the snow thrower, reusing the original bolt, washer and nut. STOP BOLT
FIGURE 83
ARM...
Operation Manual - Page 17
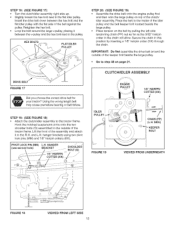
...spring over the pin and secure it between the hex bolt and the
flat idler pulley with the flat side o1 the belt against the puEley.Retighten the hex bolt , Loop the belt... different length drive belts are included with
your snow thrower Tractors with manual attachment clutcl_es and dual front deck suspension brackets use the 55" drive belt with #46989 pdnted on the idler arm. HEX BOLTS
FLATIDLER...
Operation Manual - Page 18
... step 48 on top of the c_utch/idler assembly.The belt must be equipped with the snow thrower, reusing the original bolt, washer and nut.
CLUTCH/IDLER
ENGINE PULLEY KEEPER
ASSEMBLY
Le# Side of Tractor
PULLEY
/
\\
FIGURE 89
/
N
FIGURE 40
VIEWED FROM UNDERNEATH
18 Attach the clutch/idler assembly to the tractor frame as follows. Lift the front of...
Operation Manual - Page 19
... HOLE
FIGURE 42
TENSIONING CHAIN (PP)
STEP 44: (SEE TABLE 2)
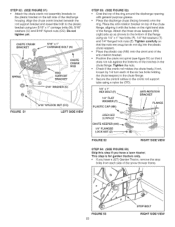
Two different length drive belts are included with your snow thrower• Use the table below to select the correct drive belt for your type tractor The part number is printed on the outside of the bolt and nut which secure the idler pulley to the upper idler arm. Hold...
Operation Manual - Page 20
... large pulley
• Place tension on top of the tractor frame. CLUTCH/IDLER
ASSEMBLY
PULLEY
Left Side
of the belt against the pulley.
Hook the assembly's notched arms onto the two shoulder bolts you choose the correct drive belt for your tractor? Place the belt to the pulley.
IDLER
STEP 46: (SEE FIGURE 45) Attach the clutchddler assembly to the...
Operation Manual - Page 22
...SEE FIGURE 53) Skip this step if you have a lawn tractor. This step is for garden tractors only. • If you have a (GT) Garden Tractor, remove timestop
bolts from each of the discharge housing ...loosen by 1/4 turn each side o1 the snow thrower frame•
FIGURE 53 22
STOP BOLT RIGHT SIDE ViEW
STEP 52: (SEE FIGURE 51) • Attach the chute crank rod assembly brackets to
the...
Operation Manual - Page 23
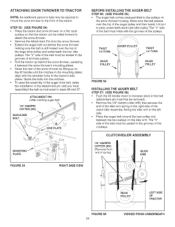
... the tractor and snow thrower on a flat_ level
surface so that secures the
end of the idler arm spring to the pulleys on the idler arm. The "V" side of the belt must mate with the shoulder bolts in the grooves of the auger pulley and then twists 1/4 turn to attach the snow thrower. * Remove the Attachment Pin from the snow thrower.
* Extend the auger belt out...
Operation Manual - Page 24
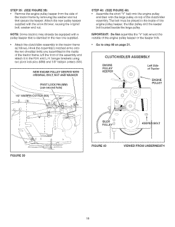
...Idler assembly
IMPORTANT: For correct belt tension, the 1/8" hairpin cotter must attach to the end of the spring, securing it with by reinstalling the 1/8" hairpin cotter (OO). COTTER (KK) [
LEFT SIDE OF TRACTOR
FLAT PULLEY
END OF SPRING... tray to the tractor hitch using two 5/16" x 1" carriage bolts (N) and 5/16" nylock nuts (CO). Secure it on top of the snow blower to align the holes...
Operation Manual - Page 26
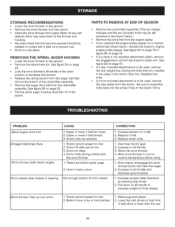
...snow thrower. Remove the rear wheels from the axle, retaining the square key and all other parts for reassembly Remove the hex bolt from the top hole in the side of the tractor frame. See Accessories and Attachments... Make sure the correct dbve belt was installed. • Make sure the drive belt and auger belt are routed
properly around pulleys and inside all belt keepers • Check discharge ...
Operation Manual - Page 29
... 29
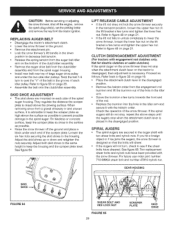
SCRAPER PLATE
SKID SHOE They regulate the distance the scraper plate is necessary. When removing snow from the auger belt idler
arm on page 21
CLUTCH DISENGAGEMENT
ADJUSTMENT
(For tractors with the snow thrower. Refer to figure 55 on the tractor is
disengaged, then adjustment is raised above the surface as possible to prevent possible damage to...
Operation Manual - Page 30
... skid shoes
2 Pull down
position to decrease belt tension * Release the spring tension from the auger belt idler
arm on the bottom of the clutchddler assembly. * Remove the auger ddve belt from the clutch/idler
assembly See figure 56 on V belt 2. If you replaced the engine pulley keeper on a manual attachment clutch tractor, reinsta{l the tractor's odgina] engine pulley keeper See figure 33...
Operation Manual - Page 38
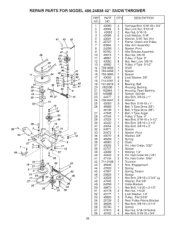
... x 3/4"
2
43064
3 Hex Lock Nut, 5/16-18
3
43083 2 Hex Nut, 6/16-18
4
43086
4 Lock Washer, 5/16"
41 43 42
"X \
5
43081
4 Washer, 5/16" Std. Wrt
6
25727
1 Frame, Clutch and Pulley
7
63904
1 idler Arm Assembly
8
24286
1 Spacer, Pivot
9
63762
1 idler Bracket Assembly
10 43015
1 Hex Nut, 3/8-16
11 46981
1 Pulley, V Type 9"
12 43082
8 Nut, Hex Lock, 3/8-16...
Similar Questions

Craftsman Snow Thrower. Will A 247 Model Fit Onto A 24838 Model? Thank You
(Posted by thewoodenangel 8 years ago)

Craftsman Snow Thrower Attachment Won't Lift
(Posted by BKapigg 10 years ago)

V Belt, Drive Replacement
My V Belt snapped while snow blower auger is attached to to Craftman Lawn Tractor. Cana new V Belt ...
My V Belt snapped while snow blower auger is attached to to Craftman Lawn Tractor. Cana new V Belt ...
(Posted by jerrygrossi 11 years ago)

Snow Thrower Attachment
Can a 42 inch snow thrower attachment from a 1997 Sears lawn tractor be made to fit on a 2004 25 hp ...
Can a 42 inch snow thrower attachment from a 1997 Sears lawn tractor be made to fit on a 2004 25 hp ...
(Posted by harryaldrich 12 years ago)

Snow Thrower Won't Lift Off The Ground
I have a 42" 2 stage snow thrower attached to a lawn tractor Model 917.272246. The first year or t...
I have a 42" 2 stage snow thrower attached to a lawn tractor Model 917.272246. The first year or t...
(Posted by donpam 13 years ago)