Craftsman 24838 Support Question
Craftsman 24838 Support Question
Find answers below for this question about Craftsman 24838 - 42 in. Lawn Tractor Snow Thrower.Need a Craftsman 24838 manual? We have 1 online manual for this item!
Question posted by jerrygrossi on March 2nd, 2013
V Belt, Drive Replacement
My V Belt snapped while snow blower auger is attached to to Craftman Lawn Tractor.
Can a new V Belt be installed without removing or detaching snow blower auger from the tractor?
Current Answers
Related Craftsman 24838 Manual Pages
Operation Manual - Page 1
...., Hoffman Estates, IL 60179 U.S.A. www sears.corn/craftsman PRINTED iN U.S.A. Safety Assembly Operation Maintenance Parts
FORM NO. 49812 (2/06)
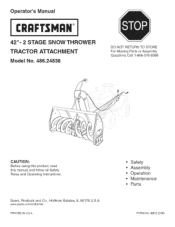
Operator's Manual
CRQFTSNQ°N
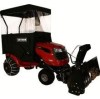
42"= 2 STAGE SNOW THROWER TRACTOR ATTACHMENT Model No. 486.24838
DO NOT RETURN TO STORE For Missing Parts or Assembly Questions Call 1-866-576-8388
CAUTION: Before using this product, read this manual...
Operation Manual - Page 3
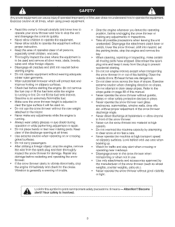
... keep it will protect feet and improve footing on . Make sure the snow thrower height is an extremely flammable fuel. Exercisecautionat alltimes,whenusingpowerequipment. Do not use • Use only attachments and accessories approved by attempting to vibrate abnormally, stop the engine, remove the wire from the plug to the slope guide on slippery surfaces...
Operation Manual - Page 9
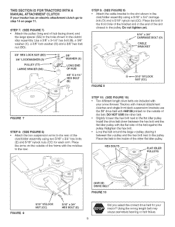
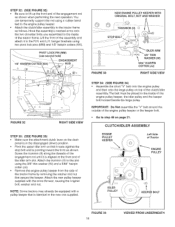
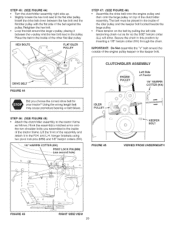
...DRIVE BELT
FIGURE 10
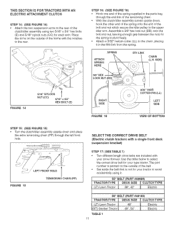
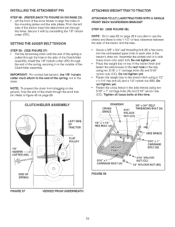
Did you select the correct drive belt fo_ your snow thrower Tractors with manual attachment clutches and single front deck suspension brackets use the 56" drive belt with the flat side o1 the belt against the pulley. Using the wrong length belt may cause premature bearing or belt... FIGURE 9) Attach the cable bracket to the flat idler pulley Install the drive belt down ) ...
Operation Manual - Page 10
... WASHER
TRACTOR'S CLUTCH CABLE
CABLE BRACKE]
FIGURE 11
SPACER (RR)
5/64" HAIR COTTER PiN (J J)
FIGURE 12
VIEWED FROM LEFT SIDE
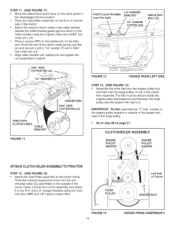
STEP 18: (SEE FIGURE 13) • Assemble the drive belt onto the... spacer (RR) on the welded pin on the idler arm. STEP 11: (SEE FIGURE 11) Move the attachment clutch lever on the dash panel to the disengaged (down ) to the cable bracket using two pivot lock pins...
Operation Manual - Page 11
... with the notches to the chain, placing it
55" BELT (PART #46989)
T(LRTA) CLTawOnR TTraYcPtoEr t DE3C8K", 4S2iZ" E ][ CLUTECleHctriTcYPE
56" BELT (PART #48138)
T(LRTA) CLTaOwRn TTraYcPtoEr (GT) Garden Tractor TABLE 1 11
DECK48"SIZE l CLUTECleHctTriYcPE
48", 54"
Electric Assemble a 3/8" hex lock nut (DD) onto the bolt and nut, leaving enough gap between the nuts for your snow thrower.
Operation Manual - Page 12
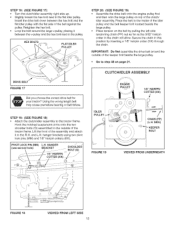
... chain will allow. IMPORTANT: Do Not assemble the drive belt around the large v-pulley, placing it to the inside of the tractor frame. Place the belt to the R.H. CLUTCH/IDLER
ASSEMBLY
PULLEY
1/8" HAIRPIN COTTER (KK)
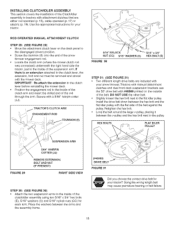
STEP 19: (SEE FIGURE 18) * Attach the clutch/idler assembly to the tractor frame
Hook the notched suspension arms onto the...
Operation Manual - Page 15
... to the pulley
HEX BOLTS
\ \ \ \
FLAT IDLER PULLEY
(#46989) DRIVE BELT FIGURE 31
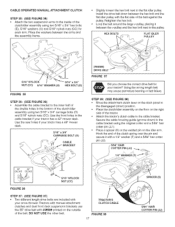
Did you choose the correct drive belt for your snow thrower. Place the washers between the hex bolt and the
flat idler pulley with the flat side of the belt against the pulley. Tractors with manual attachment clutches and dual front deck suspension brackets use the...
Operation Manual - Page 16
...belt must be equipped with a pulley keeper that is aligned at the front end of the idler arm slot Attach the trunnion (ll) to the slot using the 3/8" thin washer (W) and a 5/64" hairpin cotter (JJ) • Remove the engine pulley keeper from the side of the tractor frame by removing...so that secure the keeper Attach the new pulley keeper supplied with the snow thrower, reusing the original bolt,...
Operation Manual - Page 17
...drive belts are included with
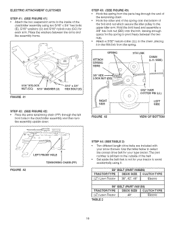
your snow thrower Tractors with manual attachment clutcl_es and dual front deck suspension brackets use the 55" drive belt with the flat side o1 the belt against the puEley.Retighten the hex bolt , Loop the belt... cable bracket if your tractor has a 42" mower deck. CABLE OPERATED MANUAL ATTACHMENT CLUTCH
STEP 35: (SEE FIGURE 35) • Attach the two suspension arms ...
Operation Manual - Page 18
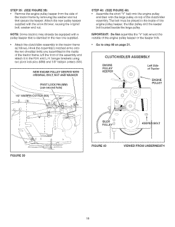
... top of the c_utch/idler assembly.The belt must be equipped with the snow thrower, reusing the original bolt, washer and nut.
STEP 39: (SEE FIGURE 39) * Remove the engine pulley keeper from the side of
the tractor frame by removing the washer and nut that secure the keeper Attach the new pulley keeper supplied with a pulley keeper...
Operation Manual - Page 19
...42
TENSIONING CHAIN (PP)
STEP 44: (SEE TABLE 2)
Two different length drive belts are included with your snow thrower• Use the table below to select the correct drive belt for your type tractor... enough space for your tractor to the chain, placing it
55" CELT (PART #46989)
TRACTOR TYPE
DECK SiZE j_ CLUTCH TYPE
(LT) Lawn Tractor
38", 42", 46" _
Electric
56" BELT (PART #48188)
T(...
Operation Manual - Page 20
... Side
of the assembly and
attach it between timehex bolt and the
flat idler pulley with the fiat side of the tractor frame. Using the wrong length belt may cause premature bearing or belt failure.
STEP45: (SEEFIGURE44)... shoulder bolts you choose the correct drive belt for your tractor? Install the drive belt down between the v-pulley and the hex bolt next to the inside of the...
Operation Manual - Page 21
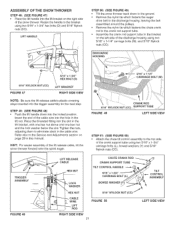
...handle down to the ground
• Remove the nylon tie which fastens the auger drive belt to the discharge housing, leaving the belt assembled around the pulleys.
• Remove the nylon tie which fastens the ... tilt the snow thrower forward onto the spiral auger
••
CRANK ROD
5t16" NYLOCK NUT (CC) .SUPPORT TUBE
FIGURE 49
LEFT SIDE ViEW
STEP 51: (SEE FIGURE 50) * Attach the chute ...
Operation Manual - Page 22
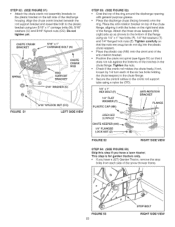
... if you have a lawn tractor. This step is for garden tractors only. • If you have a (GT) Garden Tractor, remove timestop
bolts from each ... (HH) _! If not, loosen by 1/4 turn each side o1 the snow thrower frame•
FIGURE 53 22
STOP BOLT RIGHT SIDE ViEW ROD
ROD
%... Attach the chute crank rod assembly brackets to
the plastic bracket on the right hand side of the flange Attach the...
Operation Manual - Page 23
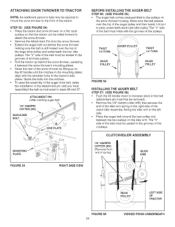
...ATTACHING SNOW THROWER TO TRACTOR
NOTE: An additional person's help may be rolled forward to attach the snow thrower. * Remove the Attachment Pin from the snow thrower.
* Extend the auger belt out behind the snow thrower, centering it between the two pulleys on
the snow thrower housing. TWIST 1/4 TURN
:i
AUGER PULLEY
_
i
TWIST 1/4 TURN
IDLER PULLEY
IDLER PULLEY
FIGURE 88
INSTALLING...
Operation Manual - Page 24
...page 20.
SETTING THE AUGER BELT TENSION
STEP 89: (...install the 1/8" hairpin cotter (KK) through the end of the spring, securing it with by reinstalling the 1/8" hairpin cotter (OO). CLUTCH/IDLER
ASSEMBLY
ATTACHING WEIGHT TRAY TO TRACTOR
ATTACHING TO (LT) LAWN TRACTORS...INSTALLING THE ATTACHMENT PIN
STEP 88: (REFER SACKTO FIGURE 54 ON PAGE 23) * Lift the front of the snow blower to the tractor...
Operation Manual - Page 26
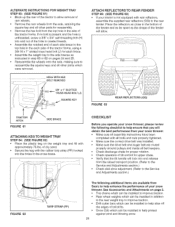
... aH bolts and nuts properly tightened. • Make sure the correct dbve belt was installed. • Make sure the drive belt and auger belt are available from the axle, retaining the square key and all other parts for reassembly Remove the hex bolt from your snow thrower. • Make sure air assembly instructions have been
completed with the rubber...
Operation Manual - Page 27
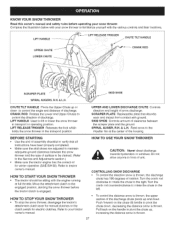
...AUGER, R.H. & L.H. SCRAPER PLATE Replaceable plate that all instructions have been properly completed. Compare the illustration below with ground
SKID SHOE Controls amount of discharge. To control the distance snow is thrown.
Feed snow to the impeller fan at full throttle Move the attachment dutch to the engaged position, starting the snow thrower before operating your snow thrower...
Operation Manual - Page 29
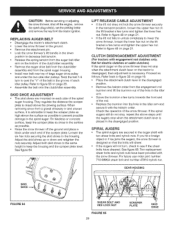
REPLACING AUGER BELT
• Disengage the tractor's attachment clutch. • Lower the snow thrower to the ground. • Remove the attachment pin • Lock the snow thrower's lift handle in the down and retighten the nuts securely. Refer to figure 48 on page 21 If the lift rod fails to unlock completely to lower the snow thrower, loosen the lower hex nut on the...
Operation Manual - Page 30
... which may be left attached to the tractor frame) • Remove the drive belt from the engine pulley. increase to assemble bolts back into the empty holes in the tractor frame. Snow melts during contact with a light oil to prevent rust * Store in a dry place
REMOVING THE SPIRAL AUGER HOUSING * Lower the snow thrower to the ground. * Remove the attachment ph_ See figure...
Similar Questions

Drives On Flat Lawn But Does Not Want To Go Up Hill. What Is Wrong With It?
(Posted by wildfirepotter6 2 years ago)

How To Replace Transmission On A 5 Horse Power Rototyler Front Drive
(Posted by nzorka 8 years ago)

Will A 24838 Snow Blower Fit On A Model 917.27601 Lawn Mower?
(Posted by kltmontana 9 years ago)

Craftsman 42' Snow Blade Model# 486244071.
I am looking to find out what model of SEARS tractor will the SEARS snowblade (Model # 486244071) f...
I am looking to find out what model of SEARS tractor will the SEARS snowblade (Model # 486244071) f...
(Posted by backmtlouie2 12 years ago)

Snow Thrower Won't Lift Off The Ground
I have a 42" 2 stage snow thrower attached to a lawn tractor Model 917.272246. The first year or t...
I have a 42" 2 stage snow thrower attached to a lawn tractor Model 917.272246. The first year or t...
(Posted by donpam 13 years ago)