Craftsman 21829 Support Question
Craftsman 21829 Support Question
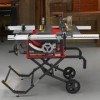
Find answers below for this question about Craftsman 21829 - Professional 10 in. Portable Table Saw.Need a Craftsman 21829 manual? We have 1 online manual for this item!
Question posted by shankarbn on May 31st, 2014
Table Saw Model 218290
i need instruction to use sliding miter angles
Current Answers
Answer #1: Posted by TechSupport101 on June 1st, 2014 4:10 AM
TechSupport101

Member since:
May 24th, 2013 Points: 12,171,305

Member since:
May 24th, 2013 Points: 12,171,305
Hi. The product's Operation Manual is available here http://www.helpowl.com/manuals/Craftsman/21829/30493
Related Craftsman 21829 Manual Pages
Operation Manual - Page 3
...'s manual carefully.Learn the saw while it is in doubt, use of personal ir_u_
• USE THE RIGHT DIRECTION OF FEED. Keep the work ares. An undersizedcord will do a job it
comes to a complete stop, • PROTECT YOUR LUNGS. TURN THE POWER OFF. READ ALL iNSTRUCTIONS
• KNOW YOUR POWER TOOL. All visitors shouldwear safety...
Operation Manual - Page 4
....Stay constant_j aware of blade
pinchingand kickback, always support large panels. • REMOVE ALL RENCES AND AUXILIARY TABLES
before transpo_ng saw blade. • ALWAYS ,RECURF.WORK firmly against rip fence, miter fence, or miter gauge. • ALWAYS USE A PUSH STICK FOR RIPPING NAR- Keep the b_de gu_-d down, th_ _ntikickback pawls down, and the rivingkrdfe...
Operation Manual - Page 5
... to the rear end sides of the saw blade.
• NEVER reach behind, over the saw .
AJwaysuse either the rip fence or miter fence to positionand guide the work that... see the work usingthe table saw blade.
• SAVE THESE INSTRUCTIONS. b) Use saw table for overhead guarding.
• DO NOT REMOVE JAMMED CUTOFFPIECES until cutter or blade has stopped and tool has been disconnected from...
Operation Manual - Page 8
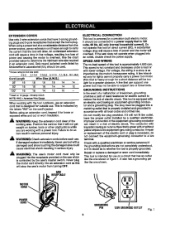
...tools or otherobstructionswhile you are workingwi.itna power toot. GROUNDING INSTRUCTIONS...: The saw's motor cord must be used.
• "Ampere rel,ing(on tool dab= ...plate)
0-2.0
2.1-3.4
3.5-5.0
5.1-7.0
7.1-12.0
Cord Length 25' "_6
Wire Size (A.W.G.)
16
"_6 t6
14
50' 16
16
16 14
14
100'
1'6
1'6 1'4 1'2 10
12.1-16.0
14 12 --
-Used...
Operation Manual - Page 11
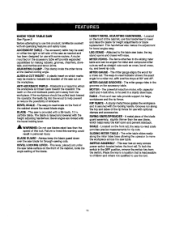
... to the table saw table. A WARNING: Do not use with some reuters.
LEG STAND - The miter gaugealigns the wood for large workpiecas and the rip fence. MOTOR -
A metal piece of the cabinet, use the tool
11 Located on the front rail, the easy-to -raad scale on the accessory table.
ADJUSTING CLAMP - If the workpiecs should be angled for...
Operation Manual - Page 14
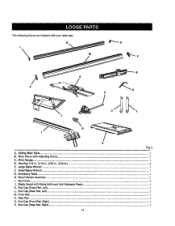
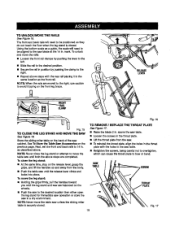
... ...1 H. I_vel Hartdle Assembly...1 I. Blade Guard with AdjustingClamp ...1 C. Miter Fance with RivingKnife and Anti-Kickback Pawls 1 K. End Cap (Front Rail, Right)...1 P. Large Btada Wrench ...1 E Small B[adeWrench ...G. Rsar Rail...1 O. End Cap (Rear Rail, Right)...1
14- Thefollowing items are included with your table saw:
G Fig. 5
i
A. End Cap {Front Rail, Left)...1 L End...
Operation Manual - Page 17
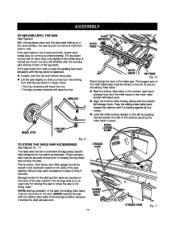
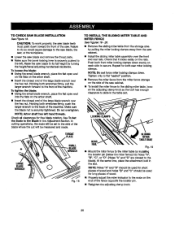
...RIPFENCE Fig. 10
Stand facing the back of the oabinst securingthe miter table in place. ff the sew rests on each accessoryin place to side, the levelingfeet need adiustlng until... the cabinet _zntiilt is not being used onlyfor moving the saw , the slidingmiter table must be used . To secure the sliding miter table: • Restthe slidingmiter table on the bottom right-hand
storage ...
Operation Manual - Page 19
.... See To Store the Tab/e Saw A_ssories on the back of the saw unlessthe sliding miter table issecurely stored. NOTE: Never close the...Using the bottom scale as described above the saw table.
• Loosen tha screws in the throat prate. • Liftthe throat plate from the body.
• Push the table saw in .
Next, set the frontand back ransto 14 in .
NOTE: Never movethe table saw...
Operation Manual - Page 20
... bolt in the AdjustmentSection. O
NOTE: Holes =A" and "D" should be used
for short
pieces of the saw ¢ablnst • Install the sliding miter table assembly over the hex nut. Failure to do so could cause damage to the saw blade, the saw, or the workpisce.
• Lowerthe saw blade teeth must point down . Do not ovsrtighten. In cutting...
Operation Manual - Page 21
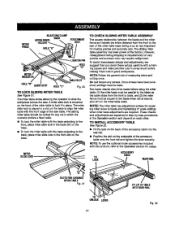
...: Followthe general rule of the saw , A miter slide lock is placed in a slot on the base to lock it travels the entire distancefrom the frontto the
rear of the accessory table into the rear rail.
• Posi_onthe slot on each other. INDICATOR
HOLE=B" QUICKSTOP
HOLE"C"
TABLESLOT Fig. 20
TO LOCK SLIDING MITER TABLE See Flours21. Two basic...
Operation Manual - Page 26
QULLL='(
Fig. 28
TO CHANGE THE BLADE ANGLE
See Figure 29.
• Push the bevel [ocVdnglever to 1/4 in piece. AN_I.ED
CHECKING SLIDING MITER TABLE AND MAKING ADJUSTMENTS
TO CHECK MITER BASE PARALLELISM See Figures 30 - 31.
• Unplug the saw.
• Set saw .
• Place a reference mark on one of the b_ds teeth (D) and rotsta the blade...
Operation Manual - Page 27
...on the mitsr table. NOTE" The quick-atopis not necessaryfor this inc{icatasthe miter base needs afign(ng. F
I ]
E
\
3"0 CHECK MITER FENCE ALIGNMENT
See Figure 32,
The miter fence must ...
adjustedbmforecheckingmiterfencealig_'nenSt_.e To Adjust The Miter Base sectionthat follows,
I
B Fig. 31
Fig. 32 27
• Remove framinQs,quare and slide miter table to the rear o1rafterbase as far...
Operation Manual - Page 29

... edo,e to preve_ =oookir=_=which will resultin excessive play in miter table. t
Q
Fig. 35
QUICK STOP
Fig. 36 29
However,when sliding miter table adjustmentsare made, these adiustmentsmay cause the quick stop to need adiusting.Check qu(ck stop againstthe miter fence with miter scale set at sxactiy zero degrees.
• Tightenhex nut securely.
• Adjust rightrear screw...
Operation Manual - Page 30
...table) the miter gauge sheutd be turned 60 ° to the blade. from the bride tipedge.
• Loosen the screw on either miter gauge channel.
TO USE THE MITER GAUGE See F=Jgur3e9.
Begin with the blade at a zero angle... miter gauge in . If adjustmentsare needed, see To Check the Alignment of this manual. The miter gauge providesgreater accuracy in . The miter gauge can use either...
Operation Manual - Page 31
...saw is installed and working proper(y to avoid serious possibleinjLIry.
•
Fig. 40 31
Positionthe rip fence the desired distance from the blade for the out and sasurstylook the handle.
Use the miter gauge when making cross, miter,bevel, and compound miter cuts. To secure the angle, lock the miter...a support (the same height as saw table) behind the saw for the blade to come to fullspeed...
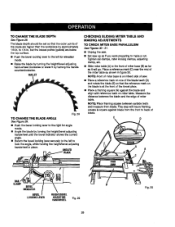
Operation Manual - Page 33

... ON position.
• Positionthe workpisce fiat on the tabis with the workplace, use the hand closest to the rip fence to avoid _apping the wood and causing ...height as the _.ble surfacebehind the saw blade build up to avoidserious persona{injury. BLADE ANGLED
BEVELCROSSCUT
MITERGAUGE STRAIGHT
• Remove the sliding miter table and move the accessory table to the left side.
• ...
Operation Manual - Page 37
...saw blade, • Unlock the rip fence, slide it away from the saw , remove the rear adjustment screw and washer on top of the rip fence. • Slide one of the table. To avoid this, install the table... rip fence against blade and lock in . ACCESSORY TABLE USAGE
Th|s accessory table has been spec'dtcaltydesignedfor use with your table
saw blade, and lock it . Reutersmust have movement st...
Operation Manual - Page 44

...; Loosen the set screws.
• Push both front and rear miter lockingclamps down to the {sft unti{it hits or comes in . Followrngextended use, the rail holder nut inside the rails may need adjusting. • Unplug the saw table.
• Tighten rait holder nut until it is snug. • Loosen rail holder nut one-fourth...
Operation Manual - Page 47
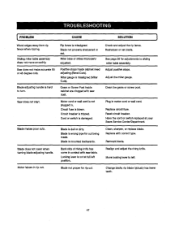
... blade.
Adjust positivestops. Replace circu'_fuse. Blade makes poor cuts. BJadenot proper for adjustments to sliding miter table assembLy. Wood edges away from rip fence when ripping.
Gears or Screw Post inside cabinet need adiusting (BevelCuts): Miter gauge is blown.
Saw does not start.
Motor taborsin rip cut .
rip blade typicallyhas fewer teeth.
47
Cord or...
Operation Manual - Page 51
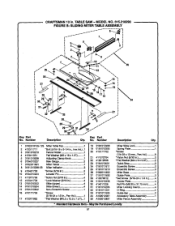
Mey Be Purchased Locally 51 MODEL NO. 815.218290 FIGURE B: SLIDING MITER TABLE ASSEMBLY
I I I I I I
% I I l
2o
k
,
\
\ \
\
j- Number
Deecdptlon
Key Part Qty. Number
Description
Qty.
1 0182010103-126 Miter Table "l'op 1
2 410011717
*Boll: (5/I6-18 x 3-1/4 in., Hex Hd_..1
3 0181010210
Fence Holder 1
4 412011051
Fb_ Washer (M8 x 16 x 1.5T) ......... 1
5 0181010209
Adjusting ...
Similar Questions

Changing Table Saw Motor To 240v
I have a 10" Craftsman table saw model #152221140. Lost the cover to the wiring which has the diagra...
I have a 10" Craftsman table saw model #152221140. Lost the cover to the wiring which has the diagra...
(Posted by mridude 9 years ago)

How To Assemble A Portable Craftsman 21829 Table Saw
(Posted by ceclau 9 years ago)

Fence On Craftsman Table Saw 315.218290 Moves To Right When Tightened
(Posted by birahel 10 years ago)

Table Saw Switch Malfunction
Today I pushed my switch on the table saw and it didn't turn off! I had to unplug the table saw. I s...
Today I pushed my switch on the table saw and it didn't turn off! I had to unplug the table saw. I s...
(Posted by gringoticahouse 11 years ago)

Is A Table Saw Motor From A Model 21807 Compatible With Other Saws?
will the 3HP 15 amp motor from a model 21807 mount properly on a model 137.248880 table saw (both ar...
will the 3HP 15 amp motor from a model 21807 mount properly on a model 137.248880 table saw (both ar...
(Posted by deannarandy 13 years ago)