Craftsman 21807 Support Question
Craftsman 21807 Support Question
Find answers below for this question about Craftsman 21807 - 10 in. Table Saw.Need a Craftsman 21807 manual? We have 1 online manual for this item!
Question posted by astalrs on February 28th, 2014
How To Remove Table Saw Insert In Craftsman Table Saw 21807
The person who posted this question about this Craftsman product did not include a detailed explanation. Please use the "Request More Information" button to the right if more details would help you to answer this question.
Current Answers
Related Craftsman 21807 Manual Pages
Operation Manual - Page 1

... SET Model No. 137.218070
C
us
CAUTION:
Before using this Table Saw, read this manual and follow
all its Safety Rules and Operating Instructions
® Safety Instructions ® Installation
... Center 1-800-488-1222
Sears, Roebuck and Co., Hoffman Estates, IL 60179 USA
Visit our Craftsman website: www.sears.comlcraftsman
Part No. 137218070001
Printed in . Operator's lVlanual
ERRFrSNRN°...
Operation Manual - Page 2

...Warranty Product Specifications Symbols Power Tool Safety Table Saw Safety Electrical Requirements and Safety Accessories and Attachments
Tools Needed for Assembly Carton Contents Know Your Table Saw
Glossary of Terms Assembly Adjustments Operation Maintenance
Troubleshooting Guide Parts List
PAGE
2 3 4 5 8 10 12
12 13 15
16 18 28 34 43
45 48
CRAFTSMAN ONE YEAR FULL WARRANTY...
Operation Manual - Page 8

.... A pattern for any part of rotation only.
10.NEVER use either the fence or the miter gauge to the saw table for long or wide workpieces.
13.AVOID KICKBACKS (work... A STALLED SAW BLADE without first turning the saw .
9. sawing operation. Refer to prevent motor damage.
4. NEVER REACH behind or over the cutting tool for making your body in place, aligned and functioning. REMOVE the rip ...
Operation Manual - Page 9

...saw blade. Remove
sawdust frequently. NOTE: On machines with this tool. slipcouldcauseyourhandto move intothesawblade.
15.NEVERUSESOLVENTtSo cleanplasticparts.Solventscould possiblydissolveor otherwise damagethematerialO. Failure to cut under saw...VENTILATED AREA. This table saw is not being used, a hole approximately 11 in use on wood and wood-like products.
21 .USE ONLY saw blade.
22.USE...
Operation Manual - Page 13
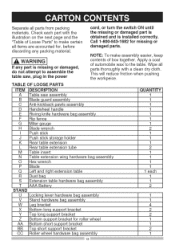
... to assemble the table saw assembly
1
B Blade guard assembly
1
C Anti-kickback pawls assembly
1
D Handwheel handle
1
E Riving knife hardware bag assembly
1
F Rip fence
1
G Miter gauge
1
H Blade wrench
2
I Push stick
1
J Push stick storage holder
1
K Rear table extension
1
L Rear table extension tube
2
M Table insert
1
N O P Q R S T STAND
Table extension wing hardware...
Operation Manual - Page 16
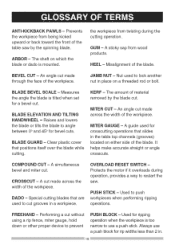
...workpiece from twisting during operation, provides a way to cut made across the width of material removed by the spinning blade. HEEL -
BLADE BEVEL SCALE - The amount of the workpiece.... simultaneous bevel and miter cut made through the face of the table saw . Misalignment of the blade. Nut used to restart the
saw by the blade cut . OVERLOAD RESET SWITCH Protects the motor ...
Operation Manual - Page 17

... outward in opposite directions to install/ remove blades. The area of the workpiece or table top directly in one minute. The distance between two saw blade, it helps keep the kerf open and prevents kickback. Insert that will be used for
dado cutting.
Making a cut straight.
RIVING KNIFE -
FEATHERBOAR- TABLE INSERT -
REVOLUTIONPSER MINUTE (RPM)
- RIP FENCE...
Operation Manual - Page 20

... adjustable wrench. This is to be properly secured to
fall -through and removal.
3. I
i
•
2
J
I_/SQUARE
_-
27
co,oo,
JJJJJJ
jl
•
Ir
SAW MOUNTED TO WORK SURFACE (FIG.
ASSEMBLING THE HANDWHEEL HANDLE (FIG. Fig.
The surface of the table where the saw on the work surface. Fig. H
5.
If the leg set will allow...
Operation Manual - Page 21

...Fig. M
4
32
3. K) 1. Push down on the saw table, and attach the set plate (3) under the saw frequently.
1. Remove the arbor nut (2) and outer blade flange (3). (Fig. ... 5. K
1
INSTALLING THE BLADE (FIG. L)
[_ WARNING] o Do not use this saw . (Fig. o To prevent hazard, clean and remove sawdust from an accidental start, make sure the switch is in the OFF position and the plug...
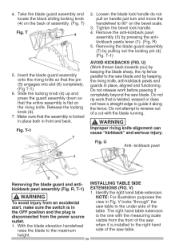
Operation Manual - Page 22

...2. o Never operate this saw arbor to the rearofthesawtable).(Fig.N)
10.Lowetrhebladeto its minimum heightpositionandplaceinsert(1) intoposition(.Fig.O)
Fig. ig.N)
7. Clean but do not remove the inner blade flange before ...position by snapping out from the power source outlet.
Then remove the blade (7). Remove the table insert by unlocking the blade tilting lock knob and turning the bevel...
Operation Manual - Page 23

... hole in place for all through the mounting bracket (3) located behind the saw , please follow the instructions on aligning the
riving knife,
l
Fig. Tighten the lock knob (6). 8. o Never operate this tool without the blade guard in the set plate. 7. Remove the table insert and raise the blade to the 0° vertical position by turning the...
Operation Manual - Page 25
...U
Anti- kickback pawl
Removing the blade guard and antikickback pawl assembly (Fig.
T
5. Release the locking knob (4).
7. Tighten the bevel lock handle. 4. Fig. T)
Fig. Insert the blade guard assembly ...TABLE SIDE
EXTENSIONS (FIG. V looks "through" the saw blade and by keeping the blade sharp, the rip fence parallel to the saw table to guide it completely beyond the saw table....
Operation Manual - Page 26
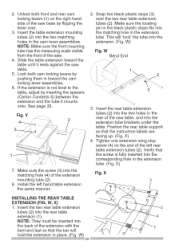
...the end of the saw table, and into the two holes in the extension
tube. (Fig.
Slidethetableextensiontowardthe
. Iftheextensionis notleveltothe table,adjustbyinsertingthespacers
3
(CartonContentsS) betweenthe
extensionandthetubeit mounts
onto.Seepage35.
3. V
tubes (2) into the extension tube brackets under the
table. W)
Fig. Insert the rear table extension
Fig. Make...
Operation Manual - Page 27
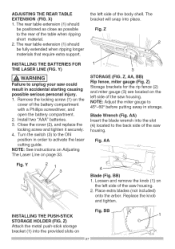
...securely. 4. NOTE: See instructions on Adjusting The Laser Line on
the left side of the saw housing. Z) Storage brackets for the rip fence (2) and miter gauge (3) are located on ...Insert the blade wrench into the slot (4) located to activate the laser cutting guide. BB) 1. Loosen and remove the knob (1) on page 33.
3
STORAGE (FIG. ADJUSTING THE REAR TABLE EXTENSION (FIG. The rear table...
Operation Manual - Page 31

...176; straight up).
4. BLADEPARALLEL TO THE MITER
GAUGE GROOVE (FIG.
Remove the safety switch key and unplug the saw.
2. Carefully slide the combination square to the rear until it touches the... the ruler touches the marked tooth.
. JJ, KK)
I_ WARNING] This adjustment was made . Remove the blade guard for this time. above the blade.
8. Place the combination square base (1) into ...
Operation Manual - Page 35

...is locked into position and is parallel with the table, remove the bolts (1) and position the extension leveling spacers (2) between the table extension and tube until the correct measurement is tightened...the length and the grain of your table saw each time, check the following: 1. NEVER USE THE TWO AT THE SAME TIME. I_ WARNING]
Before using the saw to the arbor. 2. Slide the ...
Operation Manual - Page 36

... each side of the saw ON and wait for the blade to come to the table. 3. Continue pushing the... workpiece (6) with a push stick (3). RR)
9. QQ) or push block until it in the "storage" compartment in . This will pass between the blade and the fence. Secure the rip fence to full speed. 6. Use the auxiliary fence (4) and push block (5) as shown. Remove...
Operation Manual - Page 39

...To prevent serious injury: o Do not allow familiarity or frequent
use of your table saw to pull the workpiece backwards during a cutting operation. o Never attempt to ...workpiece back with the proper operation of the saw blade guard. WW 3
2 \ _/1
USING THE WOOD FACING ON THE MITER GAUGE (FIG. XX) Slots are cutting on the table.
2. Fig. Remove the rip fence and place the miter gauge ...
Operation Manual - Page 42
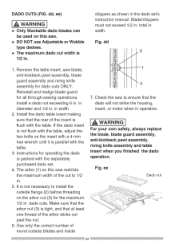
o DO NOT use Adjustable or Wobble
type dadoes.
Remove the table insert, saw to ensure that the rear of the insert is not necessary to 1/2 in operation. Reinstall and realign blade guard for operating the dado is packed with the table. DADOCUTS(FIG. dd
2
1. Install the dado table insert making sure that the dado will not strike the housing...
Operation Manual - Page 48

...
2EVJ MITER GAUGE ASS'Y
2FSV TABLE
#AW
1 2T6D
3 2T6F ... 1
48
PAN HD. TAPPING SCREW
M5_0.8-10 M5_16-12
3 2RVE 4 2RVP
0KBQ CR....TABLE SAW...10
0K7E CR. TAPPING SCREW
M5_16-25
8 2RV8
0KAE CR. PAN HD. 10 in. TABLE SAW
MODEL NO. 137.218070
i_ WARNING ]
When servicing use only CRAFTSMAN replacement parts. Any attempt to repair or replace electrical parts on this Table Saw...-10
...
Similar Questions

I Need A Rip Fence For This Table Saw How Can I Get One?
need to buy
need to buy
(Posted by tuccilaroo 9 years ago)

Changing Table Saw Motor To 240v
I have a 10" Craftsman table saw model #152221140. Lost the cover to the wiring which has the diagra...
I have a 10" Craftsman table saw model #152221140. Lost the cover to the wiring which has the diagra...
(Posted by mridude 9 years ago)

Dado Plate For A 21807 Saw.
I have a 21807 table saw. I can't find a accessory list any more on the web site. Previously I found...
I have a 21807 table saw. I can't find a accessory list any more on the web site. Previously I found...
(Posted by rockyvista 11 years ago)
What Is A Sears Electronic 10'table Saw Worth
what is a sears electronic 10" table saw w/ext,& base model 113.290650 worth?, it works great
what is a sears electronic 10" table saw w/ext,& base model 113.290650 worth?, it works great
(Posted by mastercook76 11 years ago)
Is A Table Saw Motor From A Model 21807 Compatible With Other Saws?
will the 3HP 15 amp motor from a model 21807 mount properly on a model 137.248880 table saw (both ar...
will the 3HP 15 amp motor from a model 21807 mount properly on a model 137.248880 table saw (both ar...
(Posted by deannarandy 13 years ago)