2005 Chrysler Pacifica Support Question
2005 Chrysler Pacifica Support Question
Find answers below for this question about 2005 Chrysler Pacifica.Need a 2005 Chrysler Pacifica manual? We have 2 online manuals for this item!
Question posted by markerwakeland on December 8th, 2012
Lower Attachment Clip.
how do I remove the lower attachment clip so 'i can remove the front light assembly
Current Answers
Related Manual Pages
Owner's Manual - Page 29

... obstructs the power liftgate while it meets sufficient resistance. • There are also pinch sensors attached to the closed or open position.
• The power liftgate must be in gear or ... position for any of the close buttons to remove any of the liftgate. Light pressure anywhere along these strips will automatically reverse to the side of the power liftgate switches.
2...
Owner's Manual - Page 52
...the PAD indicator light and AIRBAG warning light are illuminated the airbag will illuminate indicating that you should try to remain in the vehicle (i.e. In the presence of seat attachment bolts), take the... is a rapid change in any way (including removal or loosening/tightening of an occupant in the system, the AIRBAG warning light will be used. Occupants should take the vehicle to...
Owner's Manual - Page 58

...for any part of your protection in any part of seat attachment bolts), take the vehicle to tell anyone who works on ... you . Airbag Light You will want to have an authorized dealer service the system immediately. • The AIRBAG light does not come... that it is dangerous to try to repair any way (including removal or loosening/tightening of the airbag system yourself. WARNING!
•...
Owner's Manual - Page 65
... all three straps as you can more easily attach the hook or connector to the lower anchorages are to be equipped with separate straps on the lower straps and tether straps so that you will...and cause serious personal injury. Don't leave it loose in the vehicle with the seat belt or remove it from the vehicle. Then tighten all , restraint systems will first loosen the adjusters on each ...
Owner's Manual - Page 110
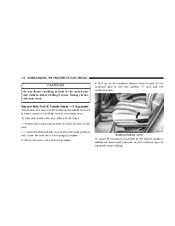
... 3. Second Row Fold & Tumble Seats - If Equipped The second row seats can be required when folding. Lower the head restraint to its full downward position and rotate the arm rest to the full rear position.
4.... in front of the seat labeled "1" and fold the seatback down . Remove any obstructions from the floor in the folded position, additional downward pressure on the outboard side of the seat...
Owner's Manual - Page 285
...for use . • Install chains on the front wheels as tightly as indicated by the manufacture. Remove the damaged parts of time on the tire side wall. NOTE: In order to avoid damage to ... could indicate chain breakage. SNOW TIRES Some areas of the country require the use the lower suggested operating speed if both the chain manufacturer and vehicle manufacture suggest a maximum speed. ...
Owner's Manual - Page 305
WHAT TO DO IN EMERGENCIES 305
CAUTION! Use of the wheel. Turn OFF the ignition.
6
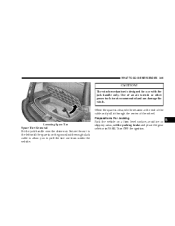
Lowering Spare Tire
Spare Tire Removal Fit the jack-handle over the drive nut. When the spare is clear, tilt the retainer at the end of the cable and pull it ...
Owner's Manual - Page 308
...tightness, have them checked with cast aluminum wheels, the center cap of the nut toward the wheel. Lightly tighten the lug nuts. Do not use a hammer or force to its fully closed position. Push ... the wheel by hand only and install the wheel lug nuts with wheel covers, remove the cover from the wheel by hand. Lower the jack to install the wheel covers. 9. WARNING! Always stow the jack parts...
Owner's Manual - Page 310

...the engine has started . This type of the booster battery. Don't lean over battery when attaching clamps or allow battery fluid to contact eyes, skin or clothing. When boost is provided by... with an output that might make an inadvertent electrical contact. 2. Wear eye protection and remove any other booster source with large quantities of the discharged battery. Vehicles equipped with an ...
Owner's Manual - Page 343

... to prevent loss of corrosion protection in the engine cooling system. Do not loosen or remove the cap to build up in the area where the vehicle is hot or under pressure. • Do not use of lower quality water will reduce the amount of coolant, and to the radiator from the...
Owner's Manual - Page 348
You could have a lower initial boiling point or unidentified as the brake pads wear. WARNING!
• Overfilling the brake fluid reservoir can... spilling brake fluid on hot engine parts and the brake fluid catching fire. • Use of the master cylinder area before removing the cap. Add fluid to bring the level up to fall as to the requirements described on the side of the "FULL...
Owner's Manual - Page 349
...automatic transmission and differential assembly are equipped with a...connect fittings that the proper lubricant is located just behind the radiator, lower right side. You are designed with quick connect fittings, or their ...the manufacture specified hoses with hoses and quick connect fittings which have been removed during service. Selection of Lubricant It is added, it should be taken...
Owner's Manual - Page 351

...or warm. Dirt and water in P (PARK).
Do not overfill. Fully apply parking brake. 4. Remove the dipstick and determine if the fluid is below 80°F (27°C). 6. If the ...COLD". CAUTION!
If the fluid is hot, the reading should be comfortably held between the lower two holes in the dipstick).
Fluid and Filter Changes Automatic transmission fluid should be between the...
Owner's Manual - Page 355

...use abrasive or strong cleaning materials such as possible. • Use Mopar auto polish to remove road film and stains and to scratch the paint. • Avoid using a mild ...and painted surfaces.
Special Care • If you detect any stone chips or scratches in the lower edges of the owner.
7 Take care never to polish your vehicle regularly. CAUTION! MAINTAINING YOUR VEHICLE 355
Washing...
Owner's Manual - Page 364
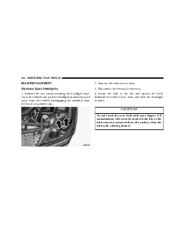
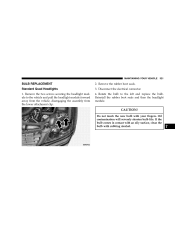
... and pull the headlight module forward away from the vehicle, disengaging the assembly from the lower attachment clip.
2. If the bulb comes in contact with an oily surface, clean the bulb with your fingers.
Oil contamination will severely shorten bulb life. Remove the two screws securing the headlight module to the left and replace the...
Owner's Manual - Page 366
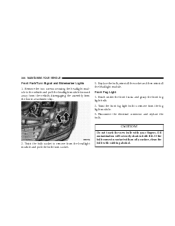
...! Disconnect the electrical connector and replace the bulb.
Twist the front fog light bulb to remove from the headlight module and pull the bulb from socket. Do not touch the new bulb with rubbing alcohol.
2. Twist the bulb socket to remove from the lower attachment clip.
3. 366 MAINTAINING YOUR VEHICLE
Front Park/Turn Signal and Sidemarker...
Owner's Manual - Page 367
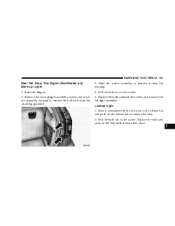
... tail light assembly. License Light 1. Pull the bulb out of the socket. Place a screwdriver in the slot next to remove it snaps into place.
7 MAINTAINING YOUR VEHICLE 367
Rear Tail, Stop, Turn Signal, Side Marker and Back-up Lights 1. Replace the bulb and push on the release tab to remove the ball stud form the attaching grommet...
Owner Manual Touring - Page 321
...!
Oil contamination will severely shorten bulb life. Rotate the bulb to the vehicle and pull the headlight module forward away from the vehicle, disengaging the assembly from the lower attachment clip.
2. Do not touch the new bulb with rubbing alcohol.
7 Remove the two screws securing the headlight module to the left and replace the bulb...
Owner Manual Touring - Page 322
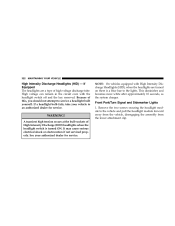
... Sidemarker Lights 1. A transient high tension occurs at the bulb sockets of high voltage discharge tube. WARNING! If a headlight bulb fails, take your authorized dealer for service. Because of this, you should not attempt to the vehicle and pull the headlight module forward away from the vehicle, disengaging the assembly from the lower attachment clip.
322...
Owner Manual Touring - Page 324
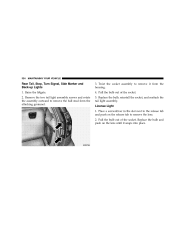
... tab to remove it snaps into place. Twist the socket assembly to remove the lens. 2. Raise the liftgate. 2. Place a screwdriver in the slot next to the release tab and push on the lens until it from the housing. 4. Remove the two tail light assembly screws and rotate the assembly outward to remove the ball stud form the attaching grommet.
3.
Similar Questions

What Does An Attachment Clip Look Like For A Headlight In A 2005 Chrysler
pacifica?
pacifica?
(Posted by shooSalvo 10 years ago)

Video Of How To Remove Temperature Control Of 05 Chrysler Pacifica
(Posted by kasfulkelo 10 years ago)
How To Remove Panel With Clock In Chrysler Pacifica
(Posted by JaMck 10 years ago)

How Do You Remove The Cable That Is Attached To The Gas Cap?
(Posted by Anonymous-74353 11 years ago)

Remove Transmission
Instructions
need instructions on removing transmission 2007 pacifica 4.0 L
need instructions on removing transmission 2007 pacifica 4.0 L
(Posted by tamithalmccoy 12 years ago)