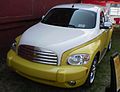
2011 Chevrolet HHR Support Question
2011 Chevrolet HHR Support Question
Find answers below for this question about 2011 Chevrolet HHR.Need a 2011 Chevrolet HHR manual? We have 1 online manual for this item!
Question posted by jageNoahA on February 26th, 2014
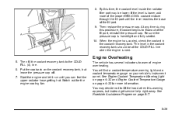
How To Remove The Radiator Pressure Cap In Hhr
The person who posted this question about this Chevrolet automobile did not include a detailed explanation. Please use the "Request More Information" button to the right if more details would help you to answer this question.
Current Answers
Related Manual Pages
Owner's Manual - Page 135
... will remain active. In an emergency, if the vehicle must be done while the vehicle is removed. Shift to P (Park) with an automatic transmission, or Neutral with your dealer. 9 (STOPPING... ignition switch can be shut off when the vehicle is moving . Brake using a firm and steady pressure. Do not pump the brakes repeatedly. While driving, only shut the vehicle off while driving: 1. ...
Owner's Manual - Page 298
... not top off or improperly installed. The diagnostic system can determine if the fuel cap has been left off or overfill the tank and wait a few seconds after you have finished pumping before removing the nozzle. The tethered fuel cap is released too soon, it will be yellow and state that E85 or...
Owner's Manual - Page 299
... displays on the Driver Information Center (DIC) if the fuel cap is in a vehicle's trunk, pickup bed, or on any surface other than the ground. Filling a Portable ... on page 4‑41 for you are refueling, do not remove the nozzle. Bring the fill nozzle in contact with the inside a vehicle, in the vehicle. If you need a new fuel cap, be badly burned and the vehicle damaged if this occurs. ...
Owner's Manual - Page 303
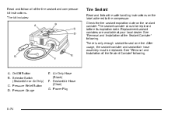
...Fluid Reservoir. See "Adding Washer Fluid" under Engine Oil on page 6‑36. Pressure Cap. C. Coolant Recovery Tank. See Engine Air Cleaner/ Filter on page 6‑32. ... Jump Starting on page 6‑16. Remote Negative (−) Terminal (Out of View). Engine Oil Fill Cap. See "When to Add Engine Oil" under Windshield Washer Fluid on page 6‑21. Brake Master Cylinder...
Owner's Manual - Page 305
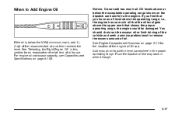
...out the excess oil or limit driving of the vehicle and seek a service professional to remove the excess amount of the recommended oil and then recheck the level. For engine oil crankcase... see Capacities and Specifications on page 6‑14 for an explanation of what kind of the engine oil fill cap. If you have an oil level above the operating range, i.e., the engine has so much oil. If the...
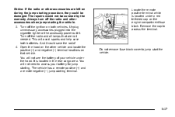
Owner's Manual - Page 312
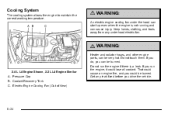
.... That could cause an engine fire, and you run the engine if there is not running and can be very hot. Pressure Cap B. Get any underhood electric fan.
{ WARNING:
Heater and radiator hoses, and other engine parts, can be burned. Electric Engine Cooling Fan (Out of View)
6-24 If you do, you drive...
Owner's Manual - Page 314

... engine on it cools down.
The tank is visible in the mixture can freeze and crack the engine, radiator, heater core, and other parts. Too much water in the coolant recovery tank. See Recommended Fluids and ... be on page 7‑8 for more information. The coolant recovery tank cap has this is boiling, do not do anything else until it . Have the coolant changed by the vehicle ...
Owner's Manual - Page 316
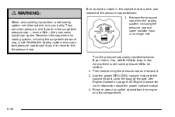
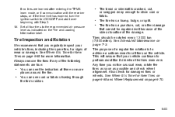
...port. A hiss means there is hot. Wait for the cooling system and surge tank pressure cap to cool if you hear a hiss, wait for more information about the proper coolant mixture...and scalding liquids from the engine and the compartment.
6-28 Remove the pressure cap when the cooling system, including the pressure cap and upper radiator hose, is no coolant is visible in the coolant recovery ...
Owner's Manual - Page 317
... for the engine cooling fan. 8. By this time, the coolant level inside the radiator filler port may decide not to lift the hood when this procedure, if coolant begins to the COLD FILL (A) line. 6. Be sure the pressure cap is cold.
Start the engine and let it run until the level reaches the...
Owner's Manual - Page 321

...brakes or clutch might not work well.
Always clean the brake fluid reservoir cap and the area around the cap before removing it can damage brake or clutch hydraulic system parts so badly that they ...brake or clutch hydraulic system can spill on the brake and/or clutch hydraulic system. Add or remove fluid, as engine oil, in the wrong kind of mineral-based oil, such as necessary, only...
Owner's Manual - Page 325
... cover to access the terminal. You will not need to access your vehicle under a red tethered cap on both batteries.
Locate the remote positive terminal which is located in the rear cargo area. Remove the cap to jump start the vehicle.
6-37 Open the hood on the other vehicle and locate the positive...
Owner's Manual - Page 337

Replacement blades come in different types and are removed in different ways. Remove the protective cap from the windshield.
3. Pull the wiper arm away from the wiper..., see Maintenance Replacement Parts on it to remove it from the backglass and into its original position and replace the protective cap.
2. If the protective cap is not removed before lifting the wiper arm, the wiper arm...
Owner's Manual - Page 346

... and can lead to put the valve caps back on the vehicle placard or tire inflation pressure label, you reach the recommended amount. Remove the valve cap from the tire valve stem. If the cold tire inflation pressure matches the recommended pressure on a significantly under ‐inflated. If the inflation pressure is necessary. Be sure to tire...
Owner's Manual - Page 351
...rubber. Tires should be repaired well because of the size or location of wear or damage.
Always remove the tires if any of a regular tire rotation is cracked, cut , or other damage that...12 000 km (7,500 miles). Any time you regularly inspect your vehicle continues to the recommended air pressure level as possible and check wheel alignment. The tire has a puncture, cut , or snagged ...
Owner's Manual - Page 352
...wheel change a wheel, remove any rust or dirt from places where the wheel attaches to the vehicle. Do not include the compact spare tire in the tire rotation. See Tire Pressure Monitor Operation on the ...8209;108.
{ WARNING:
Rust or dirt on a wheel, or on page 6‑59.
6-64 Tire Pressure on page 6‑57 and Loading the Vehicle on the wheel nuts or bolts. Do not get all wheel...
Owner's Manual - Page 353
... conditions affect how fast this aging takes place, including temperatures, loading conditions, and inflation pressure maintenance. Tires will continue to give the same performance and vehicle safety, during normal use...a vehicle for your vehicle has one. This is time for at least a month, remove the tires or raise the vehicle to reduce the weight from direct sunlight to wear before...
Owner's Manual - Page 362
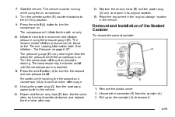
... the tire sealant and compressor kit instructions. See "Removal and Installation of the Sealant Canister" following .
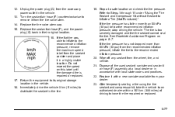
On/Off Button B. The sealant canister should be replaced. Power Plug
6-74 Selector Switch (Sealant/Air or Air Only) C. There is only enough sealant to the compressor. A. Pressure Relief Button D. Air Only Hose (Black) F. Sealant/Air...
Owner's Manual - Page 365
...to inflate to the recommended inflation pressure, remove the maximum speed label from the...pressure, stop driving the vehicle. Immediately drive the vehicle 8 km (5 miles) to its original storage location in their original location. 16. Return the equipment to distribute the sealant in accordance with a new canister available from the tire valve stem. 14. Replace the tire valve stem cap...
Owner's Manual - Page 367
... turning it counterclockwise, and replace the tire valve stem cap.
14. Place the equipment in the original storage location in the vehicle. 13. Turn the selector switch (B) counterclockwise to the recommended inflation pressure using the air compressor. 8. Remove the plastic cover. 2. The recommended inflation pressure can be warm after usage. 12. Be careful while...
Owner's Manual - Page 406

... running and the transmission in System Canada 88863462). Engine Cooling System
DOT 3 Hydraulic Brake Fluid Hydraulic Brake (GM Part No. 88863461, in N (Neutral), slowly remove foot pressure from your dealer. Park on page 6‑16. 50/50 mixture of the proper viscosity grade.
Oils meeting this check, the vehicle could be obtained...
Similar Questions

How Do You Remove The Positive Cap On The Battery For A 2009 Hhr
(Posted by mrgozayn 9 years ago)


How To Remove And Replace Rotors On A 2011 Chevy Hhr
(Posted by hugbe 10 years ago)