2011 Chevrolet HHR Support Question
2011 Chevrolet HHR Support Question
Find answers below for this question about 2011 Chevrolet HHR.Need a 2011 Chevrolet HHR manual? We have 1 online manual for this item!
Question posted by astwe on January 27th, 2014
Where Is The 10amp Hazard Fuse Located On Chevy Hhr
The person who posted this question about this Chevrolet automobile did not include a detailed explanation. Please use the "Request More Information" button to the right if more details would help you to answer this question.
Current Answers
Related Manual Pages
Owner's Manual - Page 1
2011 Chevrolet HHR Owner Manual M
In Brief ...1-1 Instrument Panel ...1-2 Initial Drive Information ...1-3 Vehicle Features ...1-15 Performance and Maintenance ...1-21 Seats and Restraint System ...2-1 Head Restraints ...2-2 Front Seats ...2-4 Rear ...
Owner's Manual - Page 2

2011 Chevrolet HHR Owner Manual M
Service and Appearance Care ...6-1 Service ...6-3 Fuel ...6-5 Checking Things Under the Hood ...6-12 Headlamp Aiming ...6-41 Bulb Replacement ...6-44 Windshield Wiper Blade Replacement ...6-49 ...
Owner's Manual - Page 3

...4123 Numéro de poste 6438 de langue française www.helminc.com
Index
To quickly locate information about the vehicle, use the index in this manual. For vehicles first sold in Canada, substitute...or due to changes subsequent to , GM, the GM logo, CHEVROLET, the CHEVROLET Emblem, and HHR are options that may or may not be obtained from your vehicle. Please refer to the purchase ...
Owner's Manual - Page 4

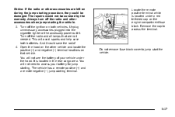
... which means "Do Not," "Do not do this," or "Do not let this manual describe hazards and what to do to avoid or reduce them. Symbols are shown along with a high level ...a slash through it is something that could result in injury or death. iv
Danger indicates a hazard with the text describing the operation or information relating to see your owner manual for additional instructions ...
Owner's Manual - Page 5

... Steering Wheel Controls or OnStar® $ : Brake System Warning Light " : Charging System I : Cruise Control B : Engine Coolant Temperature O : Exterior Lamps # : Fog Lamps
. : Fuel Gauge + : Fuses 3 : Headlamp High/Low-Beam Changer j : LATCH System Child Restraints * : Malfunction Indicator Lamp : : Oil Pressure } : Power / : Remote Vehicle Start > : Safety Belt Reminders 7 : Tire Pressure...
Owner's Manual - Page 9
...).
B. W. Traction Control System (TCS) on page 4‑27. Passenger Airbag Status Indicator on page 5‑8 (If Equipped). See Driver Information Center (DIC) on page 4‑3. P. V. Hazard Warning Flashers on page 4‑38. S. U. Audio System(s) on page 4‑4. Shift Lever (Manual Shown). Turn Signal/Multifunction Lever on page 4‑52.
Initial Drive...
Owner's Manual - Page 11

... back off . Liftgate
Open the liftgate by itself. Canceling a Remote Start
To cancel a remote start:
. See Remote Vehicle Start on the hazard warning flashers. From inside, use the manual lock knobs located at the vehicle and press and hold / until the parking lamps turn off .
. .
Turn on page 3‑7.
Turn the ignition...
Owner's Manual - Page 169

...to lock in place. To adjust the steering wheel: 1. The tilt lever is located on and off . This warns others that you are having trouble.
Pull the... . 2. Do not adjust the steering wheel while driving.
4-3 Instrument Panel Overview
Hazard Warning Flashers
| (Hazard Warning Flasher): Press this button located on the instrument panel, to make the front and rear turn the flashers off ...
Owner's Manual - Page 182
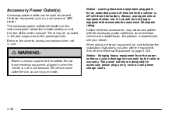
... outlets are designed for an extended period of the center console. The power outlets are located on the instrument panel below the climate controls and at the rear of time while the... and do not plug in use because the vehicle could overload vehicle and adapter fuses. When adding electrical equipment, be an outlet in for accessory power plugs only, such as a cell phone or MP3...
Owner's Manual - Page 184
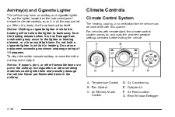
..., located on and uses the prior temperature settings selected before exiting the vehicle.
Fan Control C. Air Recirculation G. To use equipment exceeding maximum amperage rating of 15 amperes. Do not hold a cigarette lighter in while it is ready, it will not allow the lighter to the lighter or heating element, or a fuse could...
Owner's Manual - Page 325
...located under the hood. Remove the cap to jump start the vehicle.
6-37 Notice: If the radio or other accessories are not needed. And it could be covered by the warranty. Do not remove fuse...could save both vehicles.
Turn off the radio and other vehicle and locate the positive (+) and negative (−) terminal locations on that are left on during the jump starting . Turn off the...
Owner's Manual - Page 363
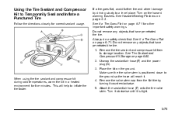
.../air hose (F) and the power plug (G). 3. Remove the valve stem cap from its storage location. Using the Tire Sealant and Compressor Kit to Temporarily Seal and Inflate a Punctured Tire
Follow the ...75 Make sure the tire valve stem is tight.
This will reach it. 4. See Hazard Warning Flashers on the ground.
When using the tire sealant and compressor kit during cold ...
Owner's Manual - Page 366
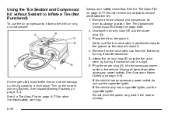
... 6‑80. 2. See Tire Sealant and Compressor Kit Storage on page 6‑71. See Hazard Warning Flashers on the ground. Remove the tire sealant and compressor kit from other important safety warnings...hose (E) and the power plug (G). 3. Place the kit on page 4‑3. Turn on the hazard warning flashers. Using the Tire Sealant and Compressor Kit without Sealant to Inflate a Tire (Not ...
Owner's Manual - Page 368

Replace with a new canister which is located in the rear compartment storage area. 1. Tire Sealant and Compressor Kit Storage
The tire sealant and compressor kit is available from your dealer. 5. See Liftgate on the hazard warning flashers.
Screw the connector (B) to a ... plastic cover back on page 4‑3.
6-80 4. Push the new canister into place. 6. See Hazard Warning Flashers on .
Owner's Manual - Page 391

... some feature of the vehicle that has the same amperage. Use the fuse puller to disconnect the four clips, and access the fuses. There are also one that you can get along without - like ...the battery. If the band is located on the road and do not have a spare fuse, you can "borrow" one or two fuses located at the silver-colored band inside the fuse. This greatly reduces the chance of...
Owner's Manual - Page 393

... Power Steering Rear Defogger Empty Body Control Module 3 Starting System
Engine Compartment Fuse Block
The underhood fuse block is located on the driver side of the fuses, relays, and features shown. Relays 30 31 32
Usage
Climate Control System Empty Retained Accessory Power (RAP)
The vehicle may damage it. Always keep the ...
Owner's Manual - Page 395

... Relay (Panel Van Only), and the Right Rear Access Panel Door Relay (Panel Van Only) are located underhood in front of the left shock tower. Fuses 66 67 69 Relays 14 15 16 17 18 19 24 26 28 34 35 38 39 48
...-Beam
A Center High-Mounted Stoplamp Relay, and a Rear Access Panel Door Interlock Relay (Panel Van only), are located in the rear of the vehicle behind the right rear quarter trim panel.
Owner's Manual - Page 435
...Electrical System Engine Compartment Fuse Block ...6-105 Floor Console Fuse Block ...6-103 Fuses and Circuit Breakers ...6-103 Headlamp Wiring ...6-102 Power Windows and Other Power Options ...6-102 Windshield Wiper Fuses ...6-102 Electronic Immobilizer PASS...84 Flash-to-Pass ...4-5 Flashers, Hazard Warning ...4-3 Flat Tire ...6-71 Changing ...6-80 Flat Tire, Storing ...6-89 Floor Mats ...3-46
i-5
Owner's Manual - Page 436

...Engine Compartment Fuse Block ...6-105 Floor Console Fuse Block ...6-103 Fuses and Circuit Breakers ...6-103 Windshield Wiper ...6-102 i-6
G
Gasoline Octane ...6-6 Specifications ...6-6 Gauges Engine Coolant Temperature ...4-33 Fuel ...4-38 Speedometer ...4-25 Tachometer ...4-25 Glove Box ...3-46 GM Mobility Reimbursement Program ...8-6
H
Halogen Bulbs ...6-44 Hazard Warning Flashers ...4-3 Head...
Owner's Manual - Page 444
...
Warning Lights, Gauges, and Indicators ...4-23 Warnings DIC Warnings and Messages ...4-41 Hazard Flashers ...4-3 Safety and Symbols ...iv
Wheels Alignment and Tire Balance ...6-70 Different ......4-6 Washer Fluid ...6-32 Wiper Blade Replacement ...6-49 Wiper Blades, Cleaning ...6-98 Wiper Fuses ...6-102 Wipers ...4-5 Winter Driving ...5-20 Wiper Activated Headlamps ...4-11 Wipers Rear Washer ...4-7
X...
Similar Questions


Where Is The Fuse Box Located On The Chevy Hhr 2011
(Posted by tarscool 10 years ago)

How To Remove Fuel Pump Fuse Location In 208 Chevy Hhr
(Posted by Lauscha 10 years ago)