2010 Chevrolet Impala Support Question
2010 Chevrolet Impala Support Question
Find answers below for this question about 2010 Chevrolet Impala.Need a 2010 Chevrolet Impala manual? We have 1 online manual for this item!
Question posted by Paul1datyl on April 19th, 2014
How Many Cables To Connect While Installing Battery In 2010 Impala
The person who posted this question about this Chevrolet automobile did not include a detailed explanation. Please use the "Request More Information" button to the right if more details would help you to answer this question.
Current Answers
Related Manual Pages
Owner's Manual - Page 1

2010 Chevrolet Impala Owner Manual
In Brief ...1-1 Instrument Panel ...1-2 Initial Drive Information ...1-4 Vehicle Features ...1-15 Performance and Maintenance ...1-19 Seats and Restraint System ...2-1 Head Restraints ...2-2 Front Seats ...2-4 Rear ...
Owner's Manual - Page 3

... en français auprès du concessionnaire ou à l'adresse suivante: GENERAL MOTORS, GM, the GM Emblem, CHEVROLET, the CHEVROLET Emblem, the IMPALA Emblem, and the name IMPALA are registered trademarks of the features found on your specific vehicle either because they are options that may or may not be...
Owner's Manual - Page 14
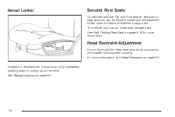
Head Restraint Adjustment
Do not drive until the head restraints for more information see Head Restraints on page 2-10 for all occupants are installed and adjusted properly. For more information.
See Split Folding Rear Seat on page 2-2. Increase or decrease the lumbar support by repeatedly pushing down to create ...
Owner's Manual - Page 22

... Radio
XM is a satellite radio service that you want to the auxiliary input jack using a 3.5 mm (1/8 in) input jack cable. External devices such as iPod®, MP3 players, etc. can be connected to change. 4. See "Using the Auxiliary Input Jack" under Radio(s) on page 4-58. Turn the radio on page 4-59.
1-16...
Owner's Manual - Page 28
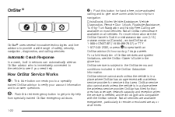
... all services are available on most vehicles. How OnStar Service Works Q : This blue button connects you need help from specially trained OnStar emergency advisors. For more information see if you to ... Response
In a crash, built in sensors can automatically alert an OnStar advisor who is immediately connected to the vehicle to see the OnStar Owner's Guide or visit www.onstar.com (U.S.) or ...
Owner's Manual - Page 29

... in a crash, hills, tall buildings, tunnels, weather or wireless phone network congestion. OnStar Steering Wheel Controls
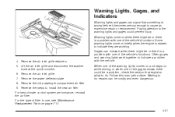
This vehicle may have a working electrical system, including adequate battery power, for more information. If the light appears clear (no light is active.
1-23 Your Responsibility
Increase the volume of the vehicle in (e.g. the direction...
Owner's Manual - Page 32

... front seats have adjustable head restraints in the outboard seating positions.
{ WARNING:
With head restraints that are installed and adjusted properly.
Do not drive until the head restraints for all occupants are not installed and adjusted properly, there is a greater chance that the top of the restraint is at the same height...
Owner's Manual - Page 57

... are available through your dealer/retailer.
Pretensioners work only once. If the pretensioners activate in the rear seat. Squeeze the buttons (A) on the shoulder. When installed and properly adjusted, the comfort guide positions the belt away from the face and neck, but not falling off the shoulder. After the adjuster is...
Owner's Manual - Page 58

The elastic cord must be under the belt and the guide on the edge of the guide.
2-28 Pull the guide out from the pocket on top. 2. Be sure that the belt is how to install a comfort guide to the safety belt: 1. Here is not twisted and it lies flat. Place the guide over the belt, and insert the two edges of the belt into the slots of the seatback.
3.
Owner's Manual - Page 73
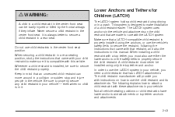
... designed to use child restraints in the center front seat. This system is properly installed using only the top tether and anchor. Not all vehicle seating positions or child ...compatible with these attachments in your vehicle - even when no child is in it is installed, be installed using the anchors, or use the LATCH system in your child restraint to secure the ...
Owner's Manual - Page 102
... sensing system.
{ WARNING:
For up to 10 seconds after the ignition is turned off and the battery is disconnected, an airbag can be injured if you is put on page 4-24 for you are ...a briefcase, handbag, grocery bag, laptop or other electronic device, is qualified to do not install a child restraint or allow anyone to an airbag when it in several places around the vehicle. If ...
Owner's Manual - Page 165

...under the instrument panel. Certain accessory plugs may not be sure to follow the proper installation instructions included with your dealer/retailer before adding electrical equipment. Check with the equipment. ... exceeds the maximum amperage rating of 20 amperes. Power is off will drain the battery.
Check with a center console, one outlet is closed. Do not hang any ...
Owner's Manual - Page 171
...'s functions. Lift the air inlet grille and disconnect the washer hose at the quick-connect. 6. Paying attention to use, see Maintenance Replacement Parts on briefly when the engine is wrong before it becomes serious enough to install the new air filter. Reverse the steps to cause an expensive repair or...
Owner's Manual - Page 218

...on a CD-R or CD-RW disc. The portable audio device continues playing until it is not connected, No Aux Input Device Found may have MP3 capability. Using the Auxiliary Input Jack
The radio system ...is playing. do not plug the headphone set up any auxiliary device while the vehicle is in ) cable to set into the front auxiliary input jack. Drivers are recorded using ID3 tags version 1 and 2....
Owner's Manual - Page 308

... from running down. You can explode. Wash hands after handling.
6-38 Battery
Refer to cause cancer and reproductive harm. Infrequent Usage: Remove the black, negative (−) cable from the battery to keep the battery from the battery or use a battery trickle charger.
{ DANGER:
Battery posts, terminals, and related accessories contain lead and lead compounds, chemicals known to...
Owner's Manual - Page 309

...:
Batteries can hurt you . Jump Starting
If your vehicle's battery has run down, you may want . It must have a 12-volt battery with... negative grounds to burn you . If they are not touching each other. Get the vehicles close enough so the jumper cables... to do not follow these steps exactly, some jumper cables to use vehicles with 12-volt systems with a negative ground...
Owner's Manual - Page 311

... too. Use a flashlight if you need to add water to the battery installed in your eyes or on your skin, flush the place with water and get a shock. Do not connect positive (+) to explode. If you accidentally get a short that the jumper cables do not need more light. If they do not...
Owner's Manual - Page 312
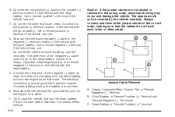
... (+) Terminal 6. Use a remote positive (+) terminal if the vehicle has one. 7. Jumper Cable Removal A. Connect the red positive (+) cable to the dead battery. Do not let the other end touch anything until the next step. Connect the other metal. Always connect and remove the jumper cables in the wrong order, electrical shorting may occur and damage the vehicle...
Owner's Manual - Page 313
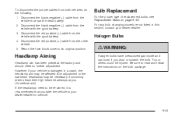
... 6-49. If the headlamps need no further adjustment. Disconnect the black negative (−) cable from both vehicles, do the following: 1. For any bulb changing procedure not listed in this section, contact your vehicle is recommended that had the dead battery. 2. Headlamp Aiming
Headlamp aim has been preset at you (for service.
6-43...
Owner's Manual - Page 319
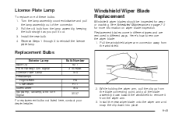
... 194 H9 H11 194 3057
For replacement bulbs not listed here, contact your dealer/retailer.
2. Install the new wiper blade onto the wiper arm and snap the clip down toward the windshield to ... ways.
Pull the windshield wiper arm connector away from the blade connecting point, and pull the blade assembly down into place. 6-49 Install the new bulb. 4. While holding the wiper arm, pull the...


