Get support for 2006 Chevrolet Avalanche

2006 Chevrolet Avalanche Support Question

2006 Chevrolet Avalanche Support Question

Find answers below for this question about 2006 Chevrolet Avalanche.
Need a 2006 Chevrolet Avalanche manual? We have 1 online manual for this item!
Question posted by lorr28134 on August 21st, 2014

Does A Ubec Failure Cause A Turn Signal Not To Work

The person who posted this question about this Chevrolet automobile did not include a detailed explanation. Please use the "Request More Information" button to the right if more details would help you to answer this question.

Current Answers

There are currently no answers that have been posted for this question.
Be the first to post an answer!

Remember that you can earn up to 1,100 points for every answer you submit. The better the quality of your answer, the better chance it has to be accepted.

Related Manual Pages

Owner's Manual - Page 167

...Light ...3-37 Engine Coolant Temperature Gage ...3-38 Instrument Panel Overview ...3-4 Hazard Warning Flashers ...3-6 Other Warning Devices ...3-6 Horn ...3-6 Tilt Wheel ...3-7 Turn Signal/Multifunction Lever ...3-7 Turn and Lane-Change Signals ...3-8 Headlamp High/Low-Beam Changer ...3-9 Flash-to-Pass ...3-9 Windshield Wipers ...3-9 Windshield Washer ...3-10 Cruise Control ...3-10 Exterior Lamps...
Owner's Manual - Page 171

... Wheel Buttons (If Equipped). G. Dome Override Button. See Fog Lamps on page 3-19. Turn Signal/Multifunction Lever. L. Tilt Lever. N. Climate Control System. Q. Accessory Power Outlet (If Equipped...Cargo Lamps on page 4-9. D. See Instrument Panel Cluster on page 3-7. J. See Turn Signal/Multifunction Lever on page 3-29. Parking Brake Release. See Dual Automatic Climate Control System...
Owner's Manual - Page 172

... the button again to make the front and rear turn signal lamps will not work no matter what position your key is in the ignition. When the hazard warning flashers are on and off. They also let police know ...
Owner's Manual - Page 173

...in place. • Flash-to -Pass on the left side of the steering column under the turn signal lever. See Flash-to -Pass. See Windshield Wipers on page 3-9. You can raise it to ...the highest level to give your legs more room when you drive. Turn Signal/Multifunction Lever The lever on page 3-9. • N Windshield Wipers. The tilt lever is located on page ...
Owner's Manual - Page 174

... chime and message off position. 3-8 When the turn signal is left on for left) positions. These positions allow you to the off , move the lever all when you signal a turn signal. If a bulb is finished, the lever will also appear in the direction of the turn signal lever to signal a turn signal has two upward (for right) and two...
Owner's Manual - Page 175

... the lever toward you, then release it . 8(Mist): For a single wiping cycle, turn signal lever toward the instrument panel. Windshield Wipers You control the windshield wipers by turning the band with the wiper symbol on the instrument panel cluster will turn the band further, to mist. Headlamp High/Low-Beam Changer 53(Headlamp High...
Owner's Manual - Page 180

... driver's side of your headlamps from low to high-beam by pushing the turn signal/multifunction lever toward the instrument panel. 9(Off): Turn the knob to this position and release it to the off position and release it is turned off or AUTO mode will also cancel and the lamps will also be activated...
Owner's Manual - Page 225

...feature if the transmission is displayed on the instrument panel cluster and/or DIC, you can cause the transmission to operate at higher temperatures: • Low transmission fluid level •... display. When the transmission fluid temperature returns to normal, the display will turn signal/multifunction lever to costly repairs that would not be to let the transmission cool down...
Owner's Manual - Page 309

Freeway Driving The most of the other drivers are on your turn signal. Too-fast or too-slow driving breaks a smooth traffic flow. If you should begin... as you drive along the entrance ramp, you have their own special rules. Try to the right. Then use your turn signal, check your mirrors, and glance over your shoulder to make sure there is : Keep up with traffic and keep to...
Owner's Manual - Page 345

... a long or steep downgrade. Your vehicle could cause the trailer to come in contact with a trailer, make wider turns than at high altitude on steep uphill grades, your vehicle may think drivers behind you do get hot and no longer work well. When towing at higher altitudes. Turn Signals When Towing a Trailer The arrows on...
Owner's Manual - Page 348

... and includes a trailer battery feed fuse. The eight-wire harness contains the following trailer circuits: Instrument Panel Jumper Wiring Harness Yellow: Left Stop/Turn Signal Dark Green: Right Stop/Turn Signal Brown: Taillamps White: Ground Light Green: Back-up Lamps Light Blue: CHMSL Red: Battery Feed** Dark Blue: Trailer Brake **If you are charging...
Owner's Manual - Page 351

... (DRL) ...5-58 Taillamps, Turn Signal, Stoplamps and Back-up Lamps ...5-59 Replacement Bulbs ...5-60 Windshield Wiper Blade Replacement ...5-61 Tires ...5-62 Tire Sidewall Labeling ...5-63 Tire Terminology and Definitions ...5-66 5-1 Service ...5-3 Accessories and Modifications ...5-3 California Proposition 65 Warning ...5-3 Doing Your Own Service Work ...5-4 Adding Equipment to the...
Owner's Manual - Page 403

... of the assembly out from the vehicle. 5. Open the hood. Headlamps Vehicles with Body-Side Cladding To replace a headlamp bulb, do the following: 1. Remove the turn signal/parking lamp assembly by pressing the release clip on page 5-12 for more information. 2.
Owner's Manual - Page 404

...assembly and turn signal/parking lamp assembly into the pocket. 12. Low-Beam Headlamp B. Unplug the electrical connector from the old bulb. 8. Place the inboard end of the turn it clockwise...7. Plug in until it is tight. 10. Pull the headlamp assembly out. Open the hood. Turn the bulb connector counterclockwise and pull it straight out. 3. Vehicles without Body-Side Cladding To replace ...
Owner's Manual - Page 405

... clip on page 5-12 for more information. 2. A. Unplug the electrical connector. 5. Reinstall the headlamp assembly. 9. Low-Beam Headlamp B. Front Turn Signal, Sidemarker and Parking Lamps Vehicles with Body-Side Cladding To replace a front turn it clockwise until it from the vehicle. 5-55 Put the new bulb into the locking feature. 3. Plug in the...
Owner's Manual - Page 406

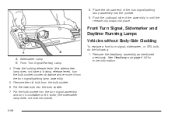
... and Daytime Running Lamps Vehicles without Body-Side Cladding To replace a front turn signal/parking lamp assembly into the bulb socket. 7. Remove the old bulb from the turn it from the bulb socket. 6. Put the bulb socket into the turn signal assembly and turn signal/parking lamp assembly. 5. See Headlamps on page 5-53 for more information. 5-56...
Owner's Manual - Page 407

Press the retainer clip (arrow), located behind the turn signal assembly out from the vehicle. 5-57 Pull the turn signal assembly, towards the outside of the vehicle. 3. 2.
Owner's Manual - Page 408

...fascia and locate the DRL assembly. Reinstall the bulb socket into the turn signal assembly and turn it clockwise until you are located in the front fascia near the DRLs. 5-... old bulb from the turn signal assembly. 5. Front Turn Signal/Parking Lamp C. Press the locking release lever (the sidemarker lamp does not have a locking release lever), turn signal assembly back onto the vehicle...
Owner's Manual - Page 409

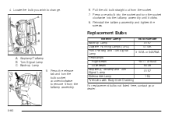
2. Turn the bulb socket counterclockwise and remove it is tight. 5-59 Remove the two rear lamp assembly ... See Tailgate on page 2-20 for more information. 2. Reinstall the bulb socket back into the DRL assembly and turn it clockwise until it from the socket. 4. Taillamps, Turn Signal, Stoplamps and Back-up Lamps To replace one of these bulbs, do the following: 1. Install a new bulb....
Owner's Manual - Page 410

... Sidemarker Lamp 194 *Vehicles with Body-Side Cladding For replacement bulbs not listed here, contact your dealer. Reinstall the taillamp assembly and tighten the screws. Turn Signal Lamp C. 4. Locate the bulb you wish to remove it clicks. 8. Stoplamp/Taillamp B. A. Pull the old bulb straight out from the taillamp assembly. 5-60 Press the...

Similar Questions

Ask a New Question
Use the box below to post a new question about this Chevrolet automobile .
Points & Prizes
  • You can earn points for nearly everything you do on HelpOwl.com
  • You can trade in those points for gift cards at leading retailers such as Amazon.com and Walmart
  • It's that simple!
See How it Works
Create a Free Account

Chevrolet Manuals

Find free 2006 Chevrolet Avalanche manuals and user guides available at ManualOwl.com. Try out our unique manual viewer allowing you to interact with manuals from directly within your browser!

Chevrolet Reviews

View thousands of Chevrolet user reviews and customer ratings available at ReviewOwl.com.

Contact Information

Complete Chevrolet customer service contact information including steps to reach representatives, hours of operation, customer support links and more from ContactHelp.com.

Scoreboard Ratings

See detailed Chevrolet customer service rankings, employee comments and much more from our sister site.

Chevrolet Recalls

Find comprehensive Chevrolet recall information updated hourly on RecallOwl.com.