
2000 Chevrolet Venture Support Question
2000 Chevrolet Venture Support Question
Find answers below for this question about 2000 Chevrolet Venture.Need a 2000 Chevrolet Venture manual? We have 1 online manual for this item!
Question posted by CadoChand on April 19th, 2014
Where Do I Attach The Jumper Cables To A 2000 Chevy Venture
The person who posted this question about this Chevrolet automobile did not include a detailed explanation. Please use the "Request More Information" button to the right if more details would help you to answer this question.
Current Answers
Answer #1: Posted by helpowlsupport on April 19th, 2014 4:00 AM
helpowlsupport

Member since:
November 17th, 2013 Points: 369,900

Member since:
November 17th, 2013 Points: 369,900
hello
all you need to do is pop the hood and connect the red clop of the wire to the positive (+) side of the battery and black clip of the wire on the negative (-) side of the battery. the positive and negative are marked as represented by the yumbols on the battery
thankyou
"@ your service, [email protected] "
Related Manual Pages
Owner's Manual - Page 2

Bumper-to-Bumper
3-years/36,000 miles (60 000 km)
Limited Warranty
Every 2000 Venture under warranty is backed with the following services:
1-800-CHEV-USA
( For vehicles purchased in Canada, call 1-800-268-6800)
that provides in an emergency:
Courtesy Transportation
Free lockout assistance Free dead-battery assistance Free out-of-fuel assistance Free flat-tire change Emergency towing
Owner's Manual - Page 3
2000 Chevrolet Venture Owner's Manual
Litho in U.S.A. Part Number 10423670 A First Edition
© Copyright General Motors Corporation 1999 All Rights Reserved
i
Owner's Manual - Page 8
... manual in Canada, substitute the name "General Motors of General Motors Corporation.
GENERAL MOTORS, GM, the GM Emblem, CHEVROLET, the CHEVROLET Emblem and the name VENTURE are registered trademarks of Canada Limited" for Chevrolet Motor Division whenever it when you sell the vehicle, please leave this manual. This manual includes the...
Owner's Manual - Page 21
... with the seatback in the upright position. 1. The other lever is locked into place.
3. This mini-buckle is in the upright position, unhook the side attachment for passengers.
Lift the seatback recliner lever or pull the nylon strap on the right side of the seat to remove the seat belt, if...
Owner's Manual - Page 23
... they face rearward because they won't latch that diagram. See "Seat Controls" in the full rear position before beginning this section for the legs to attach correctly.
1. Replacing the Split Bench Sections Make sure the seatback is in the beginning of this procedure. Make sure the seat is in the upright...
Owner's Manual - Page 24
If the front latches are not attached correctly, the rear legs will not attach to check that it is in the full rear position. 3. Firmly push the rear hooks onto the rear ...so that the seat is locked down on the rear of floor pins. If the front legs are not attaching correctly, check that the front hooks clear the floor pins.
Try to raise the seat to the rear set of the seat. 4....
Owner's Manual - Page 25
...be seriously injured. After installing the seat, always check to be sure it is improperly routed, not properly attached, or twisted won't provide the protection needed in the vehicle could be injured. That could move around in ...safety belt that the safety belts are properly routed and attached, and are not twisted. Always press rearward on the seatback to check that it locks upright. 6....
Owner's Manual - Page 30
... won't latch that diagram. Replacing the Bucket Seats Don't put the seats in the full rear position before beginning this section for the legs to attach correctly. The CENTER OR LEFT seat fits in the center location or in the beginning of floor cups. See "Seat Controls" in either row, the...
Owner's Manual - Page 31
... Push and pull on the back of the seat. If the front latches are not attached correctly, the rear legs will not attach to be injured. That could be sure it is in place. People in a collision...properly when installing it locks upright. 6. If the front legs are not attaching correctly, check that the front hooks clear the floor pins. Try to raise the seat to the ...
Owner's Manual - Page 34
Push the rear of floor pins. 3. The right chair goes in the A and C sets of floor pins.
2. Push and pull on the seat to lock the rear latches onto the rear set of the seat down to be sure it is properly attached. 1. Hook the front latches over the front floor pins.
1-22 Replacing the Captain's Chairs The left chair goes in the D and F sets of floor pins.
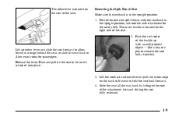
Owner's Manual - Page 54
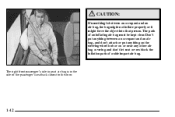
The right front passenger's side impact air bag is between an occupant and an air bag, and don't attach or put anything between an occupant and an air bag, the bag might not inflate properly or it might force the object into that person. ...
Owner's Manual - Page 103
... restraint system from doing its job, have them repaired or replaced. (The air bag system does not need regular maintenance.)
1-91 To wear it, just attach it to order it repaired. If your vehicle that might keep a safety belt or built-in to the regular safety belt. When you . Checking Your...
Owner's Manual - Page 136
... the liftgate open because carbon monoxide (CO) gas can be dangerous to its highest speed with the liftgate open or if electrical wiring or other cable connections must pass through the seal between the body and the liftgate: D Make sure all the way. Lamps in the rear of the vehicle will...
Owner's Manual - Page 151
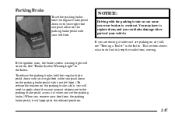
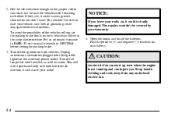
... will come on any hill, see "Towing a Trailer" in the Index. NOTICE:
Driving with your left foot. (To release the tension on the parking brake cable, you will need to apply about the same amount of your vehicle. If you could also damage other parts of pressure to replace them, and...
Owner's Manual - Page 172
... or rearward. Both outside mirrors are heated when you will fold almost flush with the vehicle. In the rearward position, they really are used to attach the seats, to prevent the door from the driver's seat. Your mirrors have the extended wheelbase version, you could hit a vehicle on your shoulder before...
Owner's Manual - Page 178
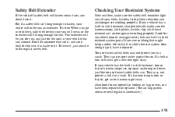
Attach the lower hooks to the metal rings on the floor of your vehicle, as far forward as you can. Once you've loaded items into ... retain its elasticity, and to keep the rear exit clear. The side of the convenience net closest to the front of 100 lbs. (45 kg). Attach the upper loops to the posts on either front seat or in place.
Owner's Manual - Page 293
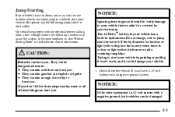
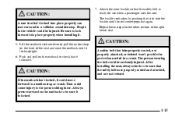
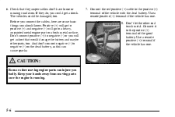
... with a negative ground, both vehicles can be dangerous because: D They contain acid that can explode or ignite.
If you don't follow these steps exactly, some jumper cables to start the battery if the hydrometer looks clear or light yellow. CAUTION:
Batteries can hurt you . D They contain gas that wouldn't be covered by...
Owner's Manual - Page 294
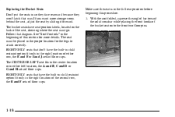
... start procedure. Keep hands, clothing and tools away from any underhood electric fan.
5-4 You wouldn't be badly damaged. 2. Get the vehicles close enough so the jumper cables can injure you don't want.
In addition, it could cause a ground connection you . If they are, it could save both vehicles involved in NEUTRAL before...
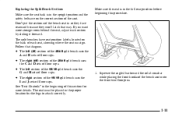
Owner's Manual - Page 296
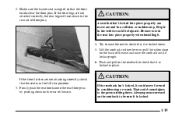
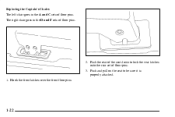
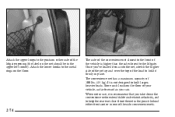
... a body metal surface.
If they do, you should know. Use a remote positive (+) terminal if the vehicle has one . The vehicles could get a short that the jumper cables don't have loose or missing insulation. 6. Keep your hands away from moving engine parts can cause sparks.
7. Positive (+) will go to positive (+) and negative (-) will...
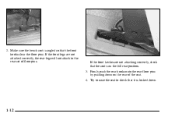
Owner's Manual - Page 297
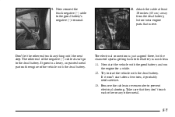
... electrical shorting. The electrical connection is much less. 11. Remove the cables in reverse order to the dead battery. Attach the cable at least 18 inches (45 cm) away from the dead battery,... needs service. 13.
Don't let the other metal.
5-7 9.
Now connect the black negative (-) cable to the battery is just as good there, but not near engine parts that they don't touch each...
Similar Questions

What Is The Correct Tire Rotation On A 2000 Chevy Venture
(Posted by jsmiamazin 9 years ago)

How Do U Put Heater Hoses On A 2000 Chevy Venture
(Posted by nicKre8iv 10 years ago)

Where Is The Alt/sense Fuse On A 2000 Chevy Venture
(Posted by riri4alfett 10 years ago)

Does 2000 Chevy Venture Have A Reset On Speedometer
(Posted by saBaid 10 years ago)

2000 Chevy Venture Pwr Sliding Door Lock Will Not Unlock
(Posted by czyzcat 11 years ago)