Canon PIXMA MX892 Support Question
Canon PIXMA MX892 Support Question
Find answers below for this question about Canon PIXMA MX892.Need a Canon PIXMA MX892 manual? We have 11 online manuals for this item!
Question posted by Micc on October 4th, 2013
Where To Enter Numbers On Canon Pixma 892
The person who posted this question about this Canon product did not include a detailed explanation. Please use the "Request More Information" button to the right if more details would help you to answer this question.
Current Answers
Related Canon PIXMA MX892 Manual Pages
Setting Up the FAX - Page 1
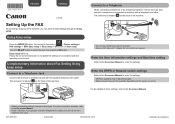
... to a telephone jack with the operating environment. QT5-4896-V01
XXXXXXXX
©CANON INC.2012
PRINTED IN XXXXXXXX
Enter the User information settings and Date/time setting
Refer to the On-screen Manual to..., be available depending on the back of the machine, you can enter the fax settings through the Easy setup. Enter the DRPD or Network switch settings
Refer to the On-screen Manual ...
Guide for Printer Setup for Network - Page 3
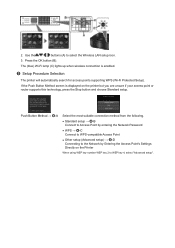
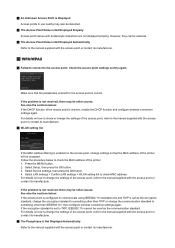
...The (blue) Wi-Fi lamp (C) lights up when wireless connection is displayed on the Printer
When using WEP key number WEP key 2 to select the Wireless LAN setup icon.
3. 2. Push Button Method ... Other setup (Advanced setup) → d-D Connecting to the Network by Entering the Access Point's Settings Directly on the printer but you are unsure if your access point or router supports this technology...
Guide for Printer Setup for Network - Page 5
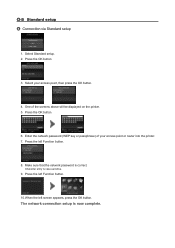
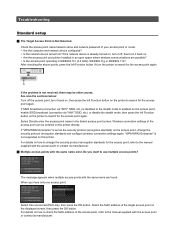
Select Standard setup. 2. Enter the network password (WEP key or passphrase) of the screens above will be displayed on the printer. 5. The network connection setup is correct. Make sure that the network password is ... d-B Standard setup d Connection via Standard setup
1. Select your access point or router into the printer. 7. Press the left screen appears, press the OK button.
Guide for Printer Setup for Network - Page 13
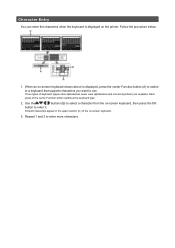
... can enter the characters when the keyboard is displayed on -screen keyboard shown above is displayed, press the center Function button (A) to switch to a keyboard that supports characters you want to use. Follow the procedure below.
1. Three types of the center Function button switches the keyboard type.
2.
When an on the printer.
Guide for Printer Setup for Network - Page 14
... operating in the Select access point screen. If "WPA/WPA2 Enterprise" is not supported on this printer.
Select the MAC address of your access point or router. • Are the computer and network..." SSID, etc.) is disabled or the stealth mode is not resolved, there may be entered on the printer directly. If SSID broadcast (connection via "ANY" SSID, etc.) or disable the stealth mode,...
Guide for Printer Setup for Network - Page 16
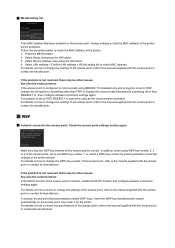
...cannot be accepted. If encryption is set to check the MAC address of the printer. 1. In addition, when using WEP key number 2, 3 or 4 of the access point, set to TKIP, change the settings... of the access point, refer to use WEP key number 1, or select a WEP key number by entering wireless connection settings of the printer directly. If using IEEE802.11n standard only and encryption is...
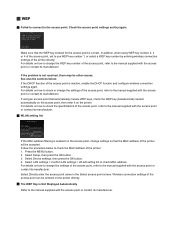
Guide for Printer Setup for Network - Page 19
... multiple AccessPoints, then press the OK button. If the network device is not resolved, there may be entered on the printer directly. After checking the above points, press the left Function button on this printer. Select Directly enter the access point name in IEEE802.11n (2.4 GHz), IEEE802.11g or IEEE802.11b? Select the MAC...
Guide for Printer Setup for Network - Page 20
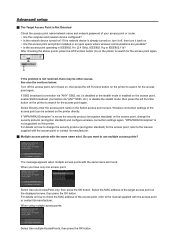
...the MAC address filtering is enabled on how to change settings so that the passphrase entered for the access point is set as the communication standard. Select Device settings, then press... with the access point or contact its manufacturer.
Make sure that the MAC address of the printer will be accepted. Press the MENU button. 2. Select Setup, then press the OK button....
Guide for Printer Setup for Network - Page 21
... contact its manufacturer. Follow the procedure below : If the DHCP function of the access point, refer to use WEP key number 1, or select a WEP key number by entering wireless connection settings of the printer. 1. Select LAN settings > Confirm LAN settings > WLAN setting list to the access point. Check the access point settings...
Guide for Printer Setup for Network - Page 22

...button. 7 Select IPv4, then press the OK button. 8. To specify the IP address of the printer and configure wireless connection settings again. Select Setup, then press the OK button. 3. Select ...the setup is inactive, enable the DHCP function or specify the IP address (IPv4 only) of the printer, follow the procedure below. 1. The device may not be able to connect to the ...
MX890 series Specifications - Page 1
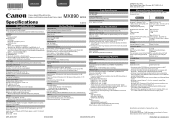
...chart for US specifications and Canon FAX Standard chart No.1 for 5 years after every 20 transactions) Sequential broadcasting (max. 101 destinations) Rejected numbers (max. 10 destinations)...) Regular dialing (with Numeric buttons) Automatic redialing Manual redialing (with the Canon inkjet printer.
Communication distance: Indoors 164 feet/50 m * Effective range varies depending on...
Configuraci?n del FAX [Spanish Version] - Page 1

....
QT5-4896-V01
XXXXXXXX
©CANON INC.2012
PRINTED IN XXXXXXXX Connect to a telephone jack with the operating environment. The connector is labeled on -screen instruction to enter the settings. For other settings, .... • Network switch may not be sure it is shown in this figure. Enter the User information settings and Date/time setting
Refer to the On-screen Manual to complete...
MX890 series Especificaciones [Spanish Version] - Page 1

...may be installed to Mac OS X Lion 10.7, install software bundled with the Canon inkjet printer. Microsoft .NET Framework 4 Client Profile must be changed
notice.
Interface USB ...available for 5 years after every 20 transactions) Sequential broadcasting (max. 101 destinations) Rejected numbers (max. 10 destinations)
Scan Specifications
Scanner driver TWAIN/WIA (for printing only. *5 ...
Setup Guide - Page 4
Fax to Phone Line Connection
Before
Wall Jack
Hand Set (Phone)
After
Wall Jack
(Existing Phone Cord)
Hand Set (Phone)
(Phone Cord included with Canon printer)
Previous
(Existing Phone Cord)
Next
4
Setup Guide - Page 5
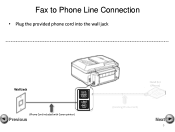
Fax to Phone Line Connection
• Plug the provided phone cord into the wall jack
Wall Jack
(Phone Cord included with Canon printer)
Previous
Hand Set (Phone)
(Existing Phone Cord)
Next
5
Setup Guide - Page 6
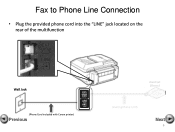
Fax to Phone Line Connection
• Plug the provided phone cord into the "LINE" jack located on the rear of the multifunction
Wall Jack
(Phone Cord included with Canon printer)
Previous
Hand Set (Phone)
(Existing Phone Cord)
Next
6
Setup Guide - Page 7
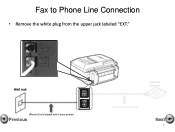
Fax to Phone Line Connection
• Remove the white plug from the upper jack labeled "EXT." Wall Jack
(Phone Cord included with Canon printer)
Previous
Hand Set (Phone)
(Existing Phone Cord)
Next
7
Setup Guide - Page 8

jack located on the rear of the multifunction
Wall Jack
(Phone Cord included with Canon printer)
Previous
Hand Set (Phone)
(Existing Phone Cord)
Next
8 Fax to Phone Line Connection
• Plug the second phone cord into the "EXT."
Setup Guide - Page 9
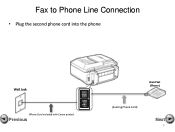
Fax to Phone Line Connection
• Plug the second phone cord into the phone
Wall Jack
(Phone Cord included with Canon printer)
Previous
Hand Set (Phone)
(Existing Phone Cord)
Next
9
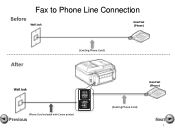
Setup Guide - Page 5
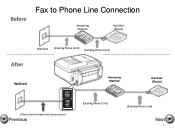
Before
Fax to Phone Line Connection
Answering Machine
Hand Set (Phone)
Wall Jack (Existing Phone Cord) (Existing Phone Cord)
After
Wall Jack
Answering Machine
Hand Set (Phone)
(Phone Cord included with Canon printer)
Previous
(Existing Phone Cord)
(Existing Phone Cord)
Next
5
Similar Questions

Where Do I Find The Serial Number On My Canon Pixma 892 Printer
(Posted by wior 10 years ago)


Canon Pixma Mx892 How To Enter Numbers For The Standard Set Up
(Posted by jb00ale 10 years ago)