Canon PIXMA MX892 Support Question
Canon PIXMA MX892 Support Question
Find answers below for this question about Canon PIXMA MX892.Need a Canon PIXMA MX892 manual? We have 11 online manuals for this item!
Question posted by jmars2012 on August 26th, 2013
Cannon Pixma 452 All-in-one Printer. I Set It Up Correctly.
How do I set my printer up to detect automatic incoming faxes. I can scan, I can printer, I can copy, and I can fax things out. But I cannot receive incoming faxes
Current Answers
Answer #1: Posted by TommyKervz on August 26th, 2013 11:39 AM
TommyKervz

Member since:
January 10th, 2013 Points: 17,776,813

Member since:
January 10th, 2013 Points: 17,776,813
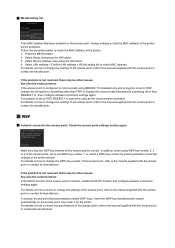
Otherwise, setting up the Receive Mode is done thus
1. Display the FAX menu.
(1) Press the FAX button, then press the Menu button.
The FAX menu is displayed.
2. Display the Receive mode settings screen.
(1) Press the or button to select Receive mode settings, then pressthe OK button.
3. Select a receive mode.
(1) Press the or button to select a receive mode, then press the OK button.
Press the Back button to exit the FAX menu.
The receive mode (A) will be displayed on the LCD.
Sandeep Pamarati :
Answer #2: Posted by TommyKervz on August 26th, 2013 11:30 AM
TommyKervz
Member since:
January 10th, 2013 Points: 17,776,813
Member since:
January 10th, 2013 Points: 17,776,813
Greetings - The pdf resources on the link below should be of great Further help.
http://www.helpowl.com/manuals/Canon/PIXMAMX892/155533 ;
http://www.helpowl.com/manuals/Canon/PIXMAMX892/155533 ;
Related Canon PIXMA MX892 Manual Pages
Guide for Printer Setup for Network - Page 1
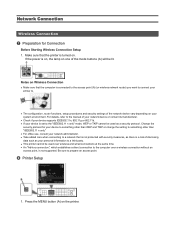
... Connection
Wireless Connection Preparation for Connection Printer Setup Setup Procedure Selection
Push Button Method Standard setup WPS Other setup (Advanced setup)
Disable WEP WPA/WPA2
Wired Connection Preparation for the printer.
Setup Guide
This guide provides information for setting up a network connection for Connection Cable Connection Printer Setup
Character Entry
Troubleshooting
Guide for Printer Setup for Network - Page 2
...if your device supports IEEE802.11n, 802.11g or 802.11b. • If your device is set to the "IEEE802.11 n only" mode, WEP or TKIP cannot be used over wireless and wired...when connecting to a third party. • This printer cannot be lit. Be sure to .
• The configuration, router functions, setup procedures and security settings of disclosing data such as a security protocol. ...
Guide for Printer Setup for Network - Page 3
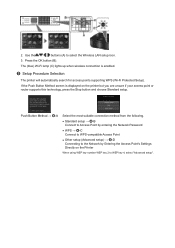
c Setup Procedure Selection
The printer will automatically search for access points supporting WPS (Wi-Fi Protected Setup). Push Button Method ...Point
• Other setup (Advanced setup) → d-D Connecting to the Network by Entering the Access Point's Settings Directly on the printer but you are unsure if your access point or router supports this technology, press the Stop button and choose ...
Guide for Printer Setup for Network - Page 5
...network password (WEP key or passphrase) of the screens above will be displayed on the printer. 5. Press the left Function button.
10.When the left Function button.
8. d-B ...setup d Connection via Standard setup
1. Select your access point or router into the printer. 7.
Character entry is correct. Press the OK button.
6. Make sure that the network password is case-sensitive...
Guide for Printer Setup for Network - Page 10
...wireless and wired connections at the back of the network device vary depending on . Connect the printer and a network device (router, etc.) with security measures, as your system environment. Make...) are connected.
• The configuration, router functions, setup procedures and security settings of the printer.
2. If the power is a risk of the mode buttons (A) will need an Ethernet...
Guide for Printer Setup for Network - Page 11
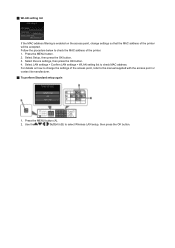
Press the MENU button (A) on the printer.
2. Select LAN settings. 7. Press the OK button. Press the OK button.
6. c Printer Setup
1. Use the
buttons (A) to select the Setup icon.
3. Select Change wireless/wired. 9. Press the OK button.
10.Select Wired LAN active. 11. Press the OK button (B).
4. Select Device settings. 5. Press the OK button.
8.
Guide for Printer Setup for Network - Page 14
... Target Access Point is not resolved, there may be entered on this printer. If the problem is Not Detected Check the access point name/network name and network password of the access..."WPA/WPA2 Enterprise" is not supported on the printer directly. "WPA/WPA2 Enterprise" is set as the security protocol (encryption standard) on the printer to use multiple access points? The message appears...
Guide for Printer Setup for Network - Page 16
...details on how to change the WEP key number of the access point is correct. See also the sections below : If the access point is configured to ...when using an access point that automatically creates WEP keys, check the WEP key (hexadecimal) created automatically on the access point, then enter it on the access point, change the settings of the printer directly. If using WEP key...
Guide for Printer Setup for Network - Page 17
... press the OK button. Press the MENU button (A).
2. For details on the access point, change the settings of the access point, refer to check the MAC address of the printer will be accepted. Press the MENU button. 2. WLAN setting list
If the MAC address filtering is enabled on how to change...
Guide for Printer Setup for Network - Page 19
....) or disable the stealth mode, then press the left Function button on the printer to change the security protocol (encryption standard) and configure wireless connection settings again. Advanced setup
The Target Access Point is Not Detected Check the access point name/network name and network password of your access point...
Guide for Printer Setup for Network - Page 20
...Automatically Refer to the manual supplied with the access point or contact its manufacturer. WLAN setting...set to check MAC address. An Unknown Access Point is Displayed Access points in use nearby may also be other causes. Make sure that the MAC address of the printer. 1. If the problem is not resolved, there may be detected.
The Access Point Name is correct...
Guide for Printer Setup for Network - Page 21
... the access point or contact its manufacturer. For details on the printer directly. The WEP Key is Not Displayed Automatically Refer to the manual supplied with the access point or contact its manufacturer. Select LAN settings > Confirm LAN settings > WLAN setting list to the access point. Select Setup, then press the OK...
Guide for Printer Setup for Network - Page 22

...IPv4 only) of the printer and configure wireless connection settings again. To specify the IP address of the printer, follow the procedure below. 1. Select Device settings, then press the OK ... button.
To perform Advanced setup again
1. Press the MENU button. 2. Select TCP/IP settings, then press the OK button. 7 Select IPv4, then press the OK button. 8. Select Yes,...
Setup Guide - Page 4
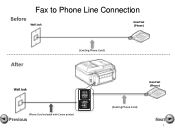
Fax to Phone Line Connection
Before
Wall Jack
Hand Set (Phone)
After
Wall Jack
(Existing Phone Cord)
Hand Set (Phone)
(Phone Cord included with Canon printer)
Previous
(Existing Phone Cord)
Next
4
Setup Guide - Page 5
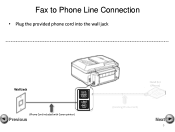
Fax to Phone Line Connection
• Plug the provided phone cord into the wall jack
Wall Jack
(Phone Cord included with Canon printer)
Previous
Hand Set (Phone)
(Existing Phone Cord)
Next
5
Setup Guide - Page 6
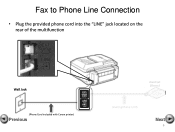
Fax to Phone Line Connection
• Plug the provided phone cord into the "LINE" jack located on the rear of the multifunction
Wall Jack
(Phone Cord included with Canon printer)
Previous
Hand Set (Phone)
(Existing Phone Cord)
Next
6
Setup Guide - Page 7
Wall Jack
(Phone Cord included with Canon printer)
Previous
Hand Set (Phone)
(Existing Phone Cord)
Next
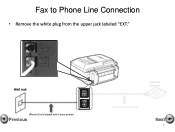
7 Fax to Phone Line Connection
• Remove the white plug from the upper jack labeled "EXT."
Setup Guide - Page 8

Fax to Phone Line Connection
• Plug the second phone cord into the "EXT." jack located on the rear of the multifunction
Wall Jack
(Phone Cord included with Canon printer)
Previous
Hand Set (Phone)
(Existing Phone Cord)
Next
8
Setup Guide - Page 9
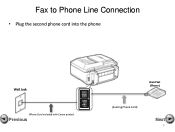
Fax to Phone Line Connection
• Plug the second phone cord into the phone
Wall Jack
(Phone Cord included with Canon printer)
Previous
Hand Set (Phone)
(Existing Phone Cord)
Next
9
Phone Line Configuration - Page 13

... service from my phone company? Only your phone company can be set to treat all incoming calls with a distinctive ring.
The multifunction can detect this distinctive ring pattern and can provide an additional number that will ring your home phone line with that ring pattern as an incoming fax. Why do I need to Previous Page
Similar Questions

What Is The Access Point On Cannon Pixma Mg3220 Printer Set Up
(Posted by danthai 9 years ago)

How To Find Access Point For A Cannon Pixma Mx892 Printer
(Posted by amiyogo 9 years ago)

Where Do I Find The Serial Number On My Cannon Pixma Mx892 Printer
(Posted by bollaJa 10 years ago)

How To Reset Network Settings On Cannon Pixma Wireless Printer
(Posted by thotxxxx 10 years ago)

How To Type Wep Key On Cannon Pixma Mx892 Printer
(Posted by jasonMOJA 10 years ago)